Sunday 25 September 2016

Fixing texture distortion on deformed polygons

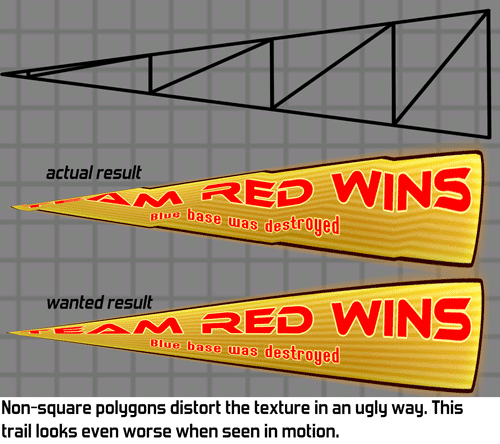
An odd effect that can be very noticeable in 2D games is the distortion that happens when deforming a texture. Especially when tapering a polygon the art can become really weird. This has been a problem in our engine for years, but since strong taper isn't used often I didn't think it needed fixing. However, when I added trails last year the distortion became much more problematic and I had to look for a solution.


If you're not very familiar with how videocards work this looks really weird. To a human it is very clear how the texture should be squashed when tapering a polygon, why can't my computer figure this out?

The reason is that videocards only handle triangles. They don't really know what a square is so if you want a square, you need to create two triangles that happen to form a square together. Many 3D tools hide this, but that's what happening under the hood.

When applying this taper to a square that consists of two triangles we can see why the weird distortion is happening. Those two triangles aren't the same size anymore: one gets squashed much more than the other. Since half of the texture is on one triangle and the other half is on the other triangle, we get this ugly malformed texture.
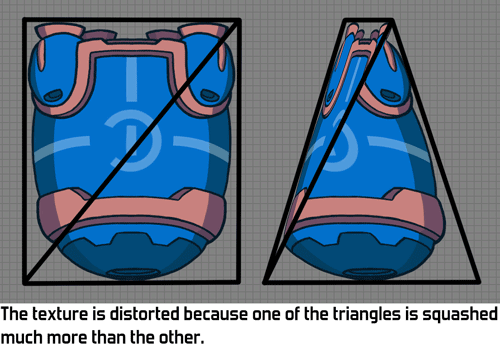


Another way of looking at the problem is to look at the centre of the image. The middle of the diagonal corresponds to the middle of the texture. But if we taper, then the middle isn't quite the middle of our object anymore!


Does this mean all deformed polygons always look broken? Luckily not: this problem only occurs if the texture has a different shape. If you apply a tapered texture to a tapered polygon it will look fine. The problem occurs when applying a square texture to a tapered polygon.

Now that it's clear what the problem is, how do we solve it? My first thought was to do something with shaders and modifying the texture coordinates to compensate. Maybe I could do away with explicit texture coordinates altogether and define the texture placement through a formula instead? I expect this should be possible somehow, although handling more complex geometry like trails might be pretty hard. Also, this seems overly complex and might cost additional performance: calculating the texture coordinates in the pixel shader would cost additional fillrate. Fillrate is the main performance bottleneck in Awesomenauts so anything costly there is probably problematic. (Note this older blogpost about fillrate in Awesomenauts.)

There is a much simpler solution: more polygons! If you subdivide the quad into a bunch of smaller quads the distortion becomes much much less noticeable. After a couple of subdivisions the distortion is usually hardly visible anymore. It isn't actually gone, but if the player doesn't notice it then it's good enough!
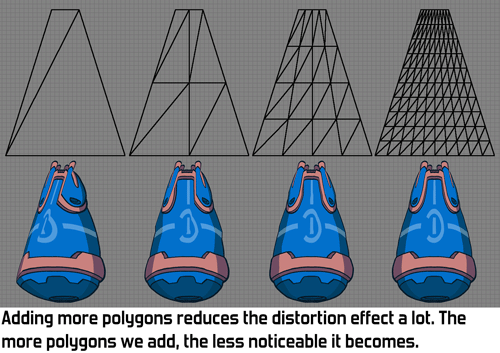


Note that a much more efficient subdivision for this particular situation is also possible by not doing a grid-based subdivision. For example by adding a second diagonal, creating a cross with 4 triangles. (Thanks to Reddit users eggfruit and not_a_profi for pointing this out.) A grid-based subdivision is more flexible though as it can also be used for other things than just solving this particular problem.

Solving problems by throwing more polygons at them is generally not a good idea, since those polygons of course cost more performance. However, our games generally use very few polygons so that's not where the performance bottleneck is for us. Also, we don't have all that many objects that need this solution, so the performance impact is negligible. Here we see a common pattern in modern game development: computers are so fast now that many things that may seem like a performance waste really don't matter, unless you're making triple-A games and are trying to beat the competition in squeezing the most effects out of the hardware.

So there you have it: I've solved this problem by simple throwing more polygons at it! Adding an option for subdivisions to the Ronitech (our own engine) had been on my wishlist for quite a while, so this felt like a good excuse to finally do so. This not only fixes the texture distortion problem: now that we have this option we could also add other fun features, like an animatable bend. I have even been playing around in my spare time with using those subdivisions for 3D heightmaps to add depth to objects in Awesomenauts. My tests show this could look really awesome, but this is not in a state where there's anything to show yet. Maybe that will make for a nice future blogpost somewhere next year. ^_^

Saturday 17 September 2016

A simple way to smooth angular trails

Last week I discussed our tools for making trails. One problem I encountered with trails is that they often don't look very good when attached to a character. Player movement in a platformer like Awesomenauts is not very smooth: all of a sudden you jump, or land, or turn around, and this creates a trail with lots of angles in it. For some effects this is fine, but especially for wider trails a smoother, curvier look is much better. Today I would like to discuss the smoothing algorithm I implemented to solve this.


Before I continue, here's last week's overview video of our trails again, since it also contains some footage of the smoothing:


Key when smoothing a trail is that the trail should always remain attached to the emitter (in this case a character). If the smoothing makes the trail detach from the emitter just a little bit, it starts to look floaty and incorrect. An artist can work around this by fading out the trail near its start, but this is not always desired. This makes smoothing a challenge: the emitter follows the player's angular movement but the resulting trail should not.

The trail must also look stable: it can't suddenly pop from unsmooth to smooth. The conclusion of these two requirements is that we must apply the smoothing over time instead of immediately or in one step.

The smoothing algorithm I came up with turns out to be really simple. It was inspired by how subdivision surfaces work on 3D mesh smoothing, but without the subdividing.


The basic idea is this: for each segment of the trail I calculate the position in between its neighbouring segments, and then move the segment a little bit towards that centre. On a straight trail without corners this means nothing happens: the segment is already in between its neighbours. But on a corner this achieves exactly what we want: the corner moves inwards a bit, rounding the corner.


By repeating this process every frame with very small steps we get a curve that over time becomes ever smoother. At first it only processes the corners, but every frame it grows to smoothen further along the straight parts as well.


To control the smoothing I've provided our artists with two settings: one sets how strong the smoothing should be, and the other how long it should keep smoothing. If you let the smoothing take too long the trail keeps deforming and starts looking floaty and unstable. What usually works best is to use quite a strong smoothing for a very short amount of time (around 0.5 seconds). This way it stops quickly enough that the player doesn't notice significant instability.

An implementation note is that we ignore the first and last segment, since those have only one neighbour, which happens to also solve the problem that the curve needs to stay attached to the emitter. A small but important detail is that not only the first and last segment should be left out of the smoothing, but also the second and penultimate segment. This is because in my version of trails the start of the trail moves with the emitter, causing it to start really close to the second segment, which gives odd results when smoothing. Something similar happens with the final segment.

Now that I've explained how it works, here's a short video that shows the impact of the various settings that control the smoothing:


A downside of this algorithm is that the strength of the smoothing depends on the number of segments. The fewer segments there are, the stronger the effect is. This means that if an artist tweaks the number of segments after having set the smoothing, she'll need to tweak the smoothing again.

The smoothing algorithm I've described here today gets the job done, is easy to implement and costs little performance. It's nice how sometimes seemingly complex problems can have such easy solutions. :) Next week I'll discuss the texture distortion caused by deformed polygons, which is a problem for both trails and normal 2D sprites.

Sunday 11 September 2016

Creating crisper special effects with trails

Until recently most special effects in Awesomenauts were either animated by hand or made using particles. This seemed to give enough possibilities, until we played the gorgeous Ori and the Blind Forest, which has very crisp special effects. We analysed how they achieved this and one of the conclusions was that for many things that we would make with particles, they used trails. Trails are quite an obvious concept, but for some reason it had never seemed like a big problem that they weren't an option in our tools. So about a year ago I added trails to our engine.


How to implement trails seems quite obvious: it's just a series of triangle segments, what's interesting about that? However, when I started implementing trails it turned out there are quite a lot of different approaches imaginable. I went with one that's extremely flexible, but also sometimes slightly difficult to control for certain effects. Today I'd like to share how I built our trails tool and what the pros and cons are. But before I get to that, let's start with a video that shows the tools for our trails and what our artists have made with those.


The core idea of my implementation is that a trail is like a series of connected particles, called segments. Each segment has it's own position and velocity, and the trail is formed by creating polygons in between the segments. This is a fun approach: it makes things like gravity, waviness and wind really easy, since you can just apply those effects to each segment separately and then connect them. It also means that the trail automatically stretches when you move quickly, just like a trail should.


An interesting aspect is what to do when standing still. In the case of normal particles you would just keep creating them regardless of your own speed, but with a trail that isn't a good idea: connecting segments that are nearly on the same position results in jumpy segment orientations. My solution to this is to have a minimum distance between segments and only emit another segment if you've moved enough. Doing this naively does have a weird side-effect: you get small holes in between the starting point of the trail and the newest created segment. To avoid this I move the newest segment along with the position of the emitter until a new segment is made.


If no care is taken something similar would also happen at the end, where the tip of the trail just suddenly disappears when its segment times out. Here the solution is to smoothly move the timed out final segment towards the penultimate segment before removing it.

To avoid creating too many segments, the artist sets how many segments he needs. Since I already have this minimum distance between segments I figured this would also be a good way to limit the number of segments. However, I now bumped into another oddity: if you move really quickly you will create a new segment every frame. That means that the number of segments depends on the framerate. Our artists have fast computers and usually have vsync disabled so they often run the game at 200fps or more. They need to go out of their way to see what Awesomenauts looks like on 30fps or even 20fps. To avoid situations where artists unknowingly create effects that only look smooth and good on very high framerates, I've limited the maximum number of segments per second to 60. If on older netbooks the framerate drops below that you will still get less smooth trails, but the difference between 20fps and 60fps is much more acceptable than between 20fps and 200fps.

A fun option you get from treating segments as particles is that you can do more than just leave them. A normal trail only exists when you move, it's literally a trail. But why not shoot segments away, like you often do with particles? With some creativity this can be abused to create effects like flames (shooting segments upwards) or flags (shooting segments horizontally) and get a very dynamic look for them. I also added an option for gravity/wind to change the speed of a segment over time.

One of the most fun things when making tools is when artists (ab)use them to make things you didn't expect. Especially Ronimo artist Ralph is really good at this. He considers it his personal crusade to use every feature of our editors for something. The weirder the feature, the more Ralph considers it a challenge to use it for something pretty. So when making trails my goal was to feed the Ralph by making trails super flexible. For this reason I added four different ways of mapping textures to the trail, and two textures can be combined on a single trail:


When I showed the trails to our artists they immediately wondered whether they could make things like a hair or a cape with it. Doing so with a normal trail would result in a very elastic look: trails become longer and shorter depending on how fast you move, which is usually not desired when making something like a braid or cloth. To fix this problem I added a feature that gives the trail a maximum and minimum length, shortening or stretching it when needed. This turned out not to work too well. The minimum length gave really odd results, especially when the character is standing still, so I removed that feature altogether. The maximum length does work, but in practice it doesn't produce convincing hair or cloth movement, so our artists usually go back to hand-animating those. I think to make good hair or cloth you need a very different approach: those require a real physics simulation, instead of simply emitting segments like I do now.

On top of all of the things discussed so far we got a lot of additional flexibility for free: years ago I made the tools of the Ronitech (our internal engine) in such a way that almost anything is animatable, so our artists can change most of the settings of trails over time. This allows for a lot of fun additional possibilities, like varying the thickness of a trail over time, or making the colour pulsate.

My implementation of trails does have one main downside: textures aren't very stable. The constantly varying length of the first and last segments makes textures flicker a bit, even though I compensate to get the correct texture coordinates. Framedrops can also leave longer holes in between segments, which is not immediately a problem but again it makes textures slightly less stable. I think if I were to ever make another version of trails I would decouple the polygons from the segments, and just create the polygons at equal distances over the path laid out by the segments.

All in all I'm really happy with how our trails system turned out. The approach of treating a trail as connected particles makes some things slightly unpredictable, but it does give a lot of flexibility. I expect our artists will come up with some more unexpected uses of trails in the future.

In the next two weeks I will discuss two more specific aspects of trails: the smoothing algorithm I created to make angular movement produce very smooth and curvy trails, and how to solve the texture distortion that occurs when skewing a quad with a texture on it. Till then!