Saturday 21 April 2012

How Awesomenauts' water effect was made

I had a lot of fun writing the water shader for Awesomenauts, especially since it allowed me to use all kinds of small and subtle tricks to get exactly the right effect. Using shaders creatively to get precisely the right look is one of the things I enjoy most, but it is not a very common pleasure when developing 2D games. So I sneaked in this water effect during a weekend just because I really wanted to make it. Before I implemented this water, our artists weren't really convinced by the necessity of creating it at that point, but once they saw it, they were really happy with the look. :)


There is nothing ground-breaking here, but I am quite happy with the specific combination of little tricks I used to get the best water effect for Awesomenauts, so here is a little graphical overview of how I made it!


(Raytracing like this in a shader is actually very similar to what I did during the research for my Master's thesis at Utrecht University. My Interior Mapping and volume rendering shaders use the same kind of concept in 3D.)


(Here's a link to my earlier blogpost about depth of field blur.


You can see the water in action for yourself when Awesomenauts launches on May 2nd for XBLA and PSN! Creating Awesomenauts took a long time and it has been a really big game for us to develop, but we are really happy with how the game turned out, so I can't wait to finally see whether people will actually like and play it massively!

Monday 16 April 2012

A fun Bokeh experiment in Proun

I posted about depth of field blur last week and discussing it in the comments got my mind back on the "Bokeh" effect. Bokeh is an advanced form of depth of field blur that is currently used in lots of tech demos to show what the next console generation will be capable of. So that got me curious again as to how Bokeh is made. I have been experimenting with it in Proun and have some nice images to share!

Bokeh is the effect that when there is strong depth of field blur, bright lights in the background become bright spots, often visible as circles or hexagons. This is a real lens effect that can also be seen in photographs, and it looks pretty cool, since it adds some definition to an otherwise completely blurry depth of field blur effect.

A nice example of rendering Bokeh on the videocard can be found in Epic's Samaritan demo. Although the style and look of this demo don't really appeal to me, Epic shows lots of really cool effects here that they think will be possible on the next console generation. That essentially means that these effects are already possible on current high-end PC videocards, and thus they managed to make this run on a single GPU this year.


I was curious about this and wondered how Bokeh is implemented. It turns out there are several techniques to do it, but the simplest seems to be to simply have a really large depth of field blur area, with usually either a circular or a hexagonal shape. So you just take lots of samples in a large area for the depth of field blur, and that's it.

The caveat here is that to get a good framerate, most games use a couple of tricks to render depth of field blur efficiently: blur is calculated in separate horizontal and vertical passes, which massively reduces the number of samples needed for a smooth blur effect. Also, the blur areas are usually kept relatively small to be able to calculate them quicker. Awesomenauts is no exception to this, but Proun actually is: Proun already has a much more advanced form of depth of field blur than most current games and to my surprise it turned out it basically already does the Bokeh effect.

So why are we not seeing those circular splotches in Proun then? The reason is rather simple: Bokeh is seen when small but very bright spots are being rendered with depth of field blur. Proun does not have any really bright and visible lights or spots, so there is nothing that could cause these circles to appear!


Another problem is that Proun's HDRI is limited too much for Bokeh. HDRI is the effect that colours can be brighter than the standard 0-255 range that Photoshop and your monitor usually use. Of course, brighter colours than 255 are simply capped by the monitor, since it cannot show anything above 255, but when blurring in-game, colours brighter than 255 become really important. I wrote a blogpost about that a long time ago and an image I made then explains it rather well:


Now the problem is that in Proun I have used a trick to get HDRI without costing any performance. This trick, however, limited the HDRI to 400, which is above 255, but not far enough above it to really get these bright Bokeh spots. That's another reason why we are not seeing any Bokeh in Proun.

So as an experiment to see Bokeh, I have used a little trick: I just treat all the brightest pixels as if they are even brighter. In the depth of field blur shader, whenever I encounter a colour that is brighter than 300, I multiply it by 100, as if it were really 30.000, which is insanely bright. And indeed, now the Bokeh splotches suddenly become visible!

Since I have cheated this a bit, the splotches are not nice round circles, but still, it is clearly the same effect. It is a dirty hack and thus doesn't look as good as scenes and effects that are really designed for Bokeh, but it does have a funny effect. Here is an example of what my first experiment looked like in Proun:
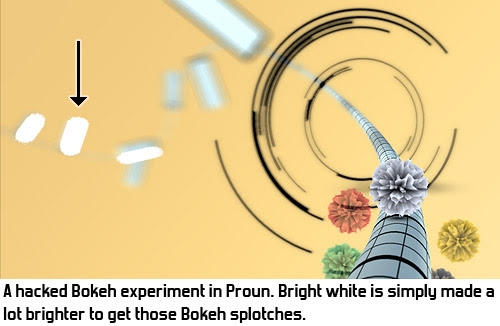


However, with all those coloured objects in Proun, there are few spots that are actually bright white. So to get more Bokeh, I changed it to handle the red, green and blue channels separately. Now if a spot is bright red, it will create a red Bokeh circle. The way I did this is probably even more hacky and fake, but it actually looks pretty awesome!


I also tried to find the limitations of my Bokeh implementation:


Unfortunately, this hack breaks all kinds of things in Proun and doesn't really work all that well with the rest of the graphics. So I don't think this is actually an improvement for Proun, but I do think this was a fun experiment! :)


And, since Bokeh is all the hype now, I can finally say that I too have implemented it... ;)

Yeah!

Monday 9 April 2012

Depth of field blur: the Swiss army knife that improved even the framerate of Awesomenauts

Depth of field blur is an effect that is used in many modern games as a cool graphics effect. A nice example of this is of course my own game Proun (for which I discussed the depth of field blur in one of my very first blog posts). However, while making Awesomenauts, I learned that it is much more than just a graphics effect. In fact, it even improved the framerate a lot!


Initially we didn't have depth of field blur in Awesomenauts, but then the first trailers of the beautiful Rayman Origins were released, and they have some levels where they add a ton of depth of field blur to the backgrounds, which looks great. So we wanted something similar, especially as these kinds of effects help make a 2D game look more like "triple A 2D" (for as much as that is an existing term).


Unlike in 3D, doing depth of field blur in 2D is actually incredibly simple. You can just render the furthest objects to a separate texture, blur that, and then render the closer objects on top of that. Since depth of field blur suggests depth to the player, in Awesomenauts I do this a couple of times at different depths, so that the furthest objects get more depth of field blur than closer objects, and thus look like they are further away. This sense of depth works really strongly in combination with the parallaxing and coloured fog that we use on far-away objects.


However, depth of field blur is not just a good looking graphics effect. It also serves an important gameplay purpose. Awesomenauts is quite a chaotic game. This chaos is part of the fun, but amidst that it is very important to make the graphics as clear and readable as possible. Background objects don't have any gameplay impact in Awesomenauts, so by blurring them, we can make them more subtle and make the characters and bullets stand out more.


Readability was actually also an important reason why I added depth of field blur to Proun. Because Proun lacks detailed material textures and recognisable objects, it is difficult to judge the distance towards an object. Depth of field blur compensates for this and makes sure the player always focusses on the nearest obstacles, as those are the only ones that are sharp.

However, depth of field blur is usually also a very expensive effect in terms of performance. Since in Proun the rest of the graphics are incredibly simple and fast to render, the depth of field blur easily accounts for 90% of the total time spent rendering a frame. In 'normal' 3D games this is of course a lot less, but depth of field blur remains a rather expensive effect to render.

However, to my own surprise, in Awesomenauts I actually managed to double the framerate using depth of field blur! The reason for this is that our artists use lots of really large fog gradient textures to make the backgrounds look further away and modify their colours. This looks great, but causes an immense performance hit, because these large fog objects on top of each other require an enormous amount of transparent pixels to be rendered. I have not actually measured this, but I wouldn't be surprised if the overdraw in Awesomenauts may be something like 10!

(Overdraw is how many times on average you need to render a single pixel to get the final image. Ideally, this would be 1, so that you render each pixel exactly once. A higher overdraw generally means a lower framerate, so in 3D, there are tons of interesting techniques to decrease it.)


These fog layers turned out to be a big performance problem in Awesomenauts. At some point the game ran at only 15fps on the Playstation 3, which is a far stretch from the 60fps we were targeting at. We did lots of different optimisations to reach 60fps, but the depth of field blur turned out to be the biggest life saver here. Since I was blurring the backgrounds anyway, I simply made the choice to only render them at the really low resolution of 640x360. This does not reduce overdraw, but simply decreases the number of pixels enormously. To improve the framerate even further, I also moved the depth of field blur forward a bit, so that even the closest background objects got blurred and thus got rendered at a low resolution. Because of the blur, this low resolution looks perfectly fine and smooth in combination with the HD foreground.


This does introduce some subtle flickering in the background as really small objects alternate between being on and in between pixels, but this is only visible if you look for it and know where to look.

I suppose parts of this approach can be (and probably already are) used for 3D graphics as well to do more efficient depth of field blur, although in 3D a lot of technical difficulties come into play to correctly handle objects that stretch into the distance, and thus are partially far away and partially nearby.

So for Awesomenauts, depth of field blur was a true Swiss army knife: it turned out to not only make the game look better and make the visuals more readable, but it also turned out to improve the framerate greatly! :)

Sunday 1 April 2012

We've announced our next game: Day of the Awesomenauts: Monkey Throttle

The Awesomenauts are nearly ready to blast away onto the screens of XBLA and PSN gamers! But we are already looking forward towards the long term for the Awesomenauts franchise. Soon we will have announcements regarding the oft-requested Awesomenauts themepark, Awesomenauts bikiniliners and Awesomenauts catfood. But some recent market research (on Kickstarter) has also shown a spike in interest for point and click adventures.

That's why we're very pleased to announce Day of the Awesomenauts: Monkey Throttle! Pushing gameplay innovation to previously imaginable levels, Day of the Awesomenauts: Monkey Throttle is a Storydriven Sidescrolling Point And Click Online Multiplayer Adventure Brawler Arena Role Playing Shooter game.


Sweet pixel art! Click for a larger view


Soon you can also click your Awesomenaut to victory through sweet pixel art, hilarious dialog trees and clever item puzzles. But watch out! Enemy players will stand in your way, attempting to talk you out of your offensive decisions. No worries though, there are lots of items available that can resolve any sticky situation. Just scan every pixel in the level to find them! "I didn't just miss the clicking," says Jasper, Ronimo game designer. "It's especially the pointing that seemed to be missing from games nowadays."

Work on Day of the Awesomenauts: Monkey Throttle will begin in earnest as soon as the 'regular' Awesomenauts is finished. The target release date is exactly a year from now.