Showing posts with label shaders. Show all posts

Sunday, 6 December 2020

Softening polygon intersections in Blightbound

Our new game Blightbound features many types of foggy effects: mist, dust, smoke and more. Such effects are often made with planes and particles, allowing us to draw fog and effect textures by hand and giving us maximum artistic control. However, one issue with this is that the place where fog planes intersect with geometry creates a hard edge, which looks very fake and outdated. My solution was to implement depth fade. This is a commonly used technique for soft particles, but we use it on lots of objects, not just on particles.

In today’s blogpost I’ll explain how depth fade rendering works. I’ll also show just how widely this technique can be applied, by going through a bunch of examples from Blightbound.

First, let’s have a look at what problem we’re trying to solve here. When putting partially transparent planes in the world, the place where they intersect with other objects creates a straight cut-off line. Sometimes that’s desired, but often those transparent planes represent volumetric effects. They’re not supposed to look like flat planes, but that’s just the easiest and most efficient way of rendering them. This is fine when there are no intersections, but when there are then the hard lines where they touch other objects break the volumetric illusion.

There’s a simple solution for this that’s used in a lot of games: depth fade. The idea is to simply fade out the plane near the intersection. This produces an effect similar to how real fog works: objects that go into the fog seem to smoothly fade out. However, actually figuring out all polygon intersections takes too much performance, so we want a rendering trick instead.
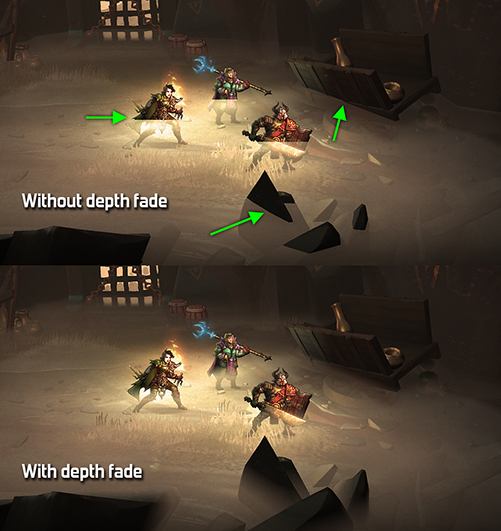

This screenshot from Blightbound shows a fog plane just above the ground. In the top image it is rendered in the standard way, resulting in hard intersections with the characters, rocks and cart. At the bottom the intersections are smoothened by depth fade.

The trick to rendering with depth fade is to first render all normal geometry, excluding any transparent objects. This fills the depth buffer, so for every pixel we know what distance it has from the camera. Then when rendering the objects that need depth fade, the pixel shader looks up the distance in the depth buffer and compares that to its own distance. If these are close to each other, then we assume that we’re near an intersection and fade out this pixel. The nearer, the stronger the fade out, until the object is entirely invisible at the point of intersection.

This technique has a few neat bonus features on top of just smoothing out intersections. By simply setting the distance over which the fade occurs, we can modify the density of the mist. Also, objects don't need to actually intersect with the fog plane to get depth fade applied. Being just beneath the fog plane also makes the effect visible. Thus depth fade is more than just a way to smoothen intersections.
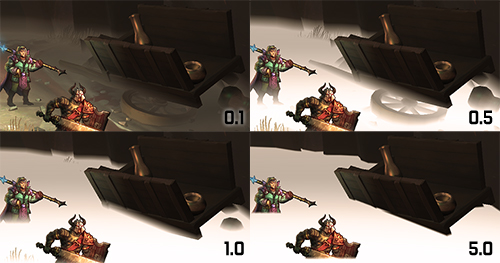

The fog's density setting determines the width of the smoothing of the intersections. At a very high density the smoothing is almost lost. At a very low density the fog almost disappears because the ground is now also considered 'close' to the fog plane.

While this technique is traditionally mostly used for particles, it can easily be used for all objects with transparency. Since the world of Blightbound is covered by the blight (a thick, corrupting fog) we have a lot of types of fog in our game, including many fog planes and particles, as well as smoke and special effects. Our artists can apply depth fade rendering to all of those, not just to particles.


Depth fade is also great for hiding the seams of moving objects, like this fog wall.

A nice property of depth fade is that it doesn't cost all that much performance compared to traditional alpha blending. For each pixel of a particle or fog plane that we render, it costs one extra texture look-up (in the depth buffer) and a distance calculation. Compared to more advanced volumetric techniques, like voxel ray marching, that's a very low price. Since the performance impact of depth fade is low, our artists can use this technique on many objects, not just on the few that really, really need it.
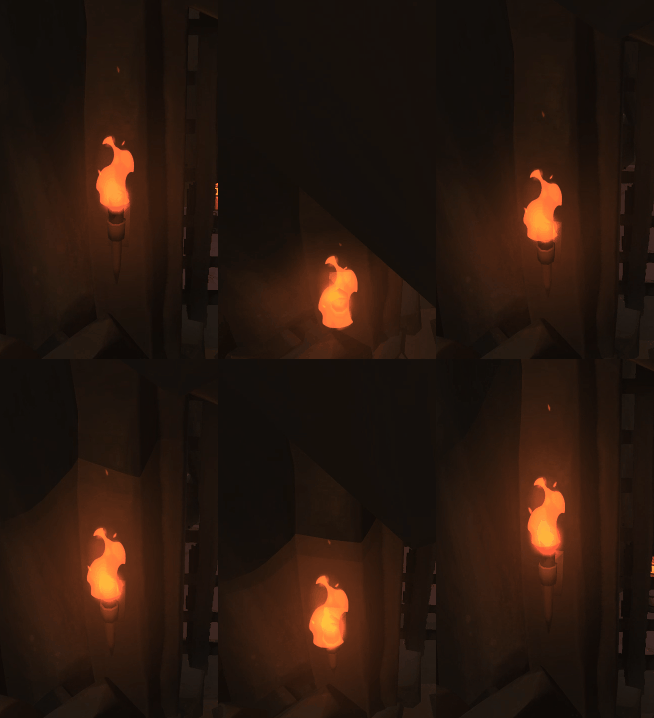

Depth fade can also solve problems with camera facing glow planes. The glow on this torch is always oriented towards the camera, but that makes it intersect with the wall behind it under certain angles. Using depth fade, the intersection can be hidden. This animation shows alternating with and without depth fade.

When I implemented depth fade, I thought I was being pretty clever: I had only ever seen this technique used for soft particles, not for generic object rendering. However, while searching the web a bit to write this blogpost, I found out it's actually a standard feature in the Unreal engine. For Unity I only found the option on particles, but it might exist in a more generic form there as well.

Now that we know how depth fade works, let’s have a look at a bunch of example uses from Blightbound. Special thanks to my colleague Ralph Rademakers, who made most of the levels and is thus the prime user of depth fade in Blightbound. Ralph gave me a nice list of cool spots to show:


A compilation of examples from Blightbound where depth fade is used to great effect, showing both with and without depth fade.
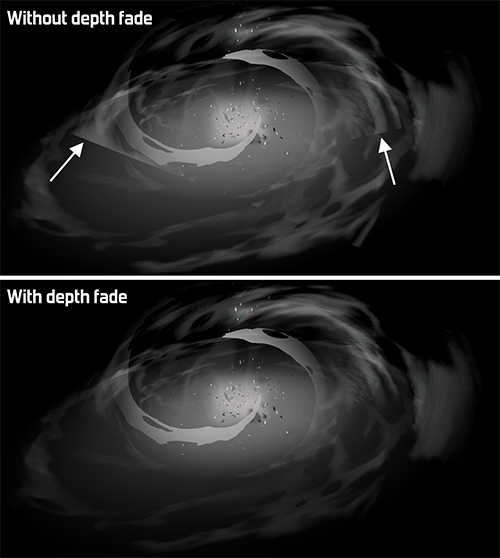

Another application of depth fade is to hide seams of VFX with the world. In this example the smoke effect intersects with a black ground plane.

When I initially implemented depth fade in Blightbound, I thought it would mostly be used on fog planes that float just above the ground, to give the impression of heroes walking through a low hanging, milky fog. As soon as our artists got hold of this technique however they started using it on tons of other objects. This is to me one of the most fun parts of building graphics tech: seeing how much more artists can do with it than I had originally imagined!

Saturday, 24 October 2020

Bending Blightbound's world to lower the horizon

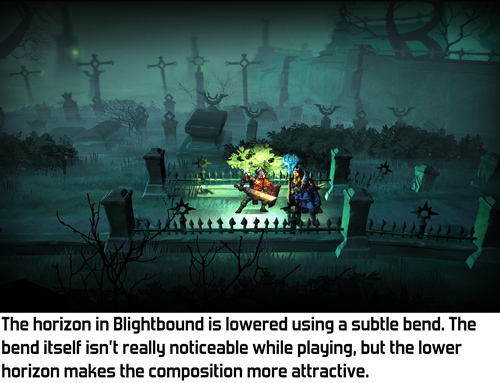
In 3D games perspective is often treated as a given; a law of nature. But it doesn’t have to be that way: with some shader trickery or clever modelling, perspective can be manipulated to achieve certain compositions that may not be realistic, but look more interesting and are still convincing to the player. One such example is how we kept the horizon on screen in our new game Blightbound by subtly bending the world.

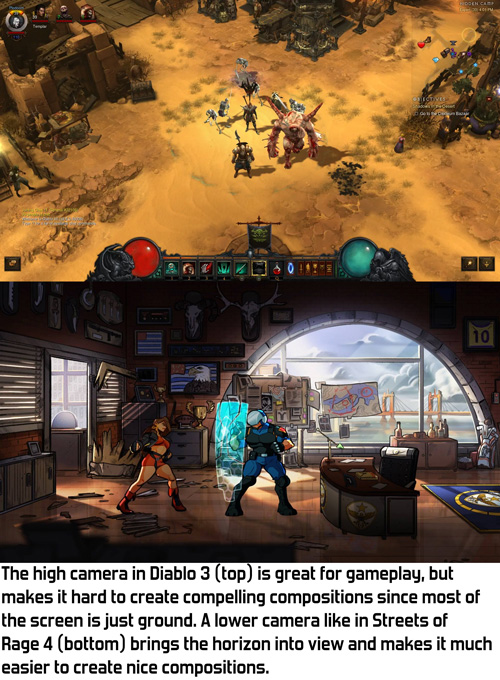
At Ronimo we come from a world of 2D games. In 2D, composition can be whatever you like. That’s why our art director Gijs Hermans may sometimes want to ignore standard perspective rules and instead looks at what he wants to achieve visually. Thus early in development Gijs came to me and said he wanted the camera to look down quite a bit, but still have the horizon in view. In fact, he wanted the horizon to be quite a bit below the top of the screen. His reasoning was that visuals look much better when you don’t see just the floor most of the time. Het position of the horizon is an important tool for shaping a composition.

The origin of this request is a clash that often happens in game development: pretty visuals versus gameplay clarity. Our artists spend a lot of time on achieving both goals simultaneously. A very successful example of this is the way gameplay objects and backgrounds are drawn in a different style in our previous game Swords & Soldiers 2, as I described in this blogpost.

In a game where depth matters, like Blightbound, a low camera is problematic because it makes it difficult to see whether you are standing in front of an enemy or behind them. A high camera solves this, but a high camera removes the horizon from view, making the image a lot more boring.

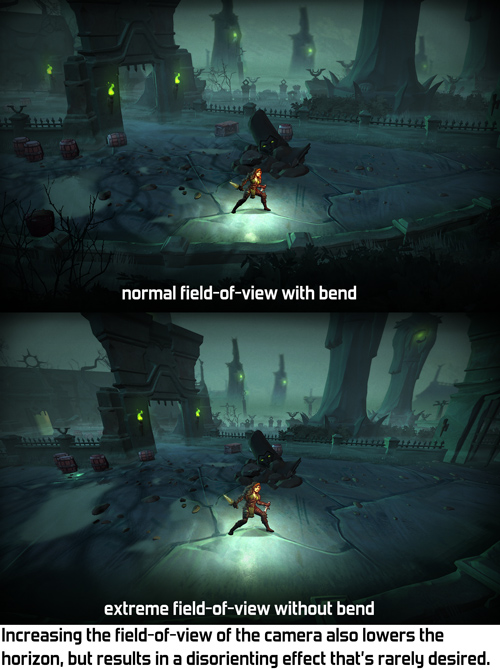
When Gijs came to me with this request, I thought of two possible solutions: either give the camera a wider field-of-view, or bend the world to move the horizon down. We tried the easiest solution first: wide field-of-view. However, it turned out this needed to be set so wide that the entire perspective looked skewed. Extreme field-of-view often isn’t very pretty and it definitely wasn't in Blightbound.

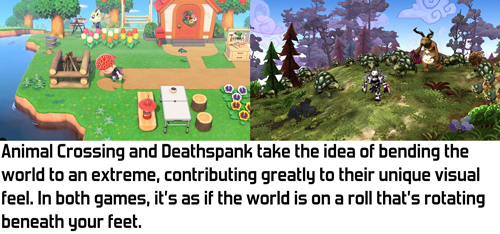
The alternative I came up with is bending the world down the further it is from the camera. This is an effect that’s used in a bunch of games to create a sense that the world is very small, making the world feel cutesy and funny. However, Blightbound is intended to be a dark fantasy game, definitely not something cute and funny, so we didn’t want anything that extreme. I figured that with some tweaking it might be possible to achieve a more subtle version of this that still keeps the horizon in view but doesn’t have the funny vibe.

My implementation of this effect is quite simple. In the vertex shader I bend down the world depending on the Z-position of the vertex in the world. The nice thing of implementing it this way is that our gameplay code and level design tools can assume a flat world, making them a lot simpler. The bending only exists during rendering, so gameplay logic doesn't need to take it into account.

A minor challenge in implementing this bend is how to handle lighting and shadows. When the camera moves forward and the world bends, we don’t want the lighting on objects to change, since that would make the bending very obvious and would make the player focus on the backgrounds instead of on the gameplay. Also, objects in the background shouldn't be more bright because they are rotated towards the light by the bend. My solution was to calculate all lighting, shadows and fog as if there is no world bend.

Also, a little technical note: since the bend happens on the vertices, objects need to have enough vertices. A big square plane for the ground with no vertices in between can’t be bent. Occasionally this caused bugs where a small object would float above a big object because the big object didn’t have enough vertices to be bent correctly.

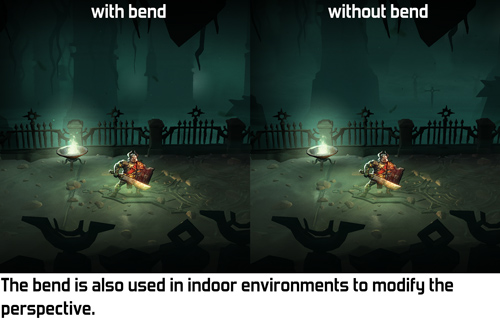
The bend effect is quite fun to see in action when set to an extreme value. However, any kind of geometric deformation is quite noticeable when the camera moves, so we chose to fix the bend in the world instead of letting it move with the camera.


A few different settings for the bend, including the final one used in Blightbound.

As you can see in the video, the bend effect is kept quite subtle in Blightbound. We didn’t want that cutesy/funny effect at all, since this is intended to be a dark fantasy game. Our level artist Ralph Rademakers tweaked the effect and the camera a lot until he got it to a point where it felt like there was no bend at all, just a natural camera. However, if you compare with and without bend, you can see that the bend makes a huge difference in what you actually see. And that’s exactly how it was intended: achieve the desired composition but don’t make it look like anything weird is going on.

And then came the fog! The bend effect was implemented when we hadn’t figured out the lore of the world yet. We didn’t know then that we would want to have so much fog. In fact, the working title of the game used to be AwesomeKnights instead of Blightbound! Once we finally decided on the lore we knew that the world of Blightbound is covered in “blight”, a corrupting fog. To match that, Ralph added a lot of fog to all the levels. This creates a great atmosphere, but… hides the horizon!

Does that make the world bend useless? No, definitely not. It's still used in quite a few levels to change the perspective and have a more horizontal view on the background, even if we can’t see as far as before. It’s a more subtle tool than originally intended, but still a very useful tool.

I think the bend effect we used here is a wonderful example of the kind of graphics programming I enjoy most: looking at what’s needed from an artistic standpoint, and then making tech that achieves that. I’m personally not very interested in realistic rendering: 3D is just a tool to make cool art, whatever the shape or type. The bend technique used here makes no sense whatsoever from a physical standpoint, but it adds to making Blightbound a prettier, more compelling game.

Sunday, 18 October 2020

Screen Space Reflections in Blightbound

An important focus during development of our new game Blightbound (currently in Early Access on Steam) is that we want to combine 2D character animation with high quality 3D rendering. Things like lighting, normal maps, depth of field blur, soft particles, fog and real-time shadows are used to make it all gel together and feel different from standard 2D graphics. One such effect I implemented into our engine is SSR: Screen Space Reflections. Today I’d like to explain what SSR is and what fun details I encountered while implementing it into our engine.

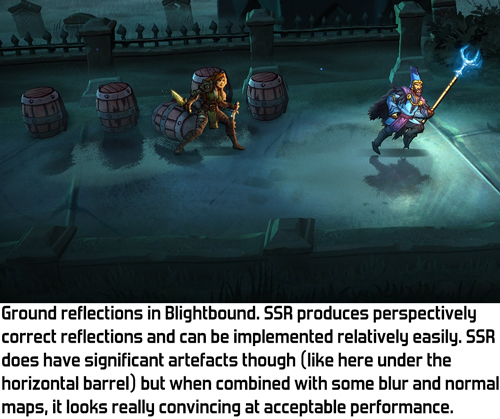
A compilation of places with reflections in rain puddles in Blightbound.

Reflections in games can be implemented in many ways. The most obvious way to implement reflections is through raytracing, but until recently GPUs couldn’t do this in any reasonable way, and even now that GPU raytracing exists, too few people have a computer that supports it to make it a feasible technique. This will change in the coming years, especially with the launch of Xbox Series X and Playstation 5, but for Blightbound that’s too late since we want it to look good on currently common GPUs.

So we need something else. The most commonly used techniques for implementing reflections in games are cubemaps, planar reflections and Screen Space Reflections (SSR). We mostly wanted to use reflections for puddles and such, so it’s important to us that characters standing in those puddles are actually reflected in real-time. That means that static cubemaps aren’t an option. A pity, since static cubemaps are by far the cheapest way of doing reflections. The alternative is dynamic reflections through cubemaps or planar reflections, using render-textures. These techniques are great, but require rendering large portions of the scene again to render-textures. I guessed that the additional rendercalls and fillrate would cost too much performance in our case. I decided to go for Screen Space Reflections (SSR) instead.

The basic idea behind SSR is that since you’re already rendering the scene normally, you might as well try to find what’s being reflected by looking it up in the image you already have.


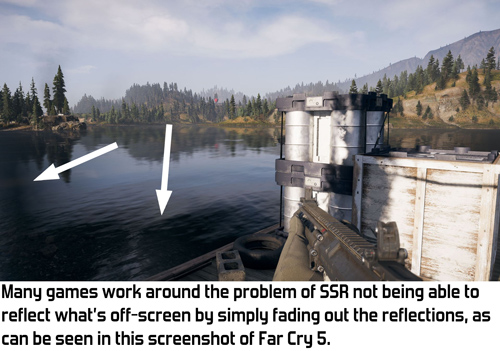
SSR has one huge drawback though: it can only reflect things that are on-screen. So you can’t use a mirror to look around a corner. Nor can you reflect the sky while looking down at the ground. When you don't focus on the reflections this is rarely a problem, but once you look for it you can see some really weird artefacts in reflections due to this. For example, have a look at the reflections of the trees in this video of Far Cry 5.


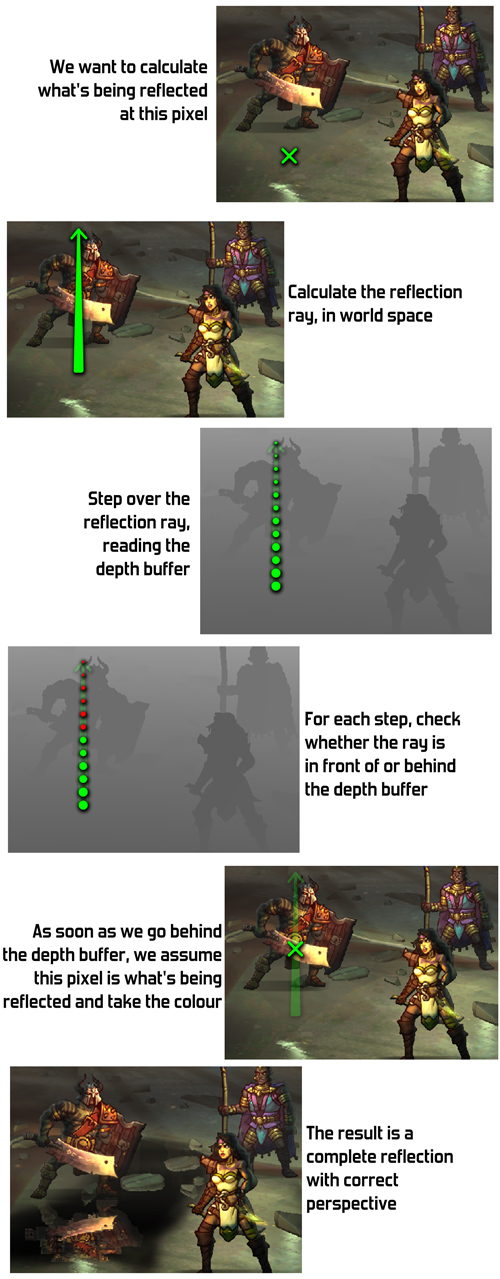
So we’re looking up our reflections in the image of the scene we already have, but how do we even do that? The idea is that we cast a ray into the world, and then look up points along the ray in the texture. For this we need not just the image, but also the depth buffer. By checking the depth buffer, we can look whether the point on our ray is in front of the scene, or behind it. If one point on the ray is in front of whatever is in the image and the next is behind it, then apparently this is where the ray crossed the scene, so we use the colour at that spot. It’s a bit difficult to explain this in words, so have a look at this scheme instead:


Since SSR can cast rays in any direction, it’s very well suited for reflections on curved surfaces and accurately handles normal maps. We basically get those features for free without any extra effort.

A demo in the Blightbound engine of SSR, with a scrolling normal map for waves.

At its core SSR is a pretty simple technique. However, it’s also full of weird limitations. The challange of implementing SSR comes from working around those. Also, there are some pretty cool ways to extend the possibilities of SSR, so let’s have a look at all the added SSR trickery I implemented for Blightbound.

First off there’s the issue of transparent objects. Since the world of Blightbound is covered in a corrupting mist (the “blight”), our artists put lots of foggy layers and particles into the world to suggest local fog. For the reflections to have the right colours it’s pretty important that these fog layers are included in the reflections. But there are also fog layers in front of the puddles, so we can't render the reflections last either.

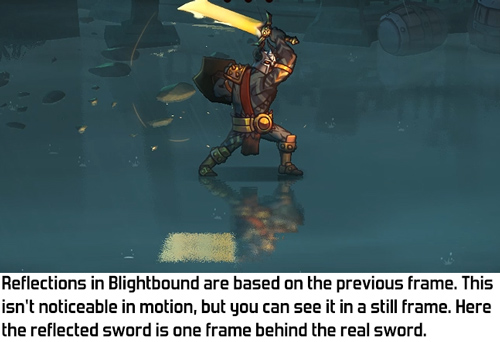
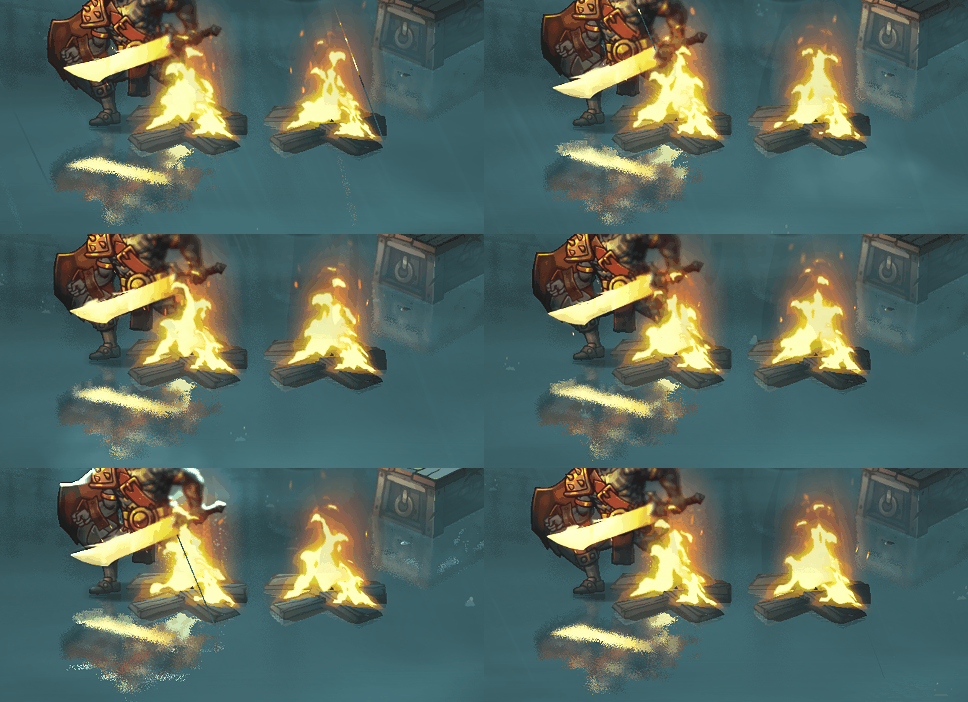
The solution I chose is simple: reflections use the previous frame instead of the current frame. This way we always look up what's being reflected in a complete image, including all transparent objects. The downside of this is of course that our reflection isn't completely correct anymore: the camera might have moved since the previous frame, and characters might be in a different pose. However, in practice the difference is so small that this isn't actually noticeable while playing the game.


Transparent objects pose another problem for SSR: they're not in the depth buffer so we can't locate them correctly. Since Blightbound has a lot of 2D animation, lots of objects are partially transparent. However, many objects can use alpha test. For example, the pixels of a character's texture are either fully transparent of not transparent at all. By rendering such objects with alpha test, they can write to the depth buffer without problems.

This doesn't solve the problem for objects with true transparency, like smoke, fog and many other special effects. This is something that I don't think can be reasonably solved with SSR, and indeed we haven't in Blightbound. If you look closely, you can see that some objects aren't reflected at all because of this. However, in most cases this isn't noticeable because if there's an opaque object closely behind it, then we'll see the special effects through that. While quite nonsensical, in practice this works so well that it seems as if most explosions are actually reflected correctly.

Transparent objects like this fire aren't in the depth buffer and thus can't be found for reflections. However, if another object is close behind, like the character on the left, then the transparent object is reflected through that. The result is that it seems as if many special effects are properly reflected.

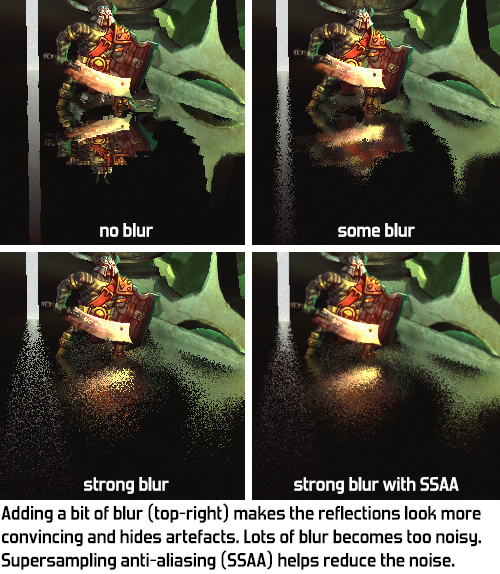
Having perfectly sharp reflections looks artificial and fake on many surfaces. Reflections in the real world are often blurry, even more so the further the reflected object is from the surface. To get reflections that accurately blur with distance I've applied a simple trick: the rays get a slight random offset applied to their direction. This way objects close remain sharp and objects get blurrier with distance. Artists can tweak the amount of blur per object.

However, this approach produces noise, since we only cast one ray per pixel. We could do more, but that would be really heavy on performance. Instead, to reduce the noise a bit, when far enough away I also sample from a low-resolution blurry version of the scene render-texture. This is a bit redundant but helps reduce the noise. Finally, by default in Blightbound we do supersampling anti-aliasing (SSAA) on the screen as a whole. This results in more than one ray being shot per screen-pixel. Only on older GPUs that can't handle SSAA is this turned off.


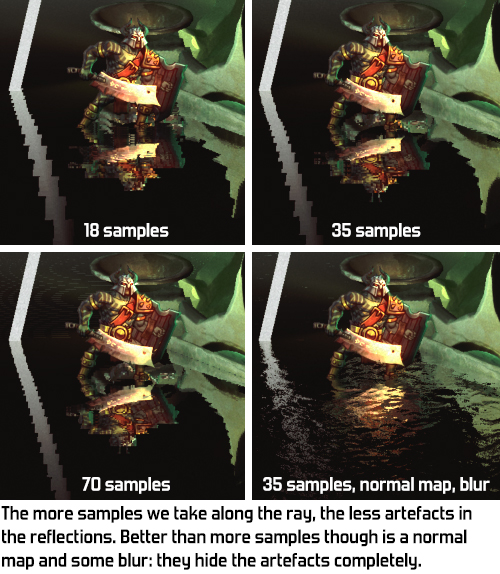
Another issue is precision. For really precise reflections, we would need to take a lot of samples along the ray. For performance reasons that's not doable though, so instead we make small jumps. This however produces a weird type of jaggy artefacts. This can be improved upon in many different ways. For example, if we would render the reflections at a lower resolution, we would be able to take a lot more samples per ray at the same performance cost. However, with how I implemented SSR into our rendering pipeline that would have been quite cumbersome, so I went for a different approach which works well for our specific situation:
  • More samples close to the ray's origin, so that close reflections are more precise.
  • Once the intersection has been found, I take a few more samples around it through binary search, to find the exact reflection point more precisely. (The image below is without binary search.)
  • The reflection fades into the fog with distance. This way the ray never needs to go further than a few meters. This fits the world of Blightbound, which is basically always foggy.
The result of these combined is that we get pretty precise reflections. This costs us 37 samples along a distance of at most 3.2 meters (so we never reflect anything that's further away than that from the reflecting surface).

Any remaining imperfects become entirely unnoticeable since blur and normal maps are often used in Blightbound, masking any artefacts even further.


A challenge when implementing SSR is what to do with a ray that passes behind an object. Since our basic hit-check is simply whether the previous sample was in front of an object and the next one is behind an object, a ray that should pass behind an object is instead detected as hitting that object. That's unintended and the result is that objects are smeared out beyond their edges, producing pretty ugly and weird artefacts. To solve this we ignore a hit if the ray dives too far behind an object in one step. This reduces the smearing considerably, but the ray might not hit anything else after, resulting in a ray that doesn't find an object to reflect. In Blightbound we can solve this quite elegantly by simply using the level's fog colour for such failed rays.

By default, SSR produces these kinds of vertical smears. Assuming objects have a limited thickness reduces this problem greatly, but adds other artefacts, like holes in reflections of tilted objects.

This brings us to an important issue in any SSR implementation: what to do with rays that don't hit anything? A ray might fly off the screen without having found an object, or it might even fly towards the camera. Since we can only reflect what we see, SSR can't reflect the backs of objects and definitely can't reflect anything behind the camera. A common solution is to have a static reflection cubemap as a fallback. This cubemap needs to be generated for each area so that the reflection makes sense somewhat, even if it isn't very precise. However, since the world of Blightbound is so foggy I didn't need to implement anything like that and can just fall back to the fog colour of the area, as set by an artist.

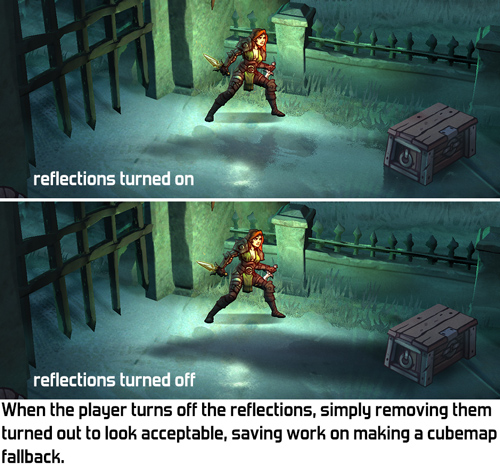
The final topic I would like to discuss regarding SSR is graphics quality settings. On PC users expect to be able to tweak graphics quality and since SSR eats quite a lot of performance, it makes sense to offer an option to turn it off. However, what to do with the reflecting objects when there's no SSR? I think the most elegant solution is to switch to static cubemaps when SSR is turned off. Static cubemaps cost very little performance and you at least get some kind of reflection, even if not an accurate and dynamic one.

However, due to a lack of time that's not what I did in Blightbound. It turned out that just leaving out the reflections altogether looks quite okay in all the spots where we use reflections. The puddles simply become dark and that's it.


For reference, here's the shader code of my SSR implementation. This code can't be copied into an engine directly, since it's dependent on the right render-textures and matrices and such from the engine. However, for reference when implementing your own version of SSR I expect this might be useful.

SSR is a fun technique to implement. The basics are pretty easy, and real-time reflections are a very cool effect to see. As I've shown in this post, the real trick in SSR is how to work around all the weird limitations inherent in this technique. I'm really happy with how slick the reflections ended up looking in Blightbound and I really enjoyed implementing SSR into our engine.

Sunday, 23 September 2018

Interior Mapping: rendering real rooms without geometry

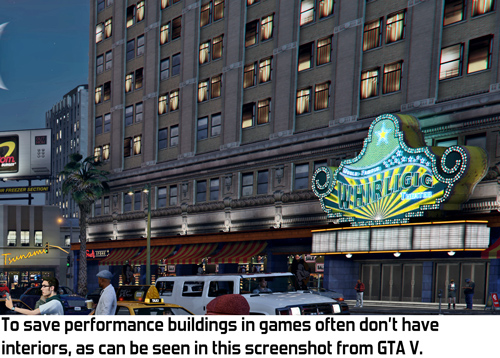
The recently released game Marvel's Spider-Man has interiors behind windows in many buildings. This looks great and it seems to be done using a rendering trick: the geometry for the interiors isn't actually there and is generated using a shader. I haven't seen any official statement by Insomniac regarding how they made this, but based on how it looks it seems very likely that they implemented interior mapping: a technique I came up with in 2007 as part of my thesis research. I've never written about this on my blog before so I figure this a good moment to explain the fun little shader trick I came up with.

Let's start by having a look at some footage from Marvel's Spider-Man. The game looks absolutely amazing and Kotaku has captured some footage of the windows in particular:


As you can see around 0:40 in this video the rooms aren't actually there in the geometry: there's a door where there should clearly be a window. You also see a different interior when you look at the same room from a different corner of the building. In some cases there's even a wall that's beyond a corner of the building. All of these suggest that the rooms are faked, but nevertheless they are entirely perspectively correct and have real depth. I expect the faults of these rooms don't matter much because while playing you probably normally don't actually look at rooms as closely as in that video: they're just a backdrop, not something to scrutinise. I think creating rooms this way adds a lot of depth and liveliness to the city without eating up too much performance.


Before I continue I'd like to clarify that this post is not a complaint: I'm thrilled to see my technique used in a big game and I'm not claiming that Insomniac is stealing or anything like that. As I stated in the original publication of interior mapping, I'd be honoured if anyone were to actually use it. If Insomniac indeed based their technique on my idea then I think that's pretty awesome. If they didn't, then they seem to have come up with something oddly similar, which is fine too and I'd be curious to know what they did exactly.

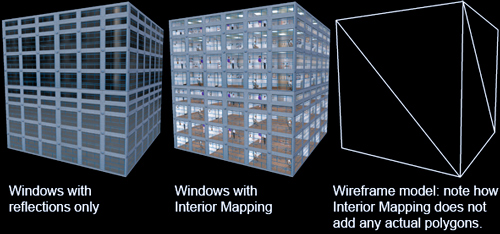
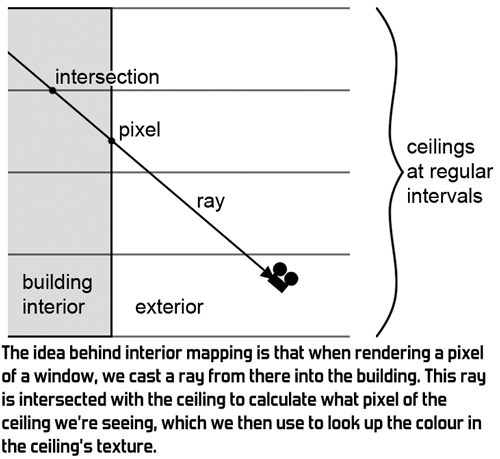
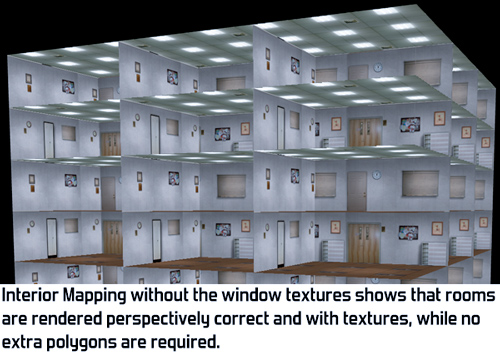
So, how does interior mapping work? The idea is that the building itself contains no extra geometry whatsoever. The interiors exist only in a shader. This shader performs raycasts with walls, ceilings and floors to figure out what you should be seeing of the interior.


The ray we use is simply the ray from the camera towards the pixel. The pixel that we're rendering is part of the exterior of the building so we only use the part of the ray beyond the pixel, since that's the part of the ray that's actually inside the building.

Doing raycasts may sound complex and expensive, but it's actually really simply and fast in this particular case. The trick is to add a simple limitation: with interior mapping, ceilings and walls are at regular distances. Knowing this we can easily calculate which room we're in and where the ceiling and walls of that room are. Ceilings and walls themselves are infinite geometric planes. Calculating the intersection between an infinite plane and a ray is only a few steps and eats little performance.


A room has 6 planes: a ceiling, a floor and 4 walls. However, we only need to consider 3 of those since we know in which direction we're looking. For example, if we're looking upward then we don't need to check the floor below because we'll be seeing the ceiling above. Similarly, of the 4 walls we only need to consider the 2 that are in the direction in which we're looking.

To figure out exactly what we're seeing, we calculate the intersection of the ray with each of those 3 planes. Which intersection is closest to the camera tells us which plane we're actually seeing at this pixel. We then use the intersection point as a texture coordinate to look up the colour of the pixel. For example, if the ray hits the ceiling at position (x,y,z), then we use (x,y) as the texture coordinate, ignoring z.

A nice optimisation I could do here at the time is that we can do part of the intersection calculations for each of the three planes at the same time. Shaders used to be just as fast when using a float4 as when using a float, so by cleverly packing variables we can perform all 3 ray-plane intersections simultaneously. This saved a little bit of performance and helped achieve a good framerate with interior mapping even back in 2007 when I came up with this technique. I've been told that modern videocards are faster with float than float4, so apparently this optimisation doesn't achieve much anymore on today's hardware.


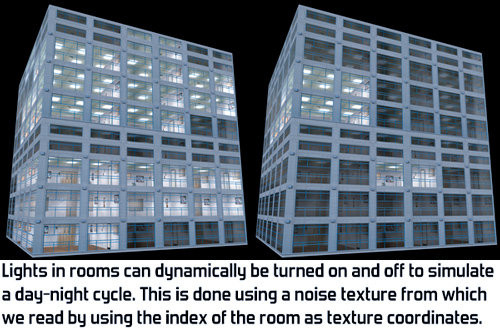
For more details on exactly how interior mapping works, have a look at the paper I wrote on interior mapping. This paper was published at the Computer Graphics International Conference in 2008. Having a real peer-reviewed publication is my one (and only) claim to fame as a scientist. This paper also includes some additional experiments for adding more detail, like varying the distance between walls for rooms of uneven size and randomly selecting textures from a texture atlas to reduce repetition in the rooms. It also goes into more detail on the two variations shown in the images below.


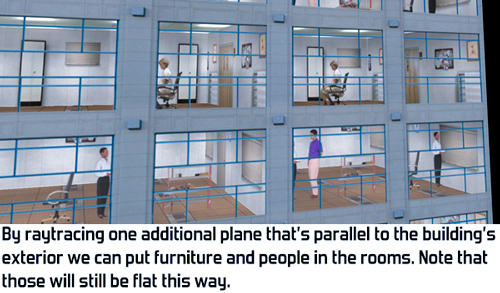
Since we're only doing raycasts with planes, all rooms are simple squares with textures. Any furniture in the room has be in the texture and thus flat. This is visible in Spiderman in close-ups: the desks in the rooms are in fact flat textures on the walls. As you can see in the image below it's possible to extend our raycasting technique with one or more additional texture layers in the room, although at an additional performance cost.


After having published this blogpost one of the programmers of Simcity (2013) told me that interior mapping was also used in that game. It looks really cool there and they have a nice video showing it off. They improved my original idea by storing all the textures in a single texture and having rooms of varying depth. The part about interior mapping starts at 1:00 in this video:


If you'd like to explore this technique further you can download my demo of interior mapping, including source code. If you happen to be an Unreal Engine 4 user you can also find interior mapping as a standard feature in the engine in the form of the InteriorCubeMap function.

After all these years it's really cool to finally see my interior mapping technique in action in a big game production! If you happen to know any other games that use something similar, let me know in the comments since I'd love to check those out.

Friday, 13 November 2015

Texture formats for 2D games, part 2: Palettes

After last week's introduction to texture formats we are going to look at palette textures today. Palette textures are an interesting and underused option for 2D games. Using them is quite a hassle since normal videocards don't support them, but for certain art styles they offer high quality and small texture size.

Palette formats are similar to GIF files. The idea is that we have a palette, a list of all the colours in a specific texture. In the actual texture we don't store the colour of each pixel, but rather a reference to the palette. If the texture doesn't have a whole lot of colours we can get away with using only 256 different colours. References to these can be stored in 8 bits per pixel, so this format is 75% smaller than uncompressed RGBA.


Palette textures are particularly useful for cartoony styles with flat shading, since those have fewer colours per texture. If your textures have more than 256 colours, you can reduce the number of colours. Depending on the art style this loss in quality might be acceptable. For a style with lots of colours and gradients, it probably isn't.

Most textures in Swords & Soldiers 1 on Nintendo Wii were stored using palettes. Some textures even had few enough colours that we could get away with only 16 different colours in the entire texture. This means we needed only 4 bits per pixel. That's 87.5% smaller than uncompressed RGBA! This would bring a 4096x4096 texture down from 64mb to 8mb. Of course such heavy compression is only suitable for some art styles and some textures.


The big caveat is that most videocards don't support palette textures directly. Older videocards like the one of the Nintendo Wii support it, but none of the modern Nvidia, AMD or Intel cards do. Swords & Soldiers 1 was originally a Wii game so we could easily use palette textures there.

This doesn't mean that using palette textures is impossible, just that it's more involved. It's quite easy to write a pixel shader that uses the colour from a greyscale texture as an index for a lookup in a 1D palette texture.

The problem with doing this yourself is that you can't use texture filtering any more. Interpolating palette indices results in random colours. To implement standard bilinear filtering you need to sample and interpolate the colours yourself in the pixel shader. Including the lookups in the palette this means 8 texture reads per pixel. If you happen to also need trilinear filtering for mipmapping this increases to 16 texture reads per pixel. Luckily not all 2D games need mipmapping, but still: 8 texture reads per pixel is significant and costs performance. However, the fun part is that many 2D games have plenty of performance to waste. If this is the case for your game and you have the time to write a good pipeline for them, then palette textures might be an excellent choice.


An interesting side effect of reducing the number of colours for a palette texture is that it makes ZIPping the texture much more effective. With less colours in the texture there is less variation so it can be compressed more effectively. This only helps for download size and for the size of the texture on disk: videocards can't handle ZIPped textures so the texture needs to be unzipped before it goes into video memory.

We used this extensively in Swords & Soldiers 1 to reduce download size. Since the Nintendo Wii had an extremely small hard disk keeping the install size of the game small was really important. For this reason we reduced the number of colours even in cases where it didn't make the texture itself smaller. For example, the size in video memory is the same for a texture with 200 colours or 256 colours. However, the texture with only 200 colours can be ZIPped further. Often there is no visible quality loss when reducing the number of colours a bit further, so we did this with a lot of textures on the Wii version of Swords & Soldiers 1.

When saving an image for the web in the GIF format it's common to turn on dithering. Dithering makes a palette texture alternate between two different colours in a noisy pattern to achieve what looks like smoother gradients with fewer colours. This works quite well for the web, but is totally unsuitable for games. Dithering makes the art flicker like crazy when an object moves around, so in games it can only be used on objects that are rendered pixel perfect, like the backdrops in old adventure games.


A huge benefit of palette textures is that team colours and colour variations can be done extremely efficiently. By simply swapping the palette you can change all the colours. This costs hardly any memory or additional performance.

In Awesomenauts we don't use palette textures so we have to store each character twice: once for the red team and once for the blue team. With palette textures this wouldn't have been necessary. To add to the fun this would also have allowed us to let the player customise his team colour (not that we would want that in a team-based game in which the visuals are all about readability). Lots of other fun tricks can be achieved through clever usage of palette swapping.


Since palette textures aren't supported by videocards by default they are quite impractical to use. Their limitation of a maximum of 256 different colours per texture is also very limiting. However, with certain art styles this technique will give you powerful, lossless compression and easy colour swapping, unique benefits that no other texture format can provide.

See you next week for a look into the master: DXT texture compression!

See also:
-Texture formats for 2D games, part 1
-Texture formats for 2D games, part 3: DXT and PVRTC
-Texture formats for 2D games, part 4: Overview

Saturday, 18 October 2014

Area based depth of field blur

While working on the visual style for my weird live performance game Cello Fortress I came up with a new technique for depth of field blur: area based depth of field blur. As far as I know this is not an existing technique so today I would like to explain how it works.

The visual style for Cello Fortress is far from finished at the moment, but I decided early on that I wanted strong depth of field blur to play a major role. I had already implemented depth of field blur for Proun (which by the way is coming to 3DS, iOS and Android soon!) and I copied that to Cello Fortress. Proun does not have blur on the foreground, so I added that and tried it in-game. The result turned out to not work at all, as you can see in this image (be sure to click the image for a larger version, since this is difficult to see in these small blog-sized images):


click for larger image


The problem is that with standard depth of field blur, only one specific distance to the camera is sharp. In Cello Fortress the camera looks down on the battlefield diagonally, which means that that specific distance looks like a circle. Even weirder is that the part of the screen that is closest to the camera is almost at the centre of the screen: that is the spot the camera hangs exactly above. The result is that both the edges of the screen and the centre are blurred. Of course it is totally undesired that the centre of the gameplay would be blurry.

A simple solution I then tried was to broaden the area that is sharp:


click for larger image


click for larger image


The goal was to have strong depth of field blur as a core part of the visual style for Cello Fortress. So far we either have depth of field blur that interferes with the gameplay, or no depth of field blur at all in the foreground. We need something better:


Once I drew where I wanted blur I realised that this is a simple shape: in world space this is just a simple axis-aligned box. So I implemented a shader that calculates the strength of the depth of field blur based on its distance to that 3D box, instead of distance to the camera. The result is exactly what I was looking for:


Click for larger image.
Note that the effect is exaggerated in the smaller screenshot above, the full-res version has the normal, slightly less extreme blur.

A big benefit of this technique is that tweaking it is really straightforward, and that it is independent on the camera. I can easily set the sharp area from code based on the gameplay situation. It also gives me precise control over the height at which the blur starts.

Technically area based blur is quite easy to do. The depth of field blur shader already uses a render-texture that contains the depth of each pixel to the camera. I don't use this depth for anything else, so I can put any value I like there. The pixel shader can easily be adjusted to calculate depth in a different way.


This concept can also be applied to other shapes than boxes. For example, you can also have a sphere within which everything is sharp, while everything outside that sphere is blurred. One can even have several such spheres. How about a visual style where everything is blurred except for the areas around the characters? I think some other interesting visual styles can be made this way, especially in combination with very strong blur.

I have seen some games that use non-distance based depth of field blur, like the beautiful Below, which seems to simply blur the top and bottom of the screen. I am not aware of games that use a 3D area as I use it. Let me know if there are other games that already do this.

The fun of writing your own shaders is that you can bend them to do whatever you want, including weird and unrealistic effects like doing my depth of field blur based on a 3D box area. Feel free to use this idea in your own games, and I'd love to hear from you if try it out!

Friday, 29 August 2014

A simple trick for fast high quality bokeh on lights in Cello Fortress

Bokeh is an effect that pops up in a lot of new games. It is one of those effects that makes a game instantly feel a lot more "next-gen". It is also an effect that usually eats up a lot of performance. For Cello Fortress I came up with a simplified version of bokeh that looks really high quality, is very fast to render and even very easy to implement. My implementation also has some severe limitations, but I think it can work really well for many games.

Bokeh is a part of focal blur, which is also known as depth of field blur or DoF. DoF is the effect that only objects at a certain distance are sharp, while everything closer and further away is blurred. This is an effect that every lens has, and the larger the lens is, the stronger the blur is. Focal blur has been done in many games for quite a while now, but with the normal DoF rendering techniques the bokeh effect is usually lost. Bokeh means that extremely bright spots grow with the blur and appear as clearly recognisable circles (or hexagons or other shapes, depending on the shape of the lens).


Image from HDWallSource.com.

The problem with rendering bokeh in games is that a naive implementation requires high dynamic range (HDR) rendering and an extremely large amount of blur samples. HDR has become quite common in games by now, but taking enough samples to get good sharp bokeh is impractical. For bokeh as large as in the image above, you would probably need many hundreds of samples to get it look smooth. I actually tried that exact thing in Proun two years ago, as a fun little experiment.

Proun already had really high quality DoF (as I described in this blogpost). I added bokeh by simply making some pixels extremely bright. This is a quick dirty trick that was needed because Proun only has limited fake HDR, but the effect looks pretty convincing, as you can see below on the left image. However, if the blur is increased the bokeh becomes extremely noisy, as you can see on the right. It looks noisy despite that it already uses a quite insane 128 samples per pixel! You can find more images of this approach in this blogpost.


This makes this naive approach unusable if strong blur is wanted. We need something smarter. The most common approach in current games seems to be to render actual polygons with a bokeh circle texture on them. To do so we need to find all the bright pixels in the image and then generate a quad for each one.

According to this article The Witcher 2 was ahead of its time by having bokeh all the way back in 2011. The Witcher 2 did this by generating a quad for every pixel and then discarding the ones that are not blurred enough. That's a whole lot of sprites to render! Needless to see this only worked in real-time on the very fastest PC videocards.

Most games that have bokeh these days seem to use a smarter approach, using newer shader models: first they look for all the pixels that are so bright that they would get a clear bokeh circle, and then they generate quads for this. An example of this approach can be found here. Unlike The Witcher 2's technique this creates only the bokeh itself, not the general focal blur, so with this technique the depth of field blur needs to be done separately.

Even with this clever technique the performance hit is still heavy. It requires analysing all the pixels on the screen to find the ones that are much brighter than the ones next to it. It also produces temporal artefacts: if the source of the bokeh is really small it will flicker because it is smaller than a pixel. Normally this is not that much of a problem because it is only a pixel, but if a big bokeh sprite flickers on and off this becomes much more noticeable. These temporal artefacts might already show with slight camera movements. I don't know what technique Star Citizen uses, but the kind of flickering this would result in can clearly be seen in this video in the bright spots in the background.

Now that we roughly know how bokeh is usually rendered, let's look at that simple and fast trick that I use in Cello Fortress. My idea comes from that the most pronounced bokeh is often from actual lights, not just random bright pixels. If you are looking directly at a light, but the light is in the blurred background, then it will generate a very clear bokeh circle. In general a game engine already knows where all the lights are, so this means that we can skip the searching for bright pixels entirely and directly create one screen-space quad for every light. To do so I first render the scene, then apply normal depth of field blur, and finally render the bokeh sprites on top of that.

Not only does this method skip the expensive step of finding the bright pixels that need bokeh, it also fixes all the issues with temporal artefacts. We always know exactly where the lights are so no matter how small they are, the bokeh will never flicker when the camera moves. It just moves along with the light correctly.


To get a good-looking effect I scale the bokeh with how blurred the light should be. This can simply be calculated based on the focal settings of the camera and the distance to the camera. I also fade out the bokeh sprite a bit as it gets larger, since the larger the blur, the less bright the bokeh circle should be (unless the light is infinitely bright). Here is a video that shows the bokeh in action in Cello Fortress. The bokeh is mostly visible at the bottom of the screen.


An important part of bokeh is the actual shape of the bokeh effect. This shape is created by the shape of the lens. I often like hexagonal bokeh best, but I recently discovered that in photography this is generally considered ugly. When reading reviews of a new camera lens I wanted to buy I learned that the more expensive lenses have circular bokeh while cheaper lenses have hexagons. Still, in the end the only thing that matters is what looks good aesthetically in your game. Since most bokeh rendering techniques use those textured sprites the bokeh shape can be modified really simply by using a different texture.


Note that this all does not look as good as it can yet because I have so far spent too little time on the actual visual design of Cello Fortress. I mostly focussed on the gameplay and some cool shaders. Once I start working on proper graphics I should also tweak the brightness, size and colour of the bokeh to make it look better. I should probably also try adding a bit of chromatic aberration to the bokeh texture then.

My bokeh technique does not solve occlusion at the moment. If a light disappears behind an object then it should not still get a bokeh sprite. I didn't solve this yet because it does not occur in the current version of Cello Fortress. However, several solutions can be implemented easily. For example, I already have a depth texture for the depth of field blur, so I can do a look-up in that on the screen position of the light to see whether there is an object in front of it.

The big downside of my method for rendering bokeh is that you need to know where the bokeh will appear beforehand. This means that more subtle bokeh sources like reflections and strong speculars are not practically doable. I can imagine some tricks to get for example bokeh in planar reflections working (if you know where the reflecting planes are), but beyond that it quickly becomes infeasible. The standard technique of searching for the bokeh pixels of the image handles this much better, so if you really need bokeh on speculars, then you will probably need to resort to such techniques.


Image from this article by MJP

I looked up a bunch of articles on bokeh implementations and couldn't find any mention of something similar to what I am doing. This surprises me because the idea is so simple and obvious. If anyone knows of any articles or games that already do this, then please let me know so that I can add a link.

That's it! My bokeh technique is simpler and much faster than most commonly used methods of rendering bokeh and it even fixes problems with temporal artefacts. It is also a limited technique that does not handle all bokeh effects, but in many cases it will probably be good enough. It definitely is for Cello Fortress!

Friday, 1 February 2013

The craziest bugs, part 2

Last week I started the top 7 of my favourite bugs with the numbers 7 to 4. The top 3 is where it gets really crazy. Sit back and enjoy to see how amazingly stupid game development can sometimes be!

Click here for numbers 7 to 4

3. Hidden functionality to turn off bugs

On one of the platforms Awesomenauts launched on, we had a lot of trouble getting the internet connection between players to remain stable. After a while the ping would always start slowly increasing, until in the end it got too high and the game disconnected. Sometimes this took a couple of minutes to start, sometimes half an hour, but in the end this always happened.

We contacted the support team for the platform-specific networking library that we were using, and their answer was that we used too much bandwidth and sent too many packages. So we spent a lot of time optimising, and we managed to half the number of packages and half the bandwidth. However, the problem remained, and they again told us we used too much bandwidth. Again we halved the bandwidth and the number of packages, but the problem remained. At this point we were well below what they said was the ideal bandwidth usage and we couldn't optimise much more, so we were getting pretty desperate and contacted them again.

And then it happened...

Their answer was that their bandwidth throttling code was quite buggy, so there was a hidden enum that we could use to turn that code off. We used that and... the problem was instantly fixed! So they knew they had a bug, they even had an option to turn that bug off, but they didn't tell us for two months! I spent all that time doing extra bandwidth optimisations and it wasn't even necessary! Blargh!

Of course, using less bandwidth is always an important improvement for a multiplayer game, but we were already enormously behind on schedule at that point and this took a lot of time for a small indie studio...


2. Lying videocards

This has been a personal gripe of mine for years. Some videocards simply lie about their specs. Your game asks the videocard what it can do, and it will proudly brag about features it doesn't actually have!

I have not yet used any of the newer videocard features like geometry shaders, hull shaders and compute shaders, so I have not encountered any lying videocards recently, but I would be surprised if this doesn't still happen when you try to use state-of-the-art videocard features. It sure did a lot around the appearance of shader models 2 and 3. (Note that I haven't used the new shader types because I think they are uninteresting, but that's a long story that I will not go into today. Instead, I will just leave it at the short and controversial statement that they are irrelevant.)

I had to work around such lying videocards in both Proun and De Blob. What happens is that I make special versions of my shaders for different shader models, so that older videocards can still run the game, but with less special effects. The Ogre-engine has a very elegant system to handle this, and thus Proun features proper materials for shader models 1, 2.0, 2.x and 3.0.

The core of this solution, however, is that you ask the videocard which shader models it supports, and then pick the highest allowed for the best quality. This works very well, unless the videocard lies. It might claim to support 3.0, but doesn't really work with it. In the worst case, the videocard doesn't even give a compile error when being fed a 3.0 shader and simply outputs black pixels!

Several older Ati videocards turned out to do this in a horrible way. The solution ended up to hardcode the names of such videocards and feed them different shaders based on their name. If you look in the Proun folder structure, you can see folders with the same materials, but for different videocards, with beautiful names like "NotX8orX9". That last one contains materials that cannot be used on Ati X8** and X9** cards. I even have another set of materials for Ati X1*** and X2*** cards, because they lie in a different way...


1. "If I buy the game, it isn't the demo any more"

Yes, you read that title correctly. This is by far the most hilarious bug report I have ever seen, and easily claims the number 1 spot in this list, despite not even being a real bug. It was reported to us through the bug database though, so it qualifies for this list!

A professional QA testing company that was testing one of our games for us, at some point reported to us that if they bought the full game from the demo, then when they came back to the game, it wasn't the demo any more. It was instead... the full game!

Oh really?

That happens to be the point of buying the game, now isn't it?

When I replied in the bug database that either I didn't understand what they meant, or this bug report was a slight mistake from the tester, a producer quickly removed the bug from the database, so I never received an actual answer to that.

I think the reason they reported this, is that that particular shop (outside the game, not made by us) concluded the buying process with a question like "Do you want to go back to the game?" Whether you chose "Okay" or "Cancel", the shop always brought you back to the game, and apparently the tester concluded from the fact that there were two options that one of them ought to bring you back to the demo, even though the game had just been bought. This is some pretty broken reasoning, but I can imagine where it came from.

(As crazy as this bug report may be, though, I would like to emphasize that this is the only silly report this testing company wrote to us. The rest of the reports made perfect sense, so this one mistake really shouldn't be held against them! That doesn't make it any less hilarious, though...)

That's it, folks! The 7 weirdest bugs I have encountered! Come back next week when I will discussion the Awesomenauts animation pipeline or visual effects performance (I haven't really made up my mind yet which it is going to be...)

Friday, 28 December 2012

Dynamically melting snow

The most complex graphics effect in Snowball Earth is without a doubt the snow. As the player walks around and heats up the area around him, the snow melts, forms puddles and finally becomes grass. This is completely dynamic: the player can turn his heating on and off at any point, and the snow reacts correctly to that. The snow even has little piles around trees and rock walls, and these piles lower and disappear when the snow melts. So how did we make this?


A slow motion video of how the snow melts around the player.

Before I continue, I would like to mention once more that Snowball Earth is Ronimo's cancelled game from 2008, and that the complete prototype can be downloaded here:


Download Snowball Earth prototype


So how did I implement this melting effect? The basic trick is that for every vertex, I store the 'meltness': to what extend the ground at that vertex has already been melted. A value of 0 means snow, 0.5 means water and 1 means grass. The pixel shader then takes this value and uses it to simply choose between three textures, for grass, water and snow.

To store the correct value in each vertex, the code simply updates all vertices for which the value has been changed. This is done every frame. This would not be very efficient if the vertex count were very high, but it works well enough here. Especially since this is only a prototype and performance isn't as much of an issue as it would be in a released game.

A nice property of storing this value at the vertex, is that the value gets interpolated before it gets to the pixel shader. So if two vertices are next to each other, and one has value 1 (grass) and the other 0 (snow), then a pixel in the middle would get value 0.5 (water). This means that if I smoothly increase the value at the snow vertex during the melting, then the edge of the snow in between the two vertices smoothly moves towards the snow vertex, which looks like the snow is melting at the edges.


The water automatically always becomes a thin edge of water in between snow and grass, because vertices usually rather quickly go from 0 (snow) to 1 (grass).

So far the edges between snow and water and between water and grass would still be straight lines, since they are simply based on interpolated vertex values. This looks kind of okay, but it is still too geometrical to be really convincing. I would like to break up the border and add patterns to it, so I have a special greyscale texture that contains puddle-like patters. This texture is used to offset the 'meltness' value: I simply add the texture's value to it. The effect this has, is that wherever the offset-texture contains white, the water will disappear into grass earlier, while wherever the offset-texture contains black, the water will remain longer.

Our artist Ralph jumped on this and created two offset-textures: one for the water and one for the snow. He made the offset-texture for the water so that it contains roundish, puddle-like patterns, while the offset-texture for the snow contains long curves. This works really well in the actual game.


In practice, the grass, water and snow are all a little bit more complex than simply 'a texture'. The snow has noisy specular reflections, the water reflects the sky a bit, etc. So instead of choosing which texture I use, I choose which material to use: snow, water or grass.

I wanted this to run on shader model 2 videocards (pretty ancient these days), so I couldn't use an if/else statement to choose the material, since if/else is not supported in shader model 2. Instead, I used the step(a, b) function, which returns 0 if a is larger and 1 otherwise. With some puzzling, most math that needs if/else-statements can be replaced by step-functions, allowing quite complex things to be done on ancient shader model 2 videocards. This is also how I got the snow/water/grass choice working. Just look at this tiny bit of shader code for how that could be done (note that the final line could be replaced by a lerp(a, b, c) call instead):

float4 grassColour = tex2D(grassTexture, uv);
float4 snowColour = tex2D(snowTexture, uv);
float choice = step(0.5f, meltness);
float4 final = (1 - choice) * grassColour + choice * snowColour;

For a complete look at the shaders described above, you can check them out in the file Data\Assets\Shaders\Snow.cg in the Snowball Earth prototype.


The final element to the snow effect is that the snow has little piles around trees and such, and when it melts, it lowers and the piles disappear. This was done with a simple morph: our artists made two versions of the ground meshes: one low one for the grass, and a slightly higher one for the snow. As the ground melts, the two positions for each vertex are simply interpolated to get the final position. Every snow-pile in the game was made by hand by our art-team, who raised the vertices around trees and next to walls.


Only one of the two meshes for the ground is used to handle physics and collisions. This is the lower grass-mesh. A nice added benefit of that is that all characters walk in the snow and on the grass/sand, giving the snow just that little bit extra.


To add to the atmosphere, there are also two different sets of lightmaps in Snowball Earth, each with different colours. This way I was able to give the snowy world a colder, more blueish lighting than the unfrozen world.

Having two sets of lightmaps also has an added benefit. There are no real-time shadows in Snowball Earth, so normally there would be the problem that objects that appear dynamically (like leafs and smaller plants) cannot cast shadows. Having separate shadow maps for the frozen and melted versions makes it possible to calculate these shadows into the melted world only.

This solution is not completely correct, though. If you look closely, you can sometimes see that if an area near a big plant is already melted while the plant itself is still frozen, it already contains the shadow of that plant, even though the plant itself has not appeared yet. However, this visual error only happens at the transition from frozen to unfrozen and is hardly visible (unless you look for it), so I never really considered that a problem.

That's it for Snowball Earth for the moment! Let me know if there are any further topics about Snowball Earth you would want to read more about! In the coming weeks I'll be getting back to posting about Awesomenauts, Cello Fortress, and hopefully also about some exciting graphics experiments I have been doing!