Showing posts with label animation. Show all posts

Wednesday, 17 March 2021

Super flexible 2D animations through the Blightbound Skin Editor

Last week I discussed how we used After Effects and Duik as our animation tools for Blightbound, achieving crisp animations at high framerates with small filesizes and nice tools for our animators. The real strength of this workflow however comes from our Skin Editor. This makes it possible to reuse animations, quickly tweak the looks of characters, swap gear, add special effects and attach objects to characters convincingly. Today I’d like to explain the ideas behind our Skin Editor and how this impacted the work of our artists.

As I showed in last week’s blogpost, the basic idea behind animations in Blightbound is that a character is made up of parts (hands, torso, face, upper arms, lower arms, etc.). These parts move and rotate and the game plays that back directly, instead of using sprite sheets.


Characters in Blightbound are animated using parts, and frame-to-frame variations on those parts. This shows some of the parts used in the animations of Malborys.

Since the game knows exactly what parts there are and where they are, there are a lot of fun things we can do with this besides simply playing back animations. How cool would it be to swap parts to create new characters, to swap weapons, to attach special effects to weapons and to attach effect-over-time animations to bodyparts? To achieve all of these things our artists made sure all characters have a similar structure, and I developed our Skin Editor.

The basic idea behind our Skin Editor is that it finds all the visible parts in all the animations for a rig and allows changing or hiding them. So a skin can change whatever it wants: a character’s head, weapon, shoulder, or even everything. When an animation is played back in-game, we inform it which skins are active and those are applied to modify the character’s looks during gameplay.


A demonstration of the interface and the various features of the Blightbound skin editor.

Skins allow us to create a new character by drawing new parts, without needing to create any new animations. This was an important goal for us, because for Blightbound we wanted quite a lot of characters. A core idea behind the game is that it should be a bit like Pokémon: gotta catch em all. There are a lot of playable heroes and the player collects those during gameplay. However, for Awesomenauts it took us 8 years to get to 34 characters and here we needed more animations per character and more characters (enemies included). So the Awesomenauts workflow wasn’t going to work and we needed to apply more reuse instead. The Skin Editor made this possible.

Note that above I said we apply skins, plural. Our skin system allows combining several skins, as well as changing which skins are active on the fly. A skin can add parts, but it can also remove or replace parts from the skin below it. This is pretty cool, because it allows us to do all kinds of cool things. For example, weapons are skins, so swapping a weapon means swapping a skin while keeping the base body skin the same.
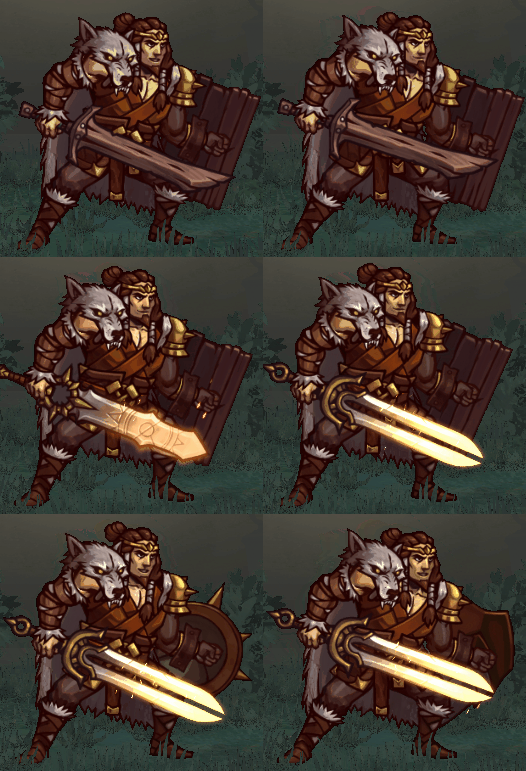

Weapons and shields are easily swapped by enabling and disabling additional skins.

Weapons are an obvious application of this, but we can do more outlandish stuff with this. If an enemy gets hit by a knife that applies a bleed effect (damage over time), then we would like to have an effect on the enemy for the duration of the bleed effect. In Awesomenauts we were heavily limited in these kinds of effects because the sprite sheet didn’t tell us where any of the limbs or feet of the character were. This meant status effects needed to be visualised with animations that are always centered on the character. In Blightbound we can do much better: we can have a knife sticking our of a leg, and the knife will move correctly with the leg. All it takes is adding a skin to the enemy that contains that knife.

Normally we put textures in skins, mostly body parts and clothing and weapons and such. But we also have a feature to attach any in-engine animation to a skin. This allows us to do things like adding sparkly particles to a staff, dripping blood to the knife, glows to the shackles, trails, and even physics capes. We also use this to attach gameplay dummies to skins, for example to make sure projectiles come out of the tip of the staff, no matter where that staff is in the current animation.


The skin system allows us to accurately attach visuals for status effects to the animation. Here the slow effect attaches to the legs. Also, the cape is a nice example of attaching a physics object to the character.

A fun but mostly unused feature I implemented is the scaling of parts. Skins can not just replace parts, but also change their size. We hoped we could use this to change a character’s silhouette, for example by giving one character longer arms and shorter legs. This feature also allows making all heads bigger (which is a common Easter egg in many games, but we didn’t add it to Blightbound).

While scaling worked fine from a technical perspective, in practice it was hard to make good looking characters this way so our artists ended up hardly using that feature. Also, a more complete implementation of limb scaling requires animation retargeting (for example to keep feet firmly on the ground when the ratio between upper and lower legs is changed), which is some pretty advanced tech that we didn’t have time to dive into.

So far it might seem like just having that skin editor enables all of these cool features. However, to make this work, all animations need to have consistent elements. For example, if we want to attach that knife to that underarm, then each animation that the character can play needs to have an underarm and it always needs to have the same name. In some cases we worked around this by adding empty visual parts to the rig, so that any characters that needed those parts could enable them. This is somewhat similar to adding attachment dummies to a skeleton in 3D animation.

Also, if we want to quickly reskin a character, then we should limit how many unique parts there are. In my previous post I mentioned that we do frame-to-frame animation on parts, for example by drawing several heads with different expressions. For every new character we add on this rig, we need to draw all of those heads. The larger the number of parts, the more work it is to add a new character that replaces all of those parts.

There are some tricks that we used to decrease the workload. For starters, our skinning system falls back to the default if variations don’t exist. If for example one character has a mask, then we don’t need to make copies of that mask for different facial expressions. If a character is less important then we can also just choose to not draw the facial expressions for that character, even if they wouldn’t be hidden by a mask.
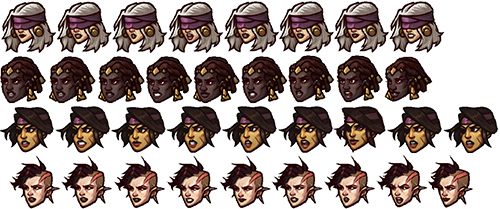

For each character we need to draw all the parts used in all their animations. For four characters in Blightbound this shows all the heads needed for the female rig. Note that some characters have one head fewer. That's okay because in such cases our skin system automatically falls back to the default.

Another thing we used is that not all characters use all animations. Enemies for example share some animations with heroes, but their animation set is a lot smaller. Enemies therefore only need to have the parts that are actually used in their animation set. For this same reason our animators had a lot more flexibility in adding parts whenever they made a character-specific animation: none of the other characters need to have those parts.

By carefully choosing which parts and variations are really needed, our artists managed to keep it all doable. Still, in total Blightbound currently has over 4,600 character parts. Together these form around 50 characters (players and enemies), 104 weapons and 45 shields.

This did require a lot of experimenting with exactly how a body is made up. While the basic parts may seem straightforward, there are a lot of subtle choices to be made. For example, feet are split in the front part (including the toes) and the back part, and the pelvis and torso are split. Also, some parts are in the rig twice: once in the front and once in the back, for more clothing possibilities.
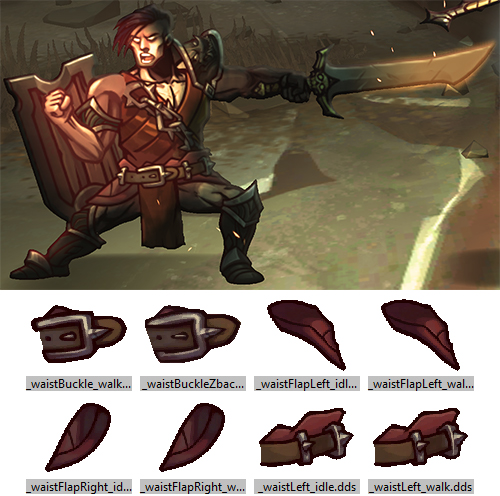

Our artists spent a lot of time figuring out exactly how the rig should be split into parts to be able to do a lot of poses and clothing variations without introducing too many parts. For example, here we see that the belt is split into 3 parts and there are "waistflaps" in the rig.

This brings us to the biggest downside of this approach: it adds a lot of limitations to what our animators can do. For each animation they need to creatively reuse the existing parts as much as possible. They can add new parts when it’s really needed, but they need to be very conservative with this to avoid bloating the workload. The result is that animations are a bit less dynamic that in Awesomenauts and Swords & Soldiers 2. Also, our artists generally did not enjoy the extra challenge of these limitations.

Another downside is that reusing animations makes characters a lot more similar visually, and limits what we can do in terms of body types. Our artists did go out of their way to make the characters as visually unique as possible within the limitations of the rig, for example by adding variation through extreme headgear, capes and clothing.

To make characters feel more unique, our artists have made select unique animations for each hero. Especially the idle animations are different, but in some cases also the walk animations. That’s one of the nice things of reuse: during development you quickly have a full character in the game with all animations, and then later on you can replace specific animations to make them more unique.


To make characters that use the same rig less samey, most have a unique idle animation.

Animation reuse is also great for prototyping: if for example a designer wants to try swapping skills around between enemies, they get an animation set for free to get a better idea of what gameplay feel that will have. In Awesomenauts on the other hand that often required an artist to make some extra concept frames for skill visualisation.

Before I finish this blogpost I would like to point out that the Skin Editor and the limitations we applied to be able to reuse animations are not necessary when using After Effects and Duik for animations. It’s perfectly possible to let go of all of those limitations and still get all the benefits that I discussed in last week’s blogpost. In fact, our After Effects exporter is technically capable of exporting Awesomenauts characters without using sprite sheets.

Despite the downsides, the scope of Blightbound would not have been doable for us without the approach we used. The combination of the Skin Editor and the consistent body setup that our artists applied to all animations made a lot of cool things possible for Blightbound. We were able to make more characters then we could otherwise have, create swappable gear, add special effects to weapons and attach animations to body parts. In total, I think the result is pretty spectacular. Also, playing around with the Skin Editor is just plain fun!

To conclude, here’s a video that shows what happens when you repeatedly randomise all parts of a character:


The Blightbound dev tools contain a feature to randomise skins. The results look both horrible and hilarious.

Special thanks to Ronimo artists Koen Gabriels, Tim Scheel and Gijs Hermans for providing feedback on this article.

Wednesday, 10 March 2021

Finding a suitable toolchain for animating Blightbound’s 2D characters

For Blightbound our technical ambitions for the 2D animation system were quite lofty: we wanted high quality animation, screen-filling bosses, crisp character art, high framerate and swappable gear. This required a complete rework of our animation pipeline, since the sprite sheets we used in Awesomenauts and Swords & Soldiers 2 allow for none of those requirements, except for high quality animations. In today’s blogpost I’d like to explain the problems we faced, and what combination of tools we chose to solve them. This is the first half of a two-parter: next week I’ll discuss our skin editor and its implications on animation.


Blightbound features huge screen-filling bosses that need to animate smoothly without taking up insane amounts of memory.

Traditionally 2D animation in games is done using sprite sheets. A sprite sheet is simply a big texture with all the frames for all a character’s animations in it. Sprite sheets aren’t limited to just character animation: they can also store other things, like special effects or plants. The frames might be in a grid, or spaced more efficiently like we did for Awesomenauts. In any case, it’s just a series of tightly packed images.

Sprite sheets are great because they allow for complete freedom. The animator can draw anything they like and it will just work. Extreme squash-and-stretch? Perspective changes? Morphs? Do as you please, to the game it’s all just images!

However, sprite sheets come with a few huge downsides. First is size. If you have a big character and want it to be crisp and high-resolution, then each frame is going to take up a lot of space. Having lots of large images is going to cost too much memory. In Awesomenauts this was indeed a problem for some of the characters. For Clunk to fit in one 4096*4096 sprite sheet (the maximum we chose for memory and compatibility reasons), we had to either lower the resolution a bit, or reduce the framerate. And that’s not even that big of a character! The high memory usage of sprite sheets means that screen-filling bosses either can’t be done, or need to have very few frames, or can’t be crisp.


In Awesomenauts, red Clunk occupies an entire 4k sprite sheet texture for all his animation frames. Clunk fit only after slightly downsizing him.

The second major downside of sprite sheets is that since it’s just images, it’s very hard to do anything with them except simply showing them. For Awesomenauts we’ve often talked about letting players customise characters by changing for example their hat or other parts, but simple sprite sheets make that incredibly hard. The engine would need to know where the hat is exactly, but the sprite sheet doesn’t contain that information. Nor does it tell us whether there are different perspectives of the hat in different frames, or whether anything is ever in front of or behind the hat.

I can think of some workarounds for this problem, but it’s all so cumbersome that’s it’s not practical to actually do. This is the main reason why Awesomenauts only contains skins that swap the entire look of a character, and no swappable hats or clothing: those would be completely new sprite sheets for each combination.


Since every skin change in Awesomenauts requires an entire new sprite sheet we decided to make full reskins instead of allowing the user to customise individual parts (like hats or weapons). These are the four looks for Ted McPain.

So, sprite sheets can’t give us four of our requirements (screen-filling bosses, crisp character art, high animation framerate and swappable items). What can we do instead? The obvious direction for a solution is to split a character in parts, and let those parts move relative to each other. Or even to go for full skeletal animation.

If you have a background in 3D animation, you might think “well skeletal animation of course, it’s awesome!” And in 3D it is indeed, but in 2D it’s a lot more limited. Because we’re restricted to the 2D plane, there’s a lot of animation that can’t be done with a standard skeleton in 2D. Rotating the head of the character away from the camera is super easy in 3D, but impossible with 2D skeletal animation. Swinging a sword vertically is easy, but horizontally is very hard because that requires 3D perspective. Wanting to circumvent these limitations, we opted for a combination of 2D skeletal animation and traditional frame-to-frame animation on parts where needed.

A common tool for doing part-based 2D animation is Spine. Spine is used by a lot of games and we expected this to be our best option. We tried Spine and it was indeed quick and easy to use, as well as easy to integrate into our own engine. However, it turned out to be a bit too simple: Spine doesn’t allow swapping a part in the middle of an animation. This is needed if you want to mix skeletal animation with frame-to-frame animation, for example by switching to a different drawing of a head or hand. The workaround was to layer several skeletons on top of each other, but that was too clunky to work with. We reached out to Spine at the time, explaining this issue, and they confirmed this was the only way. Our evaluation was three years ago and we haven't tried Spine since, but according to this post by them their options for combining frame-to-frame with skeletal animation seem to have improved recently.


Spine by Esoteric Software is a 2D character animation tool for games for creating animations using parts, skeletons and deformations (screenshot taken from one of Spine's tutorial videos).

We also tried some other tools, including Blender and 3D Studio MAX, but those turned out to be too focussed on 3D to create a good workflow for 2D animation for us. Especially the nice skeletal systems they have became quite impractical when used for 2D animation.

So instead, we wanted to stick with After Effects. After Effects is mostly known as a tool for editing video and doing special effects and such, but it’s actually also just a really good general animation tool. Our artists happily used it for character animation in our previous games Awesomenauts and Swords & Soldiers 2. The basic idea is this: each part in an animation is a layer, and can be animated, linked and deformed freely. By turning layers on and off, you can do frame-to-frame animation on parts (like a hand opening and closing) or on the character as a whole.

I imagine After Effects would be a bad fit for full hand-drawn frame-to-frame animation, like in Cuphead, since After Effects doesn’t even allow drawing on layers directly (we draw all our parts in Photoshop). However, for our games it’s an excellent tool because we don’t want to redraw the entire character every frame anyway.

There was something missing though: After Effects is a great animation tool, but it’s not really tailored to 2D character animation. Good thing we already knew about the Duik plug-in. Duik adds the rigging features that are common in 3D animation to After Effects. Combined with the strong tools After Effects already has, it’s a really effective 2D animation tool for games.


Duik is an After Effects plugin that adds tons of 2D animation features (screenshot from this tutorial video by Motion Tutorials).

I previously mentioned we wanted to mix skeletal animation with frame-to-frame animation. That part is actually really simple with Duik. The artist just links several drawings of a part to a bone and switches which is visible. This way we can change facial expressions during animations, as well as do things like open and close hands, pivot or distort a torso and switch facial expressions.


Thumbnails of most animation parts needed for one character in Blightbound. The various hands, faces and chests are for frame-to-frame animation on parts of the body.

Happy with After Effects+Duik as our animation tool, another important thing was missing: After Effects files can’t be played back in real-time engines. So I set about the task of writing an exporter from After Effects that exports all the hierarchy and animation data. I also implemented the in-game side of playing that back in real-time.

At it’s core, this is a surprisingly simple task. Each part in an After Effects animation is a layer and we can just export all the layers with their animation frames and play them back. Where I went wrong though, is that I wanted to emulate Duik’s systems in-game. I thought Duik only did basic two-bone inverse kinematics and implemented that in the engine. This worked with simple animations, but for complete characters the animations were completely broken in-game. When I looked deeper I learned that Duik actually has a ton of different animation systems and approaches. Mimicking all of those in-game was totally undoable.


Duik has so many features that only supporting parenting and two-bone IK produced completely wrong results in-game, as can be seen in this 'beautiful' monstrosity. This was intended to be a normal walk animation, early during development of Blightbound.

Once I realised this, I went for an easy alternative: animation baking. I export the orientation, scale and position of each part at 30 frames per second, simply storing the values for each frame (unless they’re not changing). This is a lot more data, but compared to the size of textures it’s really negligible. I did keep the hierarchy of the bones, so parts don’t start to subtly 'float' compared to each other.


Our custom file format is simply a text file with a long list of all parts and the information needed to position and animate them correctly, including parenting and keyframes.

I previously said we wanted high framerate. The game actually interpolates between these frames, so while they’re exported at 30fps, they’ll also run smoothly at 60fps, 144fps, or any other framerate. That’s also great for when slowing an enemy: in Awesomenauts, if you slow an enemy, you can see the low framerate of their slowed down walk animation. In Blightbound, movement remains perfectly smooth.

A note there is that whenever something needs to jump from one position to another instead of smoothly interpolating there, the artist needs to use a hold key. Our tool exports those and applies them correctly during playback. Overlooking this caused some bugs here and there, because artists aren’t used to needing to use hold keys when two frames are directly next to each other. In-game however there can be frames in between, so that case still needs a hold key.


A few animations that Ronimo animator Tim Scheel made for the Blightbound character Karrogh.

After Effects is a huge tool with tons of features, so it’s impossible to support them all in-game. Our exporter only supports what we actually need, and nothing else. This means our artists need to avoid using some After Effects features that they might want to use. In most cases this is fine, but one particular feature that we ended up not supporting due to a lack of time, is mesh deformations (also known as puppet pins). Being able to deform a part would have helped a lot, but we didn’t find the time to implement a good emulation of After Effects’ deformation features in-game. Quite a pity, and I wonder whether our artists have ever wished they had chosen Spine after all, since Spine supports deformations in-game out-of-the-box.

Our artists did apply a simple workaround for the lack of deformations. By doing them in Photoshop and saving them as different frames for a part, they work fine. Technically the engine then thinks it’s frame-to-frame animation, but it’s actually deformed instead of redrawn in Photoshop. This approach wasn’t used much because it requires a lot of handwork, especially when reusing animations on several characters, but it does get the job done when needed.


The chest deformation in this animation from Blightbound was made by deforming the chest part in Photoshop and then exporting it as separate parts.

From a memory perspective the result of our toolchain is pretty impressive. Whereas a single Awesomenauts character can take up 16mb of texture space (excluding skins and the blue team), all Blightbound characters and enemies together use only 65mb of texture space, spread out over 4,600 character parts. On top of that, Blightbound animations are much higher resolution and higher framerate and we can swap parts and weapons dynamically.

What we have so far is strong animation tools (After Effects + Duik) and a way to play animations back in-game. This is enough to make a playable game, but we wanted considerably more: easy reuse of animations between characters, equippable gear, attaching special effects to bodyparts and efficiently handling thousands of character parts. In next week’s blogpost I'll dive into how we achieved those goals using our own skin editor.

Special thanks to Ronimo artists Koen Gabriels and Gijs Hermans for providing feedback on this article.

Friday, 6 November 2020

Combining 2D and 3D in Blightbound's VFX

An important focus during development of Blightbound is that we we wanted to achieve a 2D look but have 3D movement and a 3D camera. A particular challenge are special effects: we had tons of experience with 2D special effects, but now the special effects also needed to communicate depth. For example, how far does that area-of-effect damage reach exactly? In this blogpost I will show a number of tricks we used to combine 2D and 3D in the Blightbound VFX.

This blogpost is based on an conversation I had with Ronimo VFX artist Kees Klop. Unfortunately Kees won’t be staying at Ronimo: for budget reasons we can’t keep him on after November. So, if you’re looking for a stellar VFX artist, be sure to send him a message on his Art Station or email.

Let’s start by having a look at the Gravity Well skill that some of the mages have. This is a spell that draws in all the enemies near it, making for an excellent combo with area-of-effect attacks by the Mage’s teammates. Like many of the VFX in Blightbound, this effect combines several types of geometry. Here's what it looks like, and a breakdown of some of its elements.


A video of the Gravity Well effect in-game and in our animation editor.

The next effect I would like to discuss is the Deck of Daggers skill that some rogues have. Several knives are thrown, and those that hit get stuck in the enemy for a while, causing damage over time. These knives are rotated out of the enemy's plane to add depth. It's a subtle effect, but having many of such subtle 3D effects in the game in total adds a lot of depth to the 2D drawings.


The Deck of Daggers effect or, as Triss would say it: "I'm a fan of knives!"

Also, our animation tech helps here: since Blightbound plays skeletal animation in real-time (as opposed to rendering it down to spritesheets as we previously did), objects like these knives can really stick to a body part and move along with it. While that's an obvious option to have on 3D characters, it's a lot less common to be able to do this with 2D animation without using a rather stiff animation technique. Our animation workflow however is a topic for a separate, future blogpost.

One of the most screen-filling effects in the game is the victory at the end of a dungeon, after defeating the dungeon's boss. Here we see a combination of many elements, including one that's not used often in our special effects because it's so all-encompassing: colour grading. The colours of the whole scene get changed during this effect.


The victory effect in-game and in our animation editor. Blight (a corrupting mist) is an important theme in Blightbound. Since this effect marks the end of a successful run, it sucks in and dissolves a lot of mist.


Many special effects in Blightbound are made 3D by overlapping flat planes under various angles.


A lot of the visual effects also feature bits of frame-to-frame animation. Many of those were made by Ronimo while many others were taken from the RTFX Generator pack, including this particular one.

The warrior's Warcry ability shows another technique for combining 2D and 3D. Warcry is an area of effect ability that buffs teammates. Since the range of the ability is very important, the starting point here is a circle on the ground. However, that's very flat and becomes less readable when sticking through things like grass or small stones. So to make the effect more 3D, a vertical cylinder with an animating swirl is added.


The Warcry skill in-game and in our editors.


Here's a little teaser: update 0.5 (coming this November) adds the new Tamed Wolf sword to Blightbound. A special perk of this sword is that when the warrior uses his shield, his teammates are also shielded. This effect visually overlaps with the Warcry skill. As you can see here, this shield effect makes the verticallity above the circle even stronger.

On to the assassin's Chakram ability! This is a large projectile that flies, hangs still for a while and then comes back. Unlike most other projectiles it's visible long enough that it's much more than just a flash. Also, it deals damage in an area of a meter or two, so it's quite large.


The Chakram skill in Blightbound.

The Chakram is a horizontally flying circular thingy. With the relatively low camera of Blightbound it was seen under too extreme an angle, making it look too flat. We didn't want to turn it into a 3D model though since we wanted to maintain the 2D, handpainted feel of the graphics. The solution is simple: the Chakram is tilted towards the camera a bit. This is subtle enough that it feels like the Chakram is horizontal, but it adds just enough angle that it looks a lot less flat. This is a technique that we use a lot in Blightbound.


While the main graphic of the Chakram is entirely flat, it's made more spatial by animating the pitch and adding particles and swooshes that move out of the plane.

The special effects shown in this blogpost were all made by Kees Klop, whose work I wanted to celebrate today. However, he is not the only special effects artist who worked on Blightbound: Koen Gabriëls and Luuk van Leeuwen also made a lot of VFX. Koen did most of the early work of establishing the style for the Blightbound effects. Currently Koen and his intern Ayrthon van de Klippe are working on making VFX for upcoming Blightbound updates.

Finding the right combination of 2D and 3D in the VFX for Blightbound was quite a search during early development of Blightbound. Our artists ended up combining a lot of different techniques, including hand-drawn art, frame-to-frame animations, meshes, particles, intersecting planes, screen distortions and even colour grading. I think the end result works really well in-game: it looks good, fits the style and communicates the gameplay well.

Saturday, 17 September 2016

A simple way to smooth angular trails

Last week I discussed our tools for making trails. One problem I encountered with trails is that they often don't look very good when attached to a character. Player movement in a platformer like Awesomenauts is not very smooth: all of a sudden you jump, or land, or turn around, and this creates a trail with lots of angles in it. For some effects this is fine, but especially for wider trails a smoother, curvier look is much better. Today I would like to discuss the smoothing algorithm I implemented to solve this.


Before I continue, here's last week's overview video of our trails again, since it also contains some footage of the smoothing:


Key when smoothing a trail is that the trail should always remain attached to the emitter (in this case a character). If the smoothing makes the trail detach from the emitter just a little bit, it starts to look floaty and incorrect. An artist can work around this by fading out the trail near its start, but this is not always desired. This makes smoothing a challenge: the emitter follows the player's angular movement but the resulting trail should not.

The trail must also look stable: it can't suddenly pop from unsmooth to smooth. The conclusion of these two requirements is that we must apply the smoothing over time instead of immediately or in one step.

The smoothing algorithm I came up with turns out to be really simple. It was inspired by how subdivision surfaces work on 3D mesh smoothing, but without the subdividing.


The basic idea is this: for each segment of the trail I calculate the position in between its neighbouring segments, and then move the segment a little bit towards that centre. On a straight trail without corners this means nothing happens: the segment is already in between its neighbours. But on a corner this achieves exactly what we want: the corner moves inwards a bit, rounding the corner.


By repeating this process every frame with very small steps we get a curve that over time becomes ever smoother. At first it only processes the corners, but every frame it grows to smoothen further along the straight parts as well.


To control the smoothing I've provided our artists with two settings: one sets how strong the smoothing should be, and the other how long it should keep smoothing. If you let the smoothing take too long the trail keeps deforming and starts looking floaty and unstable. What usually works best is to use quite a strong smoothing for a very short amount of time (around 0.5 seconds). This way it stops quickly enough that the player doesn't notice significant instability.

An implementation note is that we ignore the first and last segment, since those have only one neighbour, which happens to also solve the problem that the curve needs to stay attached to the emitter. A small but important detail is that not only the first and last segment should be left out of the smoothing, but also the second and penultimate segment. This is because in my version of trails the start of the trail moves with the emitter, causing it to start really close to the second segment, which gives odd results when smoothing. Something similar happens with the final segment.

Now that I've explained how it works, here's a short video that shows the impact of the various settings that control the smoothing:


A downside of this algorithm is that the strength of the smoothing depends on the number of segments. The fewer segments there are, the stronger the effect is. This means that if an artist tweaks the number of segments after having set the smoothing, she'll need to tweak the smoothing again.

The smoothing algorithm I've described here today gets the job done, is easy to implement and costs little performance. It's nice how sometimes seemingly complex problems can have such easy solutions. :) Next week I'll discuss the texture distortion caused by deformed polygons, which is a problem for both trails and normal 2D sprites.

Sunday, 11 September 2016

Creating crisper special effects with trails

Until recently most special effects in Awesomenauts were either animated by hand or made using particles. This seemed to give enough possibilities, until we played the gorgeous Ori and the Blind Forest, which has very crisp special effects. We analysed how they achieved this and one of the conclusions was that for many things that we would make with particles, they used trails. Trails are quite an obvious concept, but for some reason it had never seemed like a big problem that they weren't an option in our tools. So about a year ago I added trails to our engine.


How to implement trails seems quite obvious: it's just a series of triangle segments, what's interesting about that? However, when I started implementing trails it turned out there are quite a lot of different approaches imaginable. I went with one that's extremely flexible, but also sometimes slightly difficult to control for certain effects. Today I'd like to share how I built our trails tool and what the pros and cons are. But before I get to that, let's start with a video that shows the tools for our trails and what our artists have made with those.


The core idea of my implementation is that a trail is like a series of connected particles, called segments. Each segment has it's own position and velocity, and the trail is formed by creating polygons in between the segments. This is a fun approach: it makes things like gravity, waviness and wind really easy, since you can just apply those effects to each segment separately and then connect them. It also means that the trail automatically stretches when you move quickly, just like a trail should.


An interesting aspect is what to do when standing still. In the case of normal particles you would just keep creating them regardless of your own speed, but with a trail that isn't a good idea: connecting segments that are nearly on the same position results in jumpy segment orientations. My solution to this is to have a minimum distance between segments and only emit another segment if you've moved enough. Doing this naively does have a weird side-effect: you get small holes in between the starting point of the trail and the newest created segment. To avoid this I move the newest segment along with the position of the emitter until a new segment is made.


If no care is taken something similar would also happen at the end, where the tip of the trail just suddenly disappears when its segment times out. Here the solution is to smoothly move the timed out final segment towards the penultimate segment before removing it.

To avoid creating too many segments, the artist sets how many segments he needs. Since I already have this minimum distance between segments I figured this would also be a good way to limit the number of segments. However, I now bumped into another oddity: if you move really quickly you will create a new segment every frame. That means that the number of segments depends on the framerate. Our artists have fast computers and usually have vsync disabled so they often run the game at 200fps or more. They need to go out of their way to see what Awesomenauts looks like on 30fps or even 20fps. To avoid situations where artists unknowingly create effects that only look smooth and good on very high framerates, I've limited the maximum number of segments per second to 60. If on older netbooks the framerate drops below that you will still get less smooth trails, but the difference between 20fps and 60fps is much more acceptable than between 20fps and 200fps.

A fun option you get from treating segments as particles is that you can do more than just leave them. A normal trail only exists when you move, it's literally a trail. But why not shoot segments away, like you often do with particles? With some creativity this can be abused to create effects like flames (shooting segments upwards) or flags (shooting segments horizontally) and get a very dynamic look for them. I also added an option for gravity/wind to change the speed of a segment over time.

One of the most fun things when making tools is when artists (ab)use them to make things you didn't expect. Especially Ronimo artist Ralph is really good at this. He considers it his personal crusade to use every feature of our editors for something. The weirder the feature, the more Ralph considers it a challenge to use it for something pretty. So when making trails my goal was to feed the Ralph by making trails super flexible. For this reason I added four different ways of mapping textures to the trail, and two textures can be combined on a single trail:


When I showed the trails to our artists they immediately wondered whether they could make things like a hair or a cape with it. Doing so with a normal trail would result in a very elastic look: trails become longer and shorter depending on how fast you move, which is usually not desired when making something like a braid or cloth. To fix this problem I added a feature that gives the trail a maximum and minimum length, shortening or stretching it when needed. This turned out not to work too well. The minimum length gave really odd results, especially when the character is standing still, so I removed that feature altogether. The maximum length does work, but in practice it doesn't produce convincing hair or cloth movement, so our artists usually go back to hand-animating those. I think to make good hair or cloth you need a very different approach: those require a real physics simulation, instead of simply emitting segments like I do now.

On top of all of the things discussed so far we got a lot of additional flexibility for free: years ago I made the tools of the Ronitech (our internal engine) in such a way that almost anything is animatable, so our artists can change most of the settings of trails over time. This allows for a lot of fun additional possibilities, like varying the thickness of a trail over time, or making the colour pulsate.

My implementation of trails does have one main downside: textures aren't very stable. The constantly varying length of the first and last segments makes textures flicker a bit, even though I compensate to get the correct texture coordinates. Framedrops can also leave longer holes in between segments, which is not immediately a problem but again it makes textures slightly less stable. I think if I were to ever make another version of trails I would decouple the polygons from the segments, and just create the polygons at equal distances over the path laid out by the segments.

All in all I'm really happy with how our trails system turned out. The approach of treating a trail as connected particles makes some things slightly unpredictable, but it does give a lot of flexibility. I expect our artists will come up with some more unexpected uses of trails in the future.

In the next two weeks I will discuss two more specific aspects of trails: the smoothing algorithm I created to make angular movement produce very smooth and curvy trails, and how to solve the texture distortion that occurs when skewing a quad with a texture on it. Till then!

Saturday, 25 July 2015

Using key poses to prototype character animations

When creating a new game character it's crucial to get a feel for his in-game poses and movement as quickly as possible. During the visual design of a character you shouldn't just wonder how he looks, but also how he moves. If a character looks cool while standing still but bad while in motion, you have a problem. Not only is this a key part of a character's personality and look, it also helps discover problems early on. Maybe that big weapon is obstructing the dynamic actions your hero needs to do?

This is why our artists first draw key animation poses and throw those into the game as quickly as possible. During early development of a new character for Awesomenauts we playtest with just those key poses, without any animation. Less than 10 frames represent the entire movement set of the character. One frame for a jump, one for a fall, a couple for a walk, one for each attack, for sliding to a halt and for idling, and that's roughly it.

It's surprising how smooth and awesome a character can already feel with just one still frame per action. Doing this also has another benefit: the game design feels much more solid if a character isn't a box and doesn't look like some other character you already have in the game.

Of course, the phase after this is to create the actual animations. A finished character in Awesomenauts consists of hundreds of animation frames. But today I'd like to focus on the prototyping and concepting before the real animations are made.

Most of the characters we added to Awesomenauts during the past two years were animated by Ronimo artist Tim Scheel. Tim is a master at drawing dynamic poses and experiments a lot with the animations.

To show how this works I have dug into our archives and made a video of how Scoop, Nibbs and Rocco moved before they got any real animation. I think it's pretty amazing how powerful these already look!

Early animations of characters in Awesomenauts, using key poses only.

A nice thing to notice in this video is that Tim adds some quick in-engine squash-and-stretch effects to make it look a little bit more dynamic. This is especially noticeable in Nibbs' idle and attack frames.

Before Tim puts anything in the game he first makes animation concept art. This is just a sheet with a lot of sketches of what the various animations might look like. Here are the sketches Tim made for Rocco:

Click for high resolution

In Rocco's first gameplay design he couldn't move while doing special attacks. This allowed Tim to draw some really cool attack poses, as you can see in the sheet above. Later the game design changed and Rocco wasn't forced to stand still during attacks any more. This means Rocco needs to do his normal movement animations while doing a special attack, so the attacks changed from character animation to purely special effects.

A particular challenge when designing a character is the amount of detail. Awesomenauts has a strong cartoony style in which microscopic details don't really fit, especially since characters aren't that big on the screen. This means details that were in the concept art are often removed when the in-game version of a character is created. You can already see this happening in the concept art above: some shots have two little straps in the part around the neck, while others only have one of those, reducing the amount of detail a bit.

Rocco's scars were also a challenge: initially he had a scar on his nose but this turned out too small. The scar around his eyes was kept after making it a lot bigger to be more legible. The headphones had to go for a different reason: they had too little to do with Rocco's backstory and personality.

Another example of removing details can be seen below in Nibbs' animation concept art. Tn the bottom right you can see Nibbs' tongue hanging out while running. This is a little detail that I absolutely love: it makes Nibbs look so much more like an overly enthusiastic puppy dragon. However, it turned out to be too small and illegible in the actual game, so it was removed. How much detail there is, is an important part of any visual style, so this needs to be kept somewhat similar in all characters.

Click for high resolution

Another great example of animation influencing a character's visual design can be found in Ori And The Blind Forest, one of my favourite games of recent years. In a presentation at GDC animator James Benson mentions that Ori has a tale because it helped him show the direction of movement better. It's interesting to hear that a crucial element like a tail is there mostly because of the animation, not because of anything else. Be sure to check out this video of his highly interesting presentation!

Back to Awesomenauts! Because Scoop doesn't have legs, his walk cycle was a challenge. As you can see in the concept art below Tim drew a lot of poses for the walk cycle to try different things and find something that works.

Click for high resolution

When drawing game art one must never forget the goal of the art: to be used in an actual game. The requirements of the gameplay need to be kept in mind. In Awesomenauts this means that melee attacks allow for much more freedom than ranged attacks. Melee attacks are generally just an animation that plays, so Tim go do whatever he wants to make it look awesome. Ranged attacks however need to be aimed at the cursor, which means that the gun-arm needs to be able to rotate freely even during the attack. Not being able to animate the gun-arm is a huge limitation to the animations. Such gameplay limitations are important to keep in mind and this is why Tim enjoys animating melee attacks more than ranged attacks: more freedom!

(For those interested, in 2012 I wrote two blogposts about making 2D characters aim in all directions and about shooting animations in Awesomenauts.)

A couple of years ago I hadn't realised that animations need prototyping and playtesting just as much as any other part of a game. The video at the start of this post gives a great example of this. I hope you enjoyed seeing Tim's animation concepting as much as I did!

Saturday, 13 April 2013

Making everything animatable

Everything in our tools is animatable. Not just position, rotation and scale, but also things like colour, skew, taper, texture scroll and the number of particles emitted. This is a feature that I know from 3D Studio MAX and that I had been admiring for ages, so as a programmer I really wanted to come up with a neat system to build this. Being able to animate everything also happens to be really useful for our artists... ;) Today, I would like to explain how we built this.

You might already have seen our animation tools in the Ronitech tools trailer I made a while ago, but that was only a very short fragment, so here is a more complete demo of the animation capabilities of the Ronitech animation editor:


Before I continue, I should note that although I designed most of this system, the real credit should go to Thijs (at the time a coding intern at Ronimo, now a gameplay programmer): he implemented it all, figured out the nitty-gritty details, and built the editor's animation UI.

With so many variables that can be animated, we need a good way on the coding side to hide the actual animation code from everything else. In fact, ideally I would like to be able to just mark a variable as being animatable, and that's it. Relatively simple object oriented design allowed us to do just that.

To make a value animatable, we write a class around it called AnimatedFloat, which handles the animation and contains the data needed for that. This class is updated every frame, and whenever the value is used, we just ask for it in that class. Using our AnimatedFloat in a gameplay object looks something like this:

class WorldObject
{
    AnimatedFloat scale;
    AnimatedFloat rotation;
    TexturedRectangle* visualObject;

    void update(float time)
    {
        position.updateAnimation(time);
        rotation.updateAnimation(time);
        visualObject->setScale(scale.getCurrentValue());
        visualObject->setRotation(rotation.getCurrentValue());
    }
};

This works simple enough, and AnimatedFloat itself is quite straightforward to implement like this. There are a couple of things in this bit of code that we could try to improve, though. One is those calls to getCurrentValue(). This function returns the value that the scale has at the current moment in time. If we use the scale variable a lot, it might be cumbersome to call getCurrentValue() all the time. Luckily, there is a nice (and rather obscure) solution for this in C++: we can skip calling that function by providing a conversion operator in the AnimatedFloat class. Like this:

class AnimatedFloat
{
    float currentValue;

    void updateAnimation(float time)
    {
        //perform actual animation here and update currentValue
    }

    operator float() const
    {
        return currentValue;
    }
};

The operator float() there is a conversion operator and tells C++ what to do if we use an AnimatedFloat in a spot where a float was expected. It removes the need for calling the function getCurrentValue().

This is a simple and nice solution. However, in practice we ended up not using it in our code, because our AnimatedFloat also has a function getBaseValue() (for animations that perform a periodical animation around a base value), and we felt it was not clear enough which value the conversion operator would return.

A bigger problem in our current design is that it is easy to forget to update one of the AnimatedFloats in a class. If we forget to update it, everything still works, but the object won't animate anymore. With the large number of AnimatedFloats some of our classes have, this is an easy oversight, and forgettig it might not become apparent until an artist actually tries to animate something and it doesn't work. I would prefer it if we could make it so that it is not possible for the programmer to forget updating a single variable.

I imagine there is a solution for this using macros, but I in general I think macros are not very readable, so we avoid them whenever possible.

The solution we came up with, is that values are updated by another class: the ObjectAnimator. The AnimatedFloat itself can only be created by providing an ObjectAnimator. Now the programmer only needs to update the ObjectAnimator and cannot forget about individual variables anymore. It is still possible to forget to update the ObjectAnimator, but then nothing at all will be animatable, so this is much less likely to be overlooked. Our design now looks like this:

class ObjectAnimator
{
    std::vector animatedValues;

    void add(AnimatedFloat* value)
    {
        animatedValues.push_back(value);
    }

    void updateAnimations(float time)
    {
        for (std::size_t i = 0; i < animatedValues.size(); ++i)
        {
            animatedValues[i]->updateAnimation(time);
        }
    }
};

class AnimatedFloat
{
    //The constructor requires a pointer to an ObjectAnimator
    AnimatedFloat(ObjectAnimator* owner)
    {
        //The AnimatedFloat registers itself for updating
        owner->add(this);
    }
};

class WorldObject: ObjectAnimator
{
    AnimatedFloat scale;
    AnimatedFloat rotation;
    TexturedRectangle* visualObject;

    WorldObject():
        scale(this),
        rotation(this)
    {
    }

    void update(float time)
    {
        updateAnimations(time);
        visualObject->setScale(scale.getCurrentValue());
        visualObject->setRotation(rotation.getCurrentValue());
    }
};

The clue is that AnimatedFloat's constructor requires an ObjectAnimator. Without an ObjectAnimator, it cannot be created at all, so it is impossible to forget about it in WorldObject's initialiser list.

This is a nice example of a coding principle that is extremely important to me: code needs to be designed in such a way that common mistakes are simply not possible. Of course, this principle cannot be achieved in everything, but at least it is a good goal to strive for. In this case, by changing our class design, we have avoided a future bug that was very likely to happen quite often.

A big flaw in this design is that it currently only animates floats. In reality, a lot of our values are other things, like Colour, Radian and Vector2. The solution to this is to make AnimatedFloat templatised and to rename it to AnimatedValue. This is quite straightforward if you are experienced with templatised programming, but for any programmers less familiar with this weird part of C++, I'll provide a small example of roughly how that looks. Just think of a template as a type that will be filled in depending on what it really is. So T here can be a float, or a double, or a Colour, or whatever you want. In this specific piece of code, substitute the T with something that one can do math on, and it will still be good code.

template ‹typename T›
class AnimatedValue
{
    T currentValue;

    T getCurrentValue() const
    {
        return currentValue;
    }
};

class WorldObject: ObjectAnimator
{
    AnimatedValue‹float› scale;
    AnimatedValue‹Radian› rotation;
};

There are some details to this that make the real code a bit more complex, but the core idea remains the same. By using templates, we now have a single AnimatedValue class that can animate any kind of value that we can do math on.

There are several topics that I have completely ignored so far. The first is actual animation. However, I don't want to make this post too long, so I won't go into detail on that. Animations are calculated in the updateAnimation() function of AnimatedValue.

Another topic I have ignored is how to generate an interface for editing these values, how to save them, and how to even have complete undo/redo for editing animation details. That is an interesting topic by itself, so I think I might get to that in a future blogpost at some point.

Finally, there is the topic of performance. Updating all these animation objects uses actual performance, especially if our artists animate tons of values. I had to optimise our animation code quite a bit to still get a good framerate on consoles. In the end, this is a trade-off I seem to encounter all the time: in most cases, the more flexible a system is, the more performance it uses. Luckily, computers and consoles are getting faster and faster, so as this is only a small problem for us now, I have no doubt a couple of years from now the performance of systems like this will have become completely irrelevant in all but the biggest triple-A games.

The fun part of our animation system, is that it is extremely flexible, but at the same time rather simple to build and use. In that sense it is rather similar to our upgrade system for gameplay, which I explained in a blogpost last year. Our artists have made tons of animations with our animation system for Awesomenauts, and it contributed greatly to the lively feel that the game has!

Saturday, 9 March 2013

The character animation workflow for Awesomenauts

One topic that I have been asked repeatedly to write about, is how we made the animations for Awesomenauts. This is indeed a big and interesting topic, so today, I would like to discuss that in more detail!

I have previously shown how we make characters aim in all directions and shoot in all directions, but that did not explain the workflow and tools that our artists use to actually make those animations and put them in the game. Today's post will!

The core animation work for Awesomenauts is done in After Effects. This may come as a surprise to people who don't know the tool, since After Effects is mostly known as a video editing tool, but it is actually a great general animation tool.

It is also a big step up in comparison to Swords & Soldiers, which was animated in Flash. The biggest problem with Flash was that it only works well with vector-art. Our artists generally don't like working with vectors and would rather paint in Photoshop instead. This was especially a hot topic in our studio just after the release of Swords & Soldiers, because some commenters on the internet thought the stylised vector-art meant it was a small Flash-game that needed to be free. Flash is a great platform of course, but mostly known for small, simple games. Swords & Soldiers had way more content and polish than most Flash-games, so we felt insulted and wanted to make sure our next game had visuals that didn't remind anyone of Flash. This was an extra reason that we didn't want to use vector-art for Awesomenauts.

Another reason not to use Flash is that Flash is a rather basic animation tool. More advanced things just don't work as well as they do in After Effects. Looking for an alternative to Flash, we took a little detour around other tools before we found After Effects. We tried some things like Toonboom, but either the interface or the price were not to our liking. Then our former art intern Marlies Barends demoed After Effects to us and to our surprise it was exactly what we were looking for.

After Effects is only one part of our total animation workflow, though. In the end, we combined Photoshop, After Effects and our own tools and exporters to create this pipeline:


Note that although I was the architect of the technical parts of this pipeline, I did not actually write a lot of the code: that was mostly done by our programming interns Niels and Thijs. The art, of course, is all made by our great art team: Ralph, Olivier, Martijn and Gijs, and our more recent additions Koen and Tim. Especially Martijn came up with a lot of smart tricks to speed up the workflow in Photoshop and After Effects.

A particularly important choice here is how to make animations. There are roughly two approaches here. The traditional method is to animate frame-to-frame: the entire character is redrawn every frame. This creates extremely dynamic animation, but also costs an enormous amount of time. So we chose a different solution: the art is drawn in separate elements and these are animated by moving, rotating, scaling and deforming them. These transformations can be interpolated and thus it is possible to create a lot of frames in relatively little time.

After Effects is a great tool for this. Not just is animating basic transformation great there, but it also has tools to do skeletal animation (I believe with plugins, not sure) and, more interestingly, the so-called "Puppet Pins". Puppet Pins make it extremely easy to deform a shape, so that things like bulging muscles are easy and fast to animate. Puppet Pins are a simple concept, but also an extremely nice one, so if you never used them: be sure to give Puppet Pins a try!

Besides After Effects, the scheme mentions a lot of tools, exporters and converters. We made those ourselves and they come with a lot of features. I think they are a pretty impressive bunch, so I'd like to show this trailer of them again, which shows all of our editors in action:


The scheme above is a nice example of how complex game development really is. For an indie game, Awesomenauts is a very big production, but it is still small fries in comparison to the big AAA games like Uncharted and Killzone. Tons of development topics have many details to them, and making the wrong choices can cost so much time, that I can hardly even imagine the complexities of making something like the incredible new Killzone: Shadow Fall for PS4 (Dutch glory, woohoo!). Awesomenauts is small in comparison, but there are still many complex topics like this animation workflow. For example, I previously wrote a similar post about how we make level art for Awesomenauts, and that big scheme didn't even include any info on the foregrounds and backgrounds!

Looking at the animation workflow scheme, you may have noticed that the small image at the top shows concept art for alternative designs for Genji, the new Awesomenauts character that we released recently. Especially the Space Marine Butterfly is so insane that I'd like to show these a bit bigger:


Click for high-res

There are so many interesting details to all the parts of this workflow that I could talk about it forever, but I have to stop somewhere and I hope this blogpost gives a nice overview.

Now, let me get back to the waiting queue for Simcity! I have been looking forward to a new Simcity for years, so looking at a screen that tells me it is going to try to start the game again in 20 minutes is incredibly exiting!

Sunday, 11 November 2012

Introducing the editors of the Ronitech

If you don't feel like reading through this entire blogpost, be sure to scroll down to the video in the middle for a demonstration!

Those who read my blog from the very beginning, might remember a blogpost that went by the illustrious title Designing Levels Without Tools. When we made Swords & Soldiers, I was the only programmer at Ronimo, so I had to resort to drastic measures to be able to develop a complete console game in one year. The result was that our designers had a rather odd level design tool: Notepad... So much has changed since then! Awesomenauts was made with a larger team over a longer period of time and in this time we managed to make top-notch tools. So today, I would like to introduce the editors of the Ronitech!


We have three in-game editors, plus an in-game AI debugger, which can step through our AI trees. The in-game editors are a Level editor, a Particle editor and an Animation editor. Next to that, we also have an AI editor and a Settings editor. The latter is not in-game, but edits can be reloaded in-game at any time, thus still allowing for interactive gameplay settings editing. Note that the animation editor is not used for actual frame-by-frame animation (our artists use After Effects for that), but for adding particles, effects, sounds and game-triggers to animations.


At Ronimo we are firm believers in iteration. We think it is impossible to make final designs of any elements beforehand. Everything needs to be tried in the actual game, and then tweaked to make it work best in the game. Of course, if you make a clone of an existing game, it is possible to design everything on paper, but if you want to do any kind of innovation, then iteration is extremely important.

For this reason, one of the core principals of our tech team is that our designers and artist must be able to tweak everything as easily and quickly as possible. Now what is easier than tweaking during gameplay? With this in mind, most of our editors were implemented inside the game, instead of externally as is common for most editors.

When an editor is opened by simply pressing F1, F2, F3 or F4 while in a game, the game pauses and the editor overlays come up. Artists and designers can switch between our editors and the gameplay at any point, and can even continue playing while in the level editor. (This is of course disabled in the released game. We almost forgot about that: the editors were turned off in release versions only one or two days before we launched the beta of Awesomenauts on Steam...)

The editors were made over the course of four years, mostly by interns. I made the core components of the in-game editors myself, but from there our interns Ted, Niels, Bart, Thijs, Eric and Rick worked on them to really turn them into a useful and rich toolset. They did a great job, and Thijs and Ted actually now work at Ronimo.

Our editors have a ton of features, including:
  • Game can be played while editing
  • Several artists/designers can edit the same level at the same time over the network, seeing each other's edits in real-time
  • Complete undo/redo
  • Everything is animateable
  • Edits to animations or particles are immediately reflected during actual gameplay
  • Graphics look exactly the same on all platforms, so artists can comfortably work on their PC and don't need to use the more laborious console devkits
  • AI debugger

Of course, none of this is as interesting as actually seeing the editors in motion, so here is a video that demonstrates the core features:


One of the funniest features is in the editing over the network. During a six-player match of Awesomenauts in our office, our designers can open the level editor at any given time and tweak some stuff. This is great to fix a misplaced platform or something like that, but it can also be abused nicely. At one point, one of our designers got bored and started to slowly rotate the entire level while the rest was still playing in it. Chaos and hilarity ensued...

Having the editors in the game does have its downsides. Gameplay code is more complex because editor and game are so intertwined. Another issue is that everything needs to be able to be updated at any time, which makes some optimisations impossible. Building our editors this way definitely cost us some performance, but with a lot of optimisation work I did manage to get proper framerate: Awesomenauts now mostly runs on 60fps on Xbox 360 and Playstation 3, and rather old PCs can still run it fluently.

I expect some Awesomenauts players who read this will wonder why these tools are not available to them to make mods with. The main reason for this is that modding doesn't really work without a proper modding infrastructure. You need to be able to share your levels online, and play with others online. Getting this exactly right is a lot of work, because we need to take care of things like people having different versions of the same level and such. So turning our in-house tools into a functional modding toolset would be an enormous amount of work...

In future blogposts, I will dive into some of the specifics of our editors, explaining the most interesting aspects of how these tools were made and how our artists use them to make animations and such.

As you might have guessed from the text in this post, I am incredibly proud of the tools we have today. I think in the world of 2D games, few companies have better tools than this (of course, the Rayman folks probably easily beat us there...).

Saturday, 8 September 2012

Shooting animations in Awesomenauts

A challenge that is faced in the development of many games, is how to animate shooting, and other actions that can happen at the same time as general movement. In Awesomenauts, the player can shoot while walking, standing still, jumping, falling and sliding. How to make animations for this?


The first idea might be to simply make an animation for each combination. This means animating both walking+shooting, walking+sliding, walking+jumping, etc. This is a lot of work, especially since in the console version of Awesomenauts, characters need to be able to shoot in 5 different directions. That is just a lot of animations.

And that is not even the worst of it. The real issue is that this doesn't actually work. The player can shoot at any moment in time. This means that shooting can start at any point during another animation, not just at the start of an animation. So if the player is already halfway through his current walking animation, then the walking+shooting animation will not connect. Either the shooting has to be delayed until the walking animation has finished, or the feet will shuffle every time the player shoots (which in most games is very often). Both are unacceptable, as shuffling is ugly, and delaying destroys the responsiveness of the controls.

The common solution to this problem, is to split the upper and lower body and animate them separately. However, as I explained in last week's blogpost, our character designs were not very fit for that. And since Awesomenauts is a 2D game, we also don't have any bones to do animation blending on parts of the body, as is commonly done in 3D games.

So we had to be more creative. We came up with a combination of a couple of techniques. Our solution is somewhat hacky and weird, but I am pretty happy with the result, and the amount of time it took to make was quite acceptable.

Our solution on console consists of two parts. The most visible part is the shoot effect. Whenever the player shoots, an effect is played at the position of his gun. This effect usually contains a light flash and particles, as is very common when shooting in any game. The trick here is that we exaggerate these shoot effects to compensate for that the character's body itself is not playing an animation when shooting.

From there our artists took this even further: some shoot effects contain body parts that are drawn on top of the character. This essentially means that the gun of a character might be visible double during the shooting, but since it goes so fast, the double is not really noticeable (unless you read this blogpost and start looking for it). The recoil animations this makes possible look much more natural and powerful.

The other part of our solution in the console version of Awesomenauts is that we skew the entire character based on his shooting direction. Skewing is a rather crude effect to apply to an entire character, and looks horrible in slow-motion, but when seen at the speed of the actual game, it actually looks like a recoil effect and looks pretty good. Depending on the shooting direction, we also sometimes squash the character instead of skewing him.


This video shows how the combination of a shoot effect and a skew works out in the console version of Awesomenauts, both at normal speed and in slow motion.

This technique works fine for the short burst that each shot is, but doesn't work for some of the longer skill animations. Here we got lucky: most of those don't allow the player to walk while performing them, and many don't have specific aiming either. Clunk's Bite skill is a nice example of this, and was thus pretty straightforward to animate.

The most difficult one here is Lonestar's grenade throw. He can charge this while moving around, and throwing requires an animation in the arm. Luckily, our artists came up with a really simple solution to this: they animated him with his feet of the ground, as if jumping to throw that grenade. This works fine both when Lonestar is in the air, and when he is on the ground. Similarly, Yuri's skills are animated with his jetpack turned on, also resulting in his feet being off the ground. Note that when looking really closely, solutions like this might not look perfect. However, when actually playing, they look totally fine, so I think this was a pretty smart solution from our art team.


A couple of examples of how some of the longer animations simply use a jumping pose to solve the problem of mixing the animation with free movement.

While reading this, you might have noticed that I am constantly talking very specifically about the console version of Awesomenauts. This is because on PC, we separated the arms from the body (as I explained in last week's blogpost), and that suddenly makes it a lot easier to do some proper animation while shooting. So on PC, characters have proper recoil in their arms while shooting. Most characters also still have their skewing animations, and the combination of gun recoil, shoot effects and skewing looks great, in my opinion.


Some examples of shooting animations in the PC version of Awesomenauts, where arms are separate objects and can thus have proper recoil animations.

For the moment this is the last blogpost in this short series on animation in Awesomenauts. I would like to get back to this topic later, to talk about our tool chain and the way in which our artists create animations, but for the coming weeks I have some much more exciting topics to pester you with. I have some cool footage coming up of a cancelled Ronimo project (in my opinion a lot cooler than the previously discussed Monstertruck VS Zombies). And, even more exciting: next week I will announce the new hobby-project I am working on! My new hobby project is the weirdest thing I have worked on so far, so be sure to check out it's reveal next week! ^_^

Friday, 24 August 2012

Making 2D characters aim in all directions

In Awesomenauts we have characters that can aim in all directions. How does that work? In a 3D game this would be quite straightforward: you just make animations in a couple of directions and blend those. Blending angles of bone-animations is a really simple thing. To make it easier, you might animate the upper body and the legs separately and blend those parts as well.

In 2D, however, this is a wholly different story. Awesomenauts characters don't have bones: the game simply gets a series of frames for each animation and shows those in order. So how to do this, then?

We started by having a look at several other games. An older game that solves this problem, is Abuse (1996). Looking at footage from that game, I think what they did is that the upper and lower body are animated entirely separately and then combined in the game. The legs just do the walking and jumping and such, and totally ignore the aiming. The arms have been drawn for each aiming direction they support, which I think is as least 16 directions. I get the idea they did not actually animate the arms: they just drew one frame for each direction, and then move the entire frame up and down with the lower body to keep it from being too static. Not sure if this is actually the case, but that is what I think they did.


Another solution can be found in Capsized (2011). Capsized also splits the body at the waist, but to get the aiming directions for the arms, they simply rotate the entire upper body. This is a pretty smart solution, I think, and it rotates very fluently. The character can aim in all directions with very little animation work involved. At the same time it doesn't look very natural, since the upper body very clearly just rotates as a whole, arms and head included.


Aiming animations in Capsized. Note the smart trick they did with the lower body: it contains a bent back that becomes visible when the character looks down. It also glitches a bit at the front when the character looks up, though.

Both Capsized and Abuse have in common that the character has been split at the waist. However, when we were working on this, we already had several characters that didn't have a clear waistline (like a belt or something like that), making it difficult to separate them easily. Since our artists had already rebuilt the first characters several times at that point (they were also exploring After Effects as an animation tool around that time), we decided to not do another redesign with a clear waistline, and to not rebuild the characters in After Effects for this.


By this time, for gameplay reasons we had already decided that characters could only aim in angles of 45 degrees, and could not aim backwards. So the player could aim in only 8 directions. This made the animation problem a lot simpler. We chose to simply animate the character in each of the directions. So for each animation (walk, idle, slide, jump, fall) our art team made animations in each direction. Since the player cannot aim backwards, and since some combinations cannot be done with our control scheme (like walking and aiming straight up), our art team had to make around three directions for each animation. This works great and looks very smooth, as you can see in the video below.


Animations in different directions in Awesomenauts on console. Note how having completely separate animations allowed our artists to do cool stuff like showing Lonestar's teeth and eyes or Froggy's tongue under certain angles.


However, when we got to porting for the PC version, this turned out to not work for that. On PC the player was to aim towards the cursor, and capping that to 45 degrees plays horribly. To solve this problem, our artists were forced to rebuild all animations in a different way. Since some of our characters still didn't have a clear waistline, the choice was made to make only the arms freely rotating. So on PC, the shooting arm always rotates towards the cursor.

Combining this with what we already had, turned out to look fantastic. There are a couple of reasons for this. First of all, our artists had drawn all characters somewhat from the side and with the shooting arm at the back. This means that the rotation point of the arm is always hidden behind the shoulders, thus nicely hiding the ugly rotation point of the arm. The other great thing is that the 45 degrees animations for the body combine well with this: while the arms rotate freely over 180 degrees, the body makes jumps every 45 degrees to follow that. This looks really slick, and makes sure that if the character is aiming upwards, he also looks upwards. This is really important for making it look convincing.

Our art team did have to add the missing directions, though. So now we needed 5 directions for each animation (5, not 8, because our characters still cannot aim backwards).


Aiming on PC is a combination of a freely rotating arm and the 45 degrees body animations from the console version.

Making all of these animations was an enormous amount of work, and part of the reason why Awesomenauts took so long to make. However, seeing the end result, I am incredibly proud of what we achieved, and I think our art team really did a tremendous job.

For the next blogpost, I would like to discuss an important related topic that wasn't covered today: shooting. How to combine shoot animations with a moving character that needs consistent leg movement? We used a couple of quite clever tricks for that (or so I like to think), so I will explain how shooting was made in my next blogpost. See you then!