This December marks a big step for both Galaxy Grove and me personally; a step that I have been working towards for a long time.
When I left my previous studio Ronimo in 2021 it was to found a new studio, where I would be creative director and CEO. I had lofty goals for my new studio Galaxy Grove:
Make great games
Stay within budget and meet deadlines
Specialise in one genre (management games)
Build a great team
Be good to my employees
Be part of the game dev community
Multiple teams working in parallel
Yearly releases
Be ambitious on the business side
Become a beloved brand among gamers
Last year with the release of our debut game Station to Station we achieved the first two: a great game (90% positive on Steam), on time and within budget.
While Station to Station was a puzzle game masquerading as a management game, the game we have in production now is a real management game, achieving #3. It also proves we are achieving #4: I am not writing a single line of code this time and the game is turning out great due to our great team!
As for #5: whether I am good to my employees is not for me to judge, but I work hard for this and I feel I provide a warm and healthy work climate without crunch.
To give back to the community (#6), I share knowledge and experience wherever I can. Some examples are that we organise the NL Unreal Meetups every quarter, that I am a mentor in the Dutch Games Association mentor program and that I do talks and projects at game schools.
That brings me to the big step forward I mentioned at the start of this post: our new colleagues Ramon Huiskamp and Jordy van Opstal joined the team this month to start prototyping on another new game. I am very hyped for what they are making and very excited that this now officially achieves #7, making us multiple teams working on multiple games in parallel. It also sets us on the path to #8: yearly releases starting 2025!
As you can tell, I have in general been very ambitious with the business of running this studio. There’s something big on that side in the works too. So I hope to have something to announce for #9 in a few months as well… fingers crossed!
As you might have heard, at Galaxy Grove we've recently signed a publishing deal for our next game. Hurray! In today's tough game financing market, that's quite an achievement and really something big to celebrate.
At the same time, a lot of studios are really struggling getting financing. So I've received a bunch of questions from people who asked for tips. Heck, even an absolute industry legend, who made some of my favourite games of all time, asked for tips for getting funding because he so far wasn't able to raise the money to get his new studio off the ground. I was of course incredibly honoured by this and definitely went all fangirl on him during our call. (In between the fangirling I did attempt to share some useful experiences.)
So, since apparently people are curious how I managed to get a deal, I figured I'd share a slightly expanded version of the tips I've been giving people. I have a lot of experience with this topic, doing this kind of stuff for 17 years now, so I hope sharing some of my experiences is useful!
Expectations
Spend a crazy amount of time on pitching. Getting a deal is a nearly full-time job for one person in the team for the next six months.
Expect things to go slowly. My most recent deals took respectively 4 months and 5 months from first pitch to signing, and that's fast. Assume it will take longer!
If it's taking more than 8 months to get a deal, you are either not pitching hard enough, or your pitch is not good enough. If it's the latter, rethink your pitch and game. Maybe the prototype isn't good enough yet? Maybe the budget is wrong? Maybe the game just isn't a good idea in the first place in today's market?
If you are part of a team, the rest of the team should keep working on the game while you are pitching. This way if the pitch isn't taking off, you have a better prototype a few months later. Or they can make a different prototype as a back-up plan. In my case, the first prototype I pitched with got signed, but we did make a much more advanced prototype in the meanwhile. If I hadn't been able to get a deal signed, I would have used that for re-pitching everyone.
Expect publishers to be quite vague in their communications and don't draw conclusions quickly. Like not replying for two months and then suddenly claiming to be super enthusiastic. Or being super enthusiastic and then suddenly not replying anymore. When I got our new game signed, I sent the publishers I thought I had an active conversation with an email that we had already signed with someone else. Quite a few of them replied that they had already denied the game but had forgotten to tell me. So don't assume much during the process!
Keep pitching and chasing until a deal is signed. Publishers can bail out at any point in the process, so if you think one publisher is super enthusiastic, that's no reason to stop chasing the rest. Also, if you happen to be super lucky and get several offers then you can pick the best offer, or even play them against each other to get a better deal. I've heard rumours that this is a really nice position to be in, but getting several offers is extremely rare in my experience.
Getting meetings
Pitch to everyone and everything, don't be picky. The chances of a match are low, so don't pitch to just the coolest folks out there. A less successful publisher who funds your game is still a win compared to not having the money to make your game. Also, publishers are constantly changing strategy, so it's very hard to know whether it's a match until you talk to them. I know publishers are currently being swamped with pitches so they might not like this bit of advice, but without good public information on what each publisher is looking for (genres, budget range, release windows) the best tactic is to just pitch to as many as you can.
Use MeetToMatch as your primary thing for setting up meetings. They are not the official Gamescom thing, but they are the thing almost everyone uses. There is no alternative, you must use MeetToMatch. (Full disclosure: I personally know the MeetToMatch folks quite well, but I'd give this advice regardless.)
Start requesting meetings on MeetToMatch 4 weeks before Gamescom (or whatever event you're attending). I know, I'm posting this 1.5 weeks before Gamescom so that's too late, but then at least get started as quickly as possible.
Get as many meetings as you can at each event. At GDC I went absolutely crazy and had 40 meetings in 4 days. If you've got the stamina for it, get as many as you can! 40 meetings is a bit much compared to what others do, but definitely aim for 20+ meetings per event. Just request a meeting in every 30 minute meeting slot on MeetToMatch. Depending on the quality of your pitch, a lot of them will decline the meeting anyway, so just try to fill every slot initially.
When requesting a meeting, immediately include good materials. Publishers get as much as 10 meeting requests per 30 minute meeting slot (crazy!) so your first message needs to have the info they need to decide whether they want to meet with you. I personally include a gameplay talk-through video (4 minutes of cut gameplay footage with my voice explaining and selling it) and the pitch deck.
If you know someone at a publisher, use that for a direct email. If not, ask around or fill in the form on their website. Or just use MeetToMatch. Or all of them. Don't be shy, don't be lazy, be aggressive (but kind and respectful!). I personally did 71 pitches to get my current game signed and 50 for the previous one. About twothirds actually had a meeting, but there were also quite a bunch where I only filled in a form on their website and they responded based on that (or not).
If you can make a call or meeting personal, do that. For example by saying you played one of their games and liked it, or congratulating them with a recent successful launch.
Follow up afterwards, and chase with follow up emails a few weeks after the initial meeting. A good way to make chase emails less begging ("please reply I'm so desperate") and more fun ("look at this cool stuff!") is to give them the form of an update. "Hi, how are you doing? We've made some cool new concept art that I'd like to share! Oh by the way did you have time to dive into our pitch yet?"
The pitch
Do real market research. What is the revenue potential of your game? I personally use SteamDB's sales estimates for that. SteamDB is often a factor two too high or too low, but if you check a bunch of games in your genre it gives a fine idea of potential revenue. I've seen a bunch of studios go bankrupt in the last year because they had a great game but the budget was too high to have a good chance of making the money back. No one will sign a game that isn't expected to make it's money back.
There are plenty of talks online about what a good pitch deck looks like, and there are also some collections of successful pitches online for reference (for example this one). Do the research and make an excellent pitch.
Practice your pitch and ask a lot of people for feedback. My pitches get feedback from at least a dozen people before I start pitching.
Put your pitch deck on Google Slides and send a link so you can update it after already having sent it. Also, this allows putting videos and GIFs directly into the pitch deck.
Ask publishers what they are looking for, including genre, budget range and release period. If you can, tailor your pitch to that. For example, it's great if you can have two versions of the pitch, one with the ideal version, and one with a significantly lower budget. I hardly did this because I struggled with the logistics of knowing what version to use, but if you can show the right one based on the publisher's budget range, that's ideal.
Above all, make sure that your pitch materials and demo convince publisher scouts of these things:
That the game is fun.
That you can actually make the game.
That the game has a good chance of making way more money than the dev budget (market research!).
That there's some kind of X-factor in the game that will make it easy to market and sell. This X-factor can be anything: innovation, targeting an underserved niche, graphics, higher quality than the competition, etc.
If you have past experience in the games industry, be sure to brag about it in your pitch! In fact, if it's strong experience, it might be good to mention it in the first sentence of your emails! For example, I often lead with mentioning that we are the developers of Station to Station (90% positive reviews on Steam!).
Bookkeeping
Take extensive notes of all communications with all publishers. If you pitch to a lot of people, you'll start forgetting details more and more. After pitching two games I now have a document with 76 (!) pages of notes on conversations I've had with publishers. This greatly helps me in personalising emails and in quickly knowing for each one how long it's been since I last talked to them.
Whenever you see an indie game or hear of one, check who the publisher is. If it's someone you don't know yet, add them to your document.
Whenever you see a game, check how well it's selling. This way you'll build a good intuition for what works. And to be even more ahead, check whether unannounced games are high in the Steam top wishlisted list on SteamDB. (If you're on other platforms, SteamDB doesn't work, but there are ways to get an idea of sales anyway. Don't ask me though, since Steam is my primary platform so that's what I know.)
So, I hope this was interesting! If you have further questions, feel free to ask them in the comments, or to contact me on LinkedIn. I'm always happy to help fellow devs! And of course, if you disagree or have additional tips you'd like to share, please do comment!
PS. I'm coming to Gamescom to talk about our future games and studio plans. If you are a publisher or investor (including angels) and are curious what we're up to, be sure to send me a message on LinkedIn or propose a meeting through MeetToMatch!
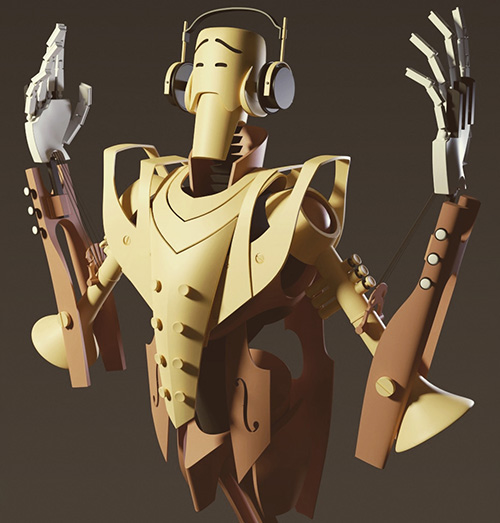
Today I'd like to share some fun, slightly unconventional techniques I used to make the Robo Maestro robot in Blender. I wanted shapes that are both smoothly curved and tight industrial. Hard surface modelling! I think it turned out well, so let's have a look at how it was made!
The concept art I was going by is this rough sketch by Robin Keijzer, creator of the awesome point and click adventure Space Rescue (available on Steam, NSFW!). As you can see, all shapes are a combination of curves, straight lines and hard edges.
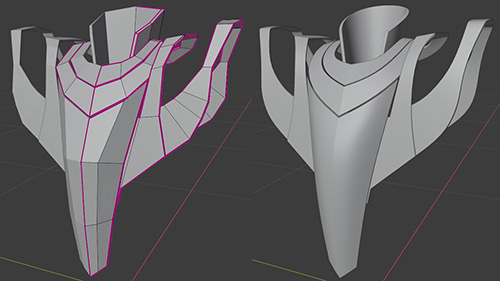
Subdivision modelling is a great way of making these kinds of curves, but it's a bit cumbersome when you need hard edges and corners as well. The tip you usually see for getting hard edges is to add supporting geometry: extra vertices around hard edges.
However, the more vertices you have, the harder it is to change the shapes: the model becomes unwieldy. Also, the fewer vertices, the smoother the curves you get. So I really really wanted to have as few vertices in the base model as possible for the best smooth curves.
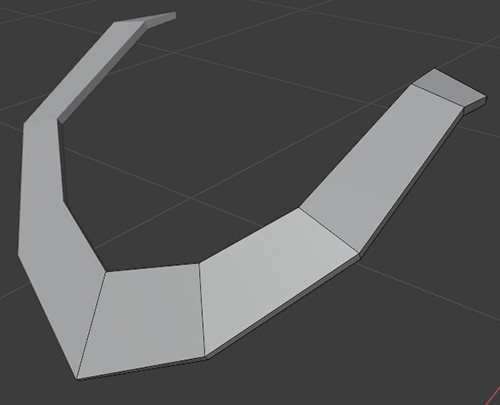
Here Blender comes to the rescue! It has a wonderful feature called "creases" that lets you mark edges that should not be smoothed by the subdivision modifier. This lets us combine hard edges and smooth curves with very few vertices in the base mesh. Very cool, very handy!
Here you can see just how few polygons the base mesh for the Robo Maestro has, and how smooth the curves are that that results in.
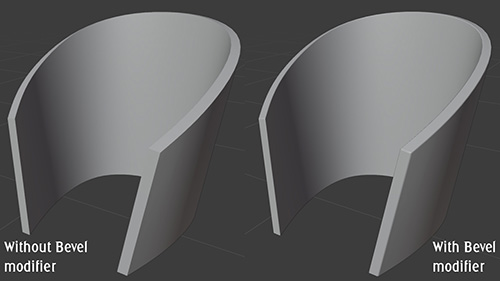
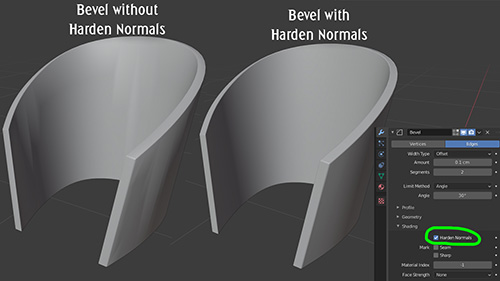
However, 100% hard edges feels cheap and fake 3D. For high quality models, we want to slightly bevel the hard edges. Luckily, Blender can also provide this: we can simply add a Bevel modifier to do this automatically.
The bevel modifier by default is either one hard edge (still not perfect) or more edges. Adding more edges makes Auto Smooth kick in, which makes us lose a lot of the tightness. The "harden normals" option fixes this (by not using interpolated normals on the bevel edge).
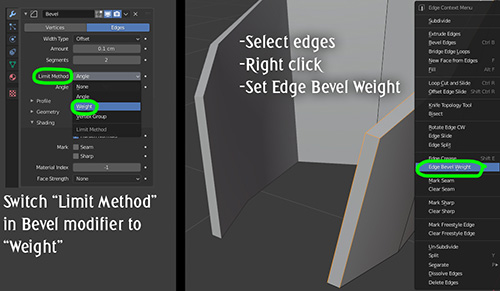
The bevel modifier automatically looks for edges to smooth, but sometimes it gets it wrong. In such cases switch the "limit method" to "weight". Now we can mark edges that need a bevel in our base mesh, and we can even mark per edge how wide the bevel should be. Neat!
Being able to mark edges and vertices with special features that are used elsewhere is one of my favourite features in Blender. Besides "crease" (for subdivisions) and "bevel weight" there's also "seam" (for automatic UV mapping) and "sharp" (for smooth shading).
Combining these techniques I was able to create the Robo Maestro pretty quickly and still remain flexible until the last stages of modelling: Robin had some feedback on the shapes and I was able to change them very quickly because the base meshes have so few vertices.
Finally, if you were wondering what this model is for: Robo Maestro is a procedural music toy that I'm developing for Steam. He even plays the actual notes with his fingers! Here's a little trailer that shows the concept. Wishlist Robo Maestro now on Steam!
Play with music like never before! Robo Maestro is the 'game' I'm currently working on and it's a procedural music toy. Guide an endless stream of new music or make detailed tweaks in Editor Mode. Create songs, be inspired and share your creations. Robo Maestro is coming to Steam, add it to your wishlist here!
Robo Maestro is a revolutionary new way of creating and experiencing music. You tell it what you want, and then the Maestro automatically generates music that fits that. Playing Robo Maestro requires no music knowledge at all: just have fun and hear what happens! Guide the Maestro and create awesome music together with it!
Lots of games and game concepts are very similar, very derivative. Partially that's because people make more of what's successful, which is sound business. But partially it's also because of a lack of inspiration, or taking inspiration from the wrong sources.
This is because most game creators get their inspiration from the same sources: other games, action comics, action movies and sci-fi/fantasy books. Thus many creators get the same ideas. To get truly original ideas, you shouldn't look at the same things as everyone else.
What other things inspire you? Please share in the comments below!
For me, modern art museums are the biggest source of inspiration, especially early 20th century stuff. I don't like it all, but it often triggers my creativity. For example, this painting by Kandinsky was the main source of inspiration for Proun at the time.
So let's play a little game. Look at the painting below, and try to imagine a game that looks like this. What would that play like?
(This beautiful painting is by Ludek Tikovsky and was exhibited in castle Groeneveld.)
Oh by the way, I'm trying a new format for my blogposts: super short and focussed on Twitter. I'll repost them here as well, as I'm doing now. Any thoughts on this new format, or tips?
After 14 years at Ronimo, I’m leaving the company I co-founded. I’l keep making games, but starting this months it’s on my own (and in the future maybe I’ll start a new studio). This news makes me both very sad and very enthusiastic. Sad that I won’t be working with my amazing friends at Ronimo anymore; enthusiastic that I will have total creative freedom to make exactly what I want to make. Today I’d like to share why I’m leaving, and what I’ll be doing next.
The reason I’m leaving is that I want the creative freedom to carry out my own ideas. I have tons of concepts for games, music and art, but I can’t execute them at Ronimo. I might have had a leading role at Ronimo as technical director, producer and co-owner, but when it comes to creative choices, Ronimo is a pretty democratic company: everyone has input on creative choices. That’s great for the creative process: tons of ideas bubble up and stuff that a lot of people are enthusiastic about makes it into the games. However, with 7 founders and a dozen employees that means that my actual creative say wasn’t that large. Especially since Ronimo makes only one game every 3 years.
That used to be fine for me since I had a creative outlet in my spare time. I made Proun, Cello Fortress and The Ageless Gate that way over the years. However, three years ago I became a dad and this has reduced my spare time a lot.
I solo developed Proun and Cello Fortress in my spare time, including code, design, music and 3D art.
The trigger for me to decide to leave Ronimo was a conversation with my wife, Marissa Delbressine. I always write down my ideas in my notebook. However, this became pretty depressing when I realised that I didn’t expect to be able to do anything with all those notes. So I said to Marissa: “I might as well not write down my ideas anymore, since it feels so useless if I can’t do anything with them.” This made her very sad, more than I had expected. Marissa is a creative person herself (she’s a comic artist, currently publishing The Shadow Prophet on Webtoon) so she could imagine the pain of telling yourself not to be creative anymore.
Marissa’s response got me thinking: maybe instead of dropping my own ideas, I should quit Ronimo instead. But I also didn’t want to abandon my friends. So in Autumn 2019 I told the other founders of Ronimo that I wanted to leave, but that I wanted to first finish Blightbound with them. They were sad to see me leave and tried to convince me to stay, but they also supported me in wanting to follow my own path. Their response was heart-warming to me. After all these years the co-founders are still my friends, but I will see them a lot less now. I will miss them dearly, as well as the rest of my former colleagues at Ronimo.
The 7 founders of Ronimo back in 2007, a few months after we founded the company. I'm on the left, lacking both a beard and grey hair back then.
Since people often leave their company because of frustrations or disagreements I would like to stress that that’s not the case here. I just want full creative freedom to explore my ideas, and that’s the only reason for my departure. I still love the folks at Ronimo and I plan to keep hanging out with them regularly (well, once the current pandemic dies down, I guess).
When I first talked about this with the other founders, we still thought I would be able to leave Ronimo in Summer 2020. But Blightbound got delayed and I decided to finish the game with the team. Then the game got delayed some more, and we agreed to set a final date, since I got restless as my departure kept moving. That date is now. As of this month I don’t actively work for Ronimo and I don’t have any management responsibilities anymore.
So, what will I be doing next? I mentioned I had tons of ideas, so I won’t be spending any time brainstorming or soul-searching. Instead, I’ve started already. My plan is to spend the next year learning new tech and skills and doing a bunch of smaller projects. After that I want to start making a bigger game that will hopefully be the start of a new studio.
I’ve already taken the first step last week: I’ve finally released my album The Ageless Gate. I’ve been working on this album for years and it’s great to finally get it out there. It’s available on all the streaming
services, with links to all of them here. The Ageless Gate is an instrumental concept album with lots of cello and a narrator that tells an overarching story in short fragments at the starts of the songs. It’s quite a unique thing and I hope it will find an audience!
Here's a preview of Sandrider, an intense cello trio and the opening song of The Ageless Gate.
As for the coming year, for now these are the smaller projects I intend to do:
Finish the Steam version of Cello Fortress. This should become playable with any musical instrument (instead of just cello) and won’t require an audience to play against anymore.
I’ll apply for a government grant to experiment with my procedural music system and to turn that into a streaming radio station.
Make a minimalist railroad building game.
Make a crowd physics puzzle game with ballet and monsters, inspired by the art of the Dufy brothers.
I also intend to learn a lot of new stuff. The main big things will be switching to Unreal Engine and Blender and learning the ins and outs of both. I also plan to expand my knowledge of UI design, design of management games and economies, task-based multithreaded programming and data-oriented code.
Then later on I hope to start working on a bigger 3D management/building game. I have a bunch of concepts for such games lying around and I currently tend towards one of the sci-fi ideas. I hope to build a bigger studio around this, focussing on high-quality 3D management games, similar in production value to games like Frostpunk, Planet Coaster and Two Point Hospital. I hope I’ll be ready to start pitching to investors with that in a few years.
It will undoubtedly take quite a while before all of these plans start making me a decent income. However, I’ve always been rather frugal, so I’ve collected enough savings that I can survive on those for long enough.
One thing you can see here is that I plan to do a LOT. Way too much, probably. I think this is going to be my biggest challenge from now on: keeping the scope of my projects small and limiting my expectations of how much I can do in a week. For years I’ve bottled up so many ideas and plans that I want too much too fast now. I’ve noticed that I’m already experiencing some stress because of how much I want to do, so keeping my plans realistic and doable in a chill manner is going to be my biggest challenge.
A clear split between work and leisure is going to be paramount to that, since up until now my hobby projects were my leisure. Now that they’ve become my work, I should make sure to not become a gamedev monomaniac. I’m sure my wife and son will help keep me grounded though, so I expect this will turn out fine.
I would like to conclude by thanking all my friends at Ronimo for 14 years of great fun. Thanks for everything I’ve learned from you and thanks for sharing all the lows and highs of making games together. I’m sure I will miss the banter and the laughter at the office most!
On my last day at Ronimo, the art team chose me as the theme for their biweekly sketching session. I love the resulting portraits! Art by, from top to bottom: Gijs Witkamp, Koen Gabriels, Ella Kremer and Gijs Hermans.
On Friday I released my album The Ageless Gate! It's my atmospheric debut album with instrumental music and lots of cello. Together, the 13 songs tell a tale that spans three centuries, starting with a mysterious artefact and culminating in a gate to another world. The story is told by short text pieces in between the songs, voiced by voice actor Chris Einspahr.
The album is available on all the major streaming services (Spotify, Apple, Amazon, Tidal, Deezer, etc.). I've also made a deluxe CD edition in a limited pressing. Links to the different places where you can listen to the album can be found here:
For the cover of the album I combined a cello bridge with a sci-fi portal, bringing together the musical core (cello) and the storytelling theme of the album.
My cello is the foundation of the album, which varies from cello trios to songs with cello, drums, guitar and keyboard. The sound goes from melodic and euphoric to dark, pumping cello rhythms. Cello is mostly known as a classical instrument and a background instrument, but it’s so much more than that. For this album I really enjoyed experimenting and exploring the possibilities of the instrument. My favourite examples of that are the fast arpeggios in the opening track Sandrider, and the gliding chaos tones in Approach of the Derelict Research Station.
Here's a preview of Sandrider, an intense cello trio and the opening song of The Ageless Gate. The image shows the CD edition of the album, which can be ordered here.
I've worked on my album for 3.5 years and it's great to finally have a complete thing, with the storyteller, the art, the music and the production all working together to create one coherent whole. It started out as just a bunch of songs, but as I wrote more of them I realised they could be telling an overarching story. From that point on I started writing that story and also changing some of the compositions to make them work in the bigger whole. For example, A Century Flies By and A Century Sails By started out as one song, and I split them into two short related pieces since I liked them as bookends in between the chapters, marking the passage of time.
The story plays out in different time periods, as is seen on the back of the CD edition of The Ageless Gate.
While working on the album I learned a lot about composition, recording and music production. One of the biggest lessons I learned is that it's pretty doable to record a bunch of cello takes and then cut them in pieces to combine the best bits. This helps me a lot in achieving a consistent high quality cello recording. Before I knew this I thought I needed to record an entire song without any mistakes and this made me super nervous during recordings. Now I know that recordings with mistakes are useable, as long as the mistakes aren't always in the same spot.
My other big lesson is that mixing/mastering is such a specialised field that I should again hire a professional for that. I first tried doing it myself, but even after spending considerable time with tutorials and experimentation, I couldn't get it to sound pro. In the end I hired Daan Kandelaars (Tremor.Studio), a professional mixing/mastering specialist, and his versions sound so much better than my own did. For my next album I won't first try to make final mixes myself and will instead hire a pro for mixing and mastering right away.
All in all I'm super happy with the final result and I hope others will like The Ageless Gate too! I'd love to hear if you have any favourite moments on the album!