Showing posts with label RoniTech. Show all posts

Wednesday, 10 March 2021

Finding a suitable toolchain for animating Blightbound’s 2D characters

For Blightbound our technical ambitions for the 2D animation system were quite lofty: we wanted high quality animation, screen-filling bosses, crisp character art, high framerate and swappable gear. This required a complete rework of our animation pipeline, since the sprite sheets we used in Awesomenauts and Swords & Soldiers 2 allow for none of those requirements, except for high quality animations. In today’s blogpost I’d like to explain the problems we faced, and what combination of tools we chose to solve them. This is the first half of a two-parter: next week I’ll discuss our skin editor and its implications on animation.


Blightbound features huge screen-filling bosses that need to animate smoothly without taking up insane amounts of memory.

Traditionally 2D animation in games is done using sprite sheets. A sprite sheet is simply a big texture with all the frames for all a character’s animations in it. Sprite sheets aren’t limited to just character animation: they can also store other things, like special effects or plants. The frames might be in a grid, or spaced more efficiently like we did for Awesomenauts. In any case, it’s just a series of tightly packed images.

Sprite sheets are great because they allow for complete freedom. The animator can draw anything they like and it will just work. Extreme squash-and-stretch? Perspective changes? Morphs? Do as you please, to the game it’s all just images!

However, sprite sheets come with a few huge downsides. First is size. If you have a big character and want it to be crisp and high-resolution, then each frame is going to take up a lot of space. Having lots of large images is going to cost too much memory. In Awesomenauts this was indeed a problem for some of the characters. For Clunk to fit in one 4096*4096 sprite sheet (the maximum we chose for memory and compatibility reasons), we had to either lower the resolution a bit, or reduce the framerate. And that’s not even that big of a character! The high memory usage of sprite sheets means that screen-filling bosses either can’t be done, or need to have very few frames, or can’t be crisp.


In Awesomenauts, red Clunk occupies an entire 4k sprite sheet texture for all his animation frames. Clunk fit only after slightly downsizing him.

The second major downside of sprite sheets is that since it’s just images, it’s very hard to do anything with them except simply showing them. For Awesomenauts we’ve often talked about letting players customise characters by changing for example their hat or other parts, but simple sprite sheets make that incredibly hard. The engine would need to know where the hat is exactly, but the sprite sheet doesn’t contain that information. Nor does it tell us whether there are different perspectives of the hat in different frames, or whether anything is ever in front of or behind the hat.

I can think of some workarounds for this problem, but it’s all so cumbersome that’s it’s not practical to actually do. This is the main reason why Awesomenauts only contains skins that swap the entire look of a character, and no swappable hats or clothing: those would be completely new sprite sheets for each combination.


Since every skin change in Awesomenauts requires an entire new sprite sheet we decided to make full reskins instead of allowing the user to customise individual parts (like hats or weapons). These are the four looks for Ted McPain.

So, sprite sheets can’t give us four of our requirements (screen-filling bosses, crisp character art, high animation framerate and swappable items). What can we do instead? The obvious direction for a solution is to split a character in parts, and let those parts move relative to each other. Or even to go for full skeletal animation.

If you have a background in 3D animation, you might think “well skeletal animation of course, it’s awesome!” And in 3D it is indeed, but in 2D it’s a lot more limited. Because we’re restricted to the 2D plane, there’s a lot of animation that can’t be done with a standard skeleton in 2D. Rotating the head of the character away from the camera is super easy in 3D, but impossible with 2D skeletal animation. Swinging a sword vertically is easy, but horizontally is very hard because that requires 3D perspective. Wanting to circumvent these limitations, we opted for a combination of 2D skeletal animation and traditional frame-to-frame animation on parts where needed.

A common tool for doing part-based 2D animation is Spine. Spine is used by a lot of games and we expected this to be our best option. We tried Spine and it was indeed quick and easy to use, as well as easy to integrate into our own engine. However, it turned out to be a bit too simple: Spine doesn’t allow swapping a part in the middle of an animation. This is needed if you want to mix skeletal animation with frame-to-frame animation, for example by switching to a different drawing of a head or hand. The workaround was to layer several skeletons on top of each other, but that was too clunky to work with. We reached out to Spine at the time, explaining this issue, and they confirmed this was the only way. Our evaluation was three years ago and we haven't tried Spine since, but according to this post by them their options for combining frame-to-frame with skeletal animation seem to have improved recently.


Spine by Esoteric Software is a 2D character animation tool for games for creating animations using parts, skeletons and deformations (screenshot taken from one of Spine's tutorial videos).

We also tried some other tools, including Blender and 3D Studio MAX, but those turned out to be too focussed on 3D to create a good workflow for 2D animation for us. Especially the nice skeletal systems they have became quite impractical when used for 2D animation.

So instead, we wanted to stick with After Effects. After Effects is mostly known as a tool for editing video and doing special effects and such, but it’s actually also just a really good general animation tool. Our artists happily used it for character animation in our previous games Awesomenauts and Swords & Soldiers 2. The basic idea is this: each part in an animation is a layer, and can be animated, linked and deformed freely. By turning layers on and off, you can do frame-to-frame animation on parts (like a hand opening and closing) or on the character as a whole.

I imagine After Effects would be a bad fit for full hand-drawn frame-to-frame animation, like in Cuphead, since After Effects doesn’t even allow drawing on layers directly (we draw all our parts in Photoshop). However, for our games it’s an excellent tool because we don’t want to redraw the entire character every frame anyway.

There was something missing though: After Effects is a great animation tool, but it’s not really tailored to 2D character animation. Good thing we already knew about the Duik plug-in. Duik adds the rigging features that are common in 3D animation to After Effects. Combined with the strong tools After Effects already has, it’s a really effective 2D animation tool for games.


Duik is an After Effects plugin that adds tons of 2D animation features (screenshot from this tutorial video by Motion Tutorials).

I previously mentioned we wanted to mix skeletal animation with frame-to-frame animation. That part is actually really simple with Duik. The artist just links several drawings of a part to a bone and switches which is visible. This way we can change facial expressions during animations, as well as do things like open and close hands, pivot or distort a torso and switch facial expressions.


Thumbnails of most animation parts needed for one character in Blightbound. The various hands, faces and chests are for frame-to-frame animation on parts of the body.

Happy with After Effects+Duik as our animation tool, another important thing was missing: After Effects files can’t be played back in real-time engines. So I set about the task of writing an exporter from After Effects that exports all the hierarchy and animation data. I also implemented the in-game side of playing that back in real-time.

At it’s core, this is a surprisingly simple task. Each part in an After Effects animation is a layer and we can just export all the layers with their animation frames and play them back. Where I went wrong though, is that I wanted to emulate Duik’s systems in-game. I thought Duik only did basic two-bone inverse kinematics and implemented that in the engine. This worked with simple animations, but for complete characters the animations were completely broken in-game. When I looked deeper I learned that Duik actually has a ton of different animation systems and approaches. Mimicking all of those in-game was totally undoable.


Duik has so many features that only supporting parenting and two-bone IK produced completely wrong results in-game, as can be seen in this 'beautiful' monstrosity. This was intended to be a normal walk animation, early during development of Blightbound.

Once I realised this, I went for an easy alternative: animation baking. I export the orientation, scale and position of each part at 30 frames per second, simply storing the values for each frame (unless they’re not changing). This is a lot more data, but compared to the size of textures it’s really negligible. I did keep the hierarchy of the bones, so parts don’t start to subtly 'float' compared to each other.


Our custom file format is simply a text file with a long list of all parts and the information needed to position and animate them correctly, including parenting and keyframes.

I previously said we wanted high framerate. The game actually interpolates between these frames, so while they’re exported at 30fps, they’ll also run smoothly at 60fps, 144fps, or any other framerate. That’s also great for when slowing an enemy: in Awesomenauts, if you slow an enemy, you can see the low framerate of their slowed down walk animation. In Blightbound, movement remains perfectly smooth.

A note there is that whenever something needs to jump from one position to another instead of smoothly interpolating there, the artist needs to use a hold key. Our tool exports those and applies them correctly during playback. Overlooking this caused some bugs here and there, because artists aren’t used to needing to use hold keys when two frames are directly next to each other. In-game however there can be frames in between, so that case still needs a hold key.


A few animations that Ronimo animator Tim Scheel made for the Blightbound character Karrogh.

After Effects is a huge tool with tons of features, so it’s impossible to support them all in-game. Our exporter only supports what we actually need, and nothing else. This means our artists need to avoid using some After Effects features that they might want to use. In most cases this is fine, but one particular feature that we ended up not supporting due to a lack of time, is mesh deformations (also known as puppet pins). Being able to deform a part would have helped a lot, but we didn’t find the time to implement a good emulation of After Effects’ deformation features in-game. Quite a pity, and I wonder whether our artists have ever wished they had chosen Spine after all, since Spine supports deformations in-game out-of-the-box.

Our artists did apply a simple workaround for the lack of deformations. By doing them in Photoshop and saving them as different frames for a part, they work fine. Technically the engine then thinks it’s frame-to-frame animation, but it’s actually deformed instead of redrawn in Photoshop. This approach wasn’t used much because it requires a lot of handwork, especially when reusing animations on several characters, but it does get the job done when needed.


The chest deformation in this animation from Blightbound was made by deforming the chest part in Photoshop and then exporting it as separate parts.

From a memory perspective the result of our toolchain is pretty impressive. Whereas a single Awesomenauts character can take up 16mb of texture space (excluding skins and the blue team), all Blightbound characters and enemies together use only 65mb of texture space, spread out over 4,600 character parts. On top of that, Blightbound animations are much higher resolution and higher framerate and we can swap parts and weapons dynamically.

What we have so far is strong animation tools (After Effects + Duik) and a way to play animations back in-game. This is enough to make a playable game, but we wanted considerably more: easy reuse of animations between characters, equippable gear, attaching special effects to bodyparts and efficiently handling thousands of character parts. In next week’s blogpost I'll dive into how we achieved those goals using our own skin editor.

Special thanks to Ronimo artists Koen Gabriels and Gijs Hermans for providing feedback on this article.
Sunday, 18 October 2020

Screen Space Reflections in Blightbound

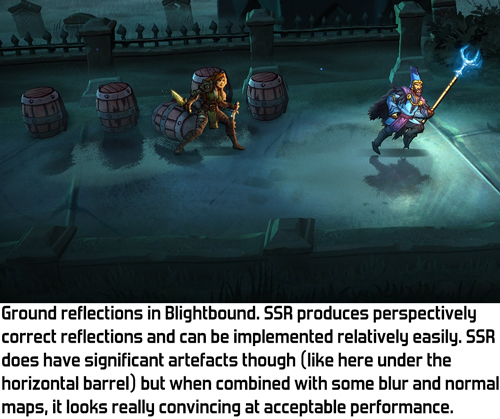
An important focus during development of our new game Blightbound (currently in Early Access on Steam) is that we want to combine 2D character animation with high quality 3D rendering. Things like lighting, normal maps, depth of field blur, soft particles, fog and real-time shadows are used to make it all gel together and feel different from standard 2D graphics. One such effect I implemented into our engine is SSR: Screen Space Reflections. Today I’d like to explain what SSR is and what fun details I encountered while implementing it into our engine.

A compilation of places with reflections in rain puddles in Blightbound.

Reflections in games can be implemented in many ways. The most obvious way to implement reflections is through raytracing, but until recently GPUs couldn’t do this in any reasonable way, and even now that GPU raytracing exists, too few people have a computer that supports it to make it a feasible technique. This will change in the coming years, especially with the launch of Xbox Series X and Playstation 5, but for Blightbound that’s too late since we want it to look good on currently common GPUs.

So we need something else. The most commonly used techniques for implementing reflections in games are cubemaps, planar reflections and Screen Space Reflections (SSR). We mostly wanted to use reflections for puddles and such, so it’s important to us that characters standing in those puddles are actually reflected in real-time. That means that static cubemaps aren’t an option. A pity, since static cubemaps are by far the cheapest way of doing reflections. The alternative is dynamic reflections through cubemaps or planar reflections, using render-textures. These techniques are great, but require rendering large portions of the scene again to render-textures. I guessed that the additional rendercalls and fillrate would cost too much performance in our case. I decided to go for Screen Space Reflections (SSR) instead.

The basic idea behind SSR is that since you’re already rendering the scene normally, you might as well try to find what’s being reflected by looking it up in the image you already have.


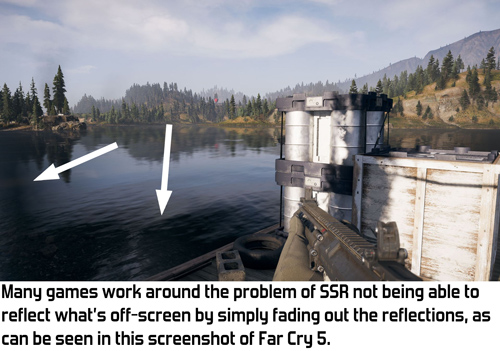
SSR has one huge drawback though: it can only reflect things that are on-screen. So you can’t use a mirror to look around a corner. Nor can you reflect the sky while looking down at the ground. When you don't focus on the reflections this is rarely a problem, but once you look for it you can see some really weird artefacts in reflections due to this. For example, have a look at the reflections of the trees in this video of Far Cry 5.


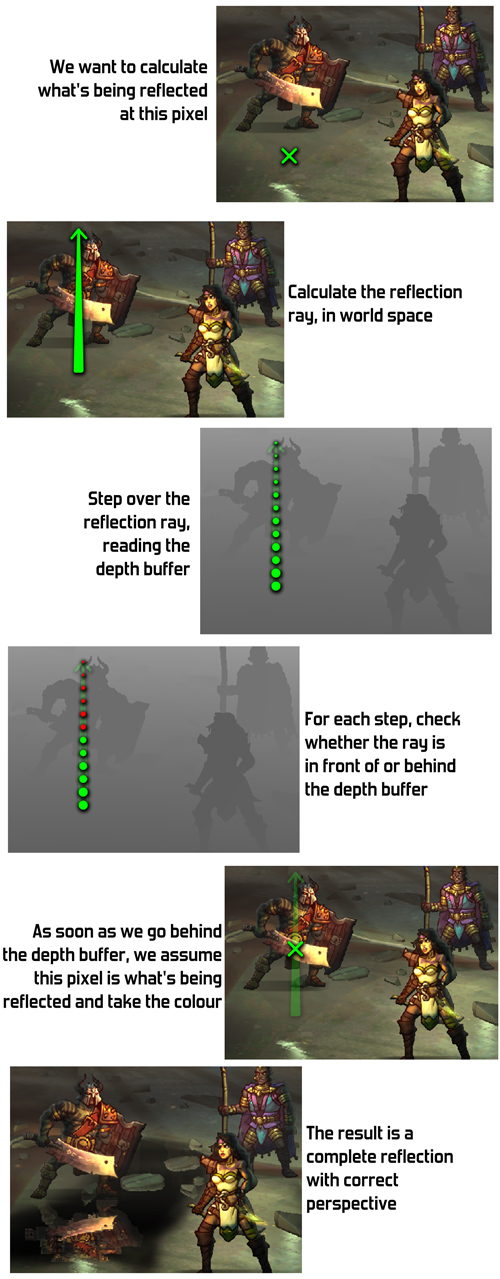
So we’re looking up our reflections in the image of the scene we already have, but how do we even do that? The idea is that we cast a ray into the world, and then look up points along the ray in the texture. For this we need not just the image, but also the depth buffer. By checking the depth buffer, we can look whether the point on our ray is in front of the scene, or behind it. If one point on the ray is in front of whatever is in the image and the next is behind it, then apparently this is where the ray crossed the scene, so we use the colour at that spot. It’s a bit difficult to explain this in words, so have a look at this scheme instead:


Since SSR can cast rays in any direction, it’s very well suited for reflections on curved surfaces and accurately handles normal maps. We basically get those features for free without any extra effort.

A demo in the Blightbound engine of SSR, with a scrolling normal map for waves.

At its core SSR is a pretty simple technique. However, it’s also full of weird limitations. The challange of implementing SSR comes from working around those. Also, there are some pretty cool ways to extend the possibilities of SSR, so let’s have a look at all the added SSR trickery I implemented for Blightbound.

First off there’s the issue of transparent objects. Since the world of Blightbound is covered in a corrupting mist (the “blight”), our artists put lots of foggy layers and particles into the world to suggest local fog. For the reflections to have the right colours it’s pretty important that these fog layers are included in the reflections. But there are also fog layers in front of the puddles, so we can't render the reflections last either.

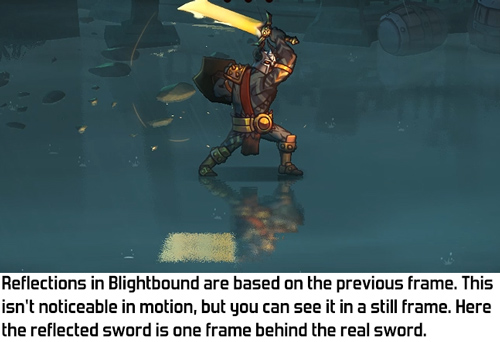
The solution I chose is simple: reflections use the previous frame instead of the current frame. This way we always look up what's being reflected in a complete image, including all transparent objects. The downside of this is of course that our reflection isn't completely correct anymore: the camera might have moved since the previous frame, and characters might be in a different pose. However, in practice the difference is so small that this isn't actually noticeable while playing the game.


Transparent objects pose another problem for SSR: they're not in the depth buffer so we can't locate them correctly. Since Blightbound has a lot of 2D animation, lots of objects are partially transparent. However, many objects can use alpha test. For example, the pixels of a character's texture are either fully transparent of not transparent at all. By rendering such objects with alpha test, they can write to the depth buffer without problems.

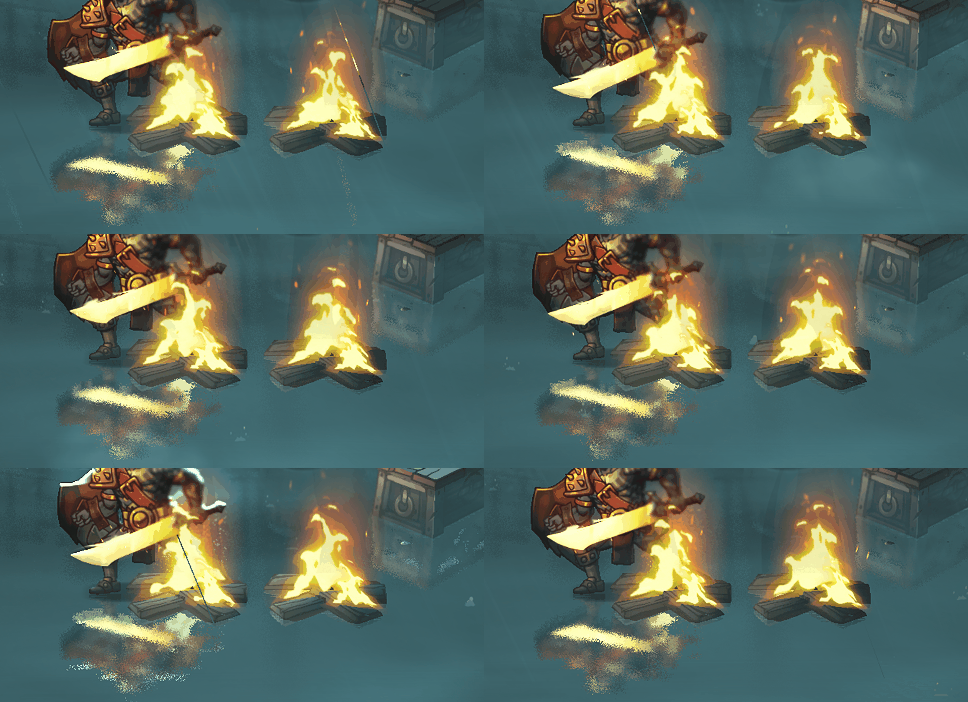
This doesn't solve the problem for objects with true transparency, like smoke, fog and many other special effects. This is something that I don't think can be reasonably solved with SSR, and indeed we haven't in Blightbound. If you look closely, you can see that some objects aren't reflected at all because of this. However, in most cases this isn't noticeable because if there's an opaque object closely behind it, then we'll see the special effects through that. While quite nonsensical, in practice this works so well that it seems as if most explosions are actually reflected correctly.

Transparent objects like this fire aren't in the depth buffer and thus can't be found for reflections. However, if another object is close behind, like the character on the left, then the transparent object is reflected through that. The result is that it seems as if many special effects are properly reflected.

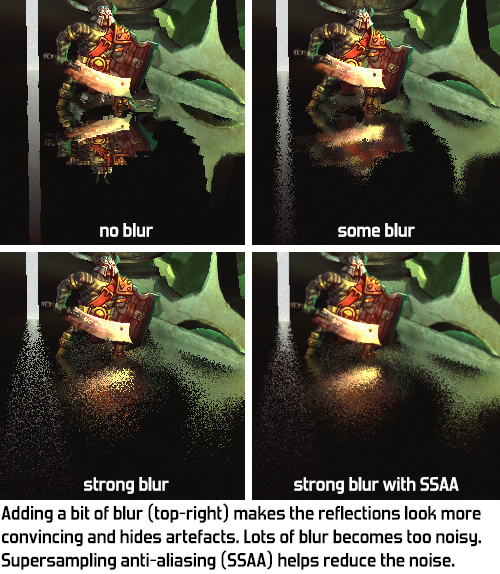
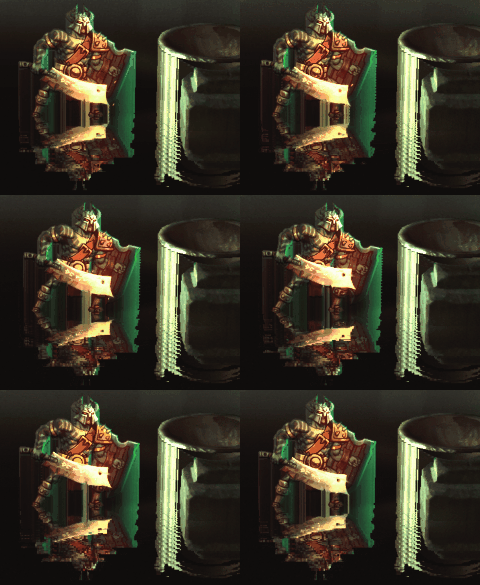
Having perfectly sharp reflections looks artificial and fake on many surfaces. Reflections in the real world are often blurry, even more so the further the reflected object is from the surface. To get reflections that accurately blur with distance I've applied a simple trick: the rays get a slight random offset applied to their direction. This way objects close remain sharp and objects get blurrier with distance. Artists can tweak the amount of blur per object.

However, this approach produces noise, since we only cast one ray per pixel. We could do more, but that would be really heavy on performance. Instead, to reduce the noise a bit, when far enough away I also sample from a low-resolution blurry version of the scene render-texture. This is a bit redundant but helps reduce the noise. Finally, by default in Blightbound we do supersampling anti-aliasing (SSAA) on the screen as a whole. This results in more than one ray being shot per screen-pixel. Only on older GPUs that can't handle SSAA is this turned off.


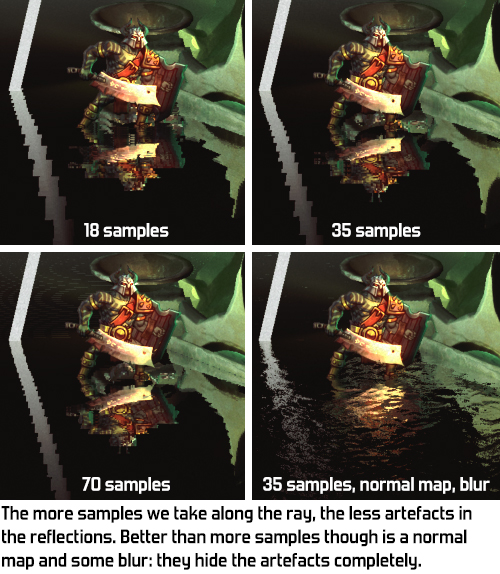
Another issue is precision. For really precise reflections, we would need to take a lot of samples along the ray. For performance reasons that's not doable though, so instead we make small jumps. This however produces a weird type of jaggy artefacts. This can be improved upon in many different ways. For example, if we would render the reflections at a lower resolution, we would be able to take a lot more samples per ray at the same performance cost. However, with how I implemented SSR into our rendering pipeline that would have been quite cumbersome, so I went for a different approach which works well for our specific situation:
  • More samples close to the ray's origin, so that close reflections are more precise.
  • Once the intersection has been found, I take a few more samples around it through binary search, to find the exact reflection point more precisely. (The image below is without binary search.)
  • The reflection fades into the fog with distance. This way the ray never needs to go further than a few meters. This fits the world of Blightbound, which is basically always foggy.
The result of these combined is that we get pretty precise reflections. This costs us 37 samples along a distance of at most 3.2 meters (so we never reflect anything that's further away than that from the reflecting surface).

Any remaining imperfects become entirely unnoticeable since blur and normal maps are often used in Blightbound, masking any artefacts even further.


A challenge when implementing SSR is what to do with a ray that passes behind an object. Since our basic hit-check is simply whether the previous sample was in front of an object and the next one is behind an object, a ray that should pass behind an object is instead detected as hitting that object. That's unintended and the result is that objects are smeared out beyond their edges, producing pretty ugly and weird artefacts. To solve this we ignore a hit if the ray dives too far behind an object in one step. This reduces the smearing considerably, but the ray might not hit anything else after, resulting in a ray that doesn't find an object to reflect. In Blightbound we can solve this quite elegantly by simply using the level's fog colour for such failed rays.

By default, SSR produces these kinds of vertical smears. Assuming objects have a limited thickness reduces this problem greatly, but adds other artefacts, like holes in reflections of tilted objects.

This brings us to an important issue in any SSR implementation: what to do with rays that don't hit anything? A ray might fly off the screen without having found an object, or it might even fly towards the camera. Since we can only reflect what we see, SSR can't reflect the backs of objects and definitely can't reflect anything behind the camera. A common solution is to have a static reflection cubemap as a fallback. This cubemap needs to be generated for each area so that the reflection makes sense somewhat, even if it isn't very precise. However, since the world of Blightbound is so foggy I didn't need to implement anything like that and can just fall back to the fog colour of the area, as set by an artist.

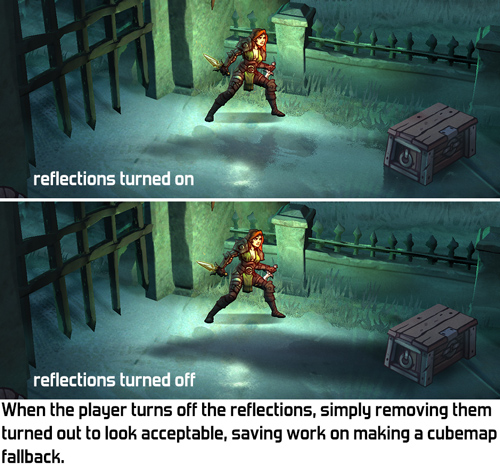
The final topic I would like to discuss regarding SSR is graphics quality settings. On PC users expect to be able to tweak graphics quality and since SSR eats quite a lot of performance, it makes sense to offer an option to turn it off. However, what to do with the reflecting objects when there's no SSR? I think the most elegant solution is to switch to static cubemaps when SSR is turned off. Static cubemaps cost very little performance and you at least get some kind of reflection, even if not an accurate and dynamic one.

However, due to a lack of time that's not what I did in Blightbound. It turned out that just leaving out the reflections altogether looks quite okay in all the spots where we use reflections. The puddles simply become dark and that's it.


For reference, here's the shader code of my SSR implementation. This code can't be copied into an engine directly, since it's dependent on the right render-textures and matrices and such from the engine. However, for reference when implementing your own version of SSR I expect this might be useful.

SSR is a fun technique to implement. The basics are pretty easy, and real-time reflections are a very cool effect to see. As I've shown in this post, the real trick in SSR is how to work around all the weird limitations inherent in this technique. I'm really happy with how slick the reflections ended up looking in Blightbound and I really enjoyed implementing SSR into our engine.

Sunday, 15 January 2017

Adding more depth to 2D levels using scissor rectangles

While creating levels for Awesomenauts and Swords & Soldiers 2 our artists often struggled with how to create more depth. All those background elements from one area would slide into view in other parts of the level, limiting how deep the backgrounds could be. For the Starstorm level in Awesomenauts I've added a trick to our editors that solves this problem: scissor rectangles. It's a neat little trick that not only makes Starstorm have backgrounds with much more depth, but also makes rendering them a lot more efficient. So let's have a look: what's the problem exactly, and how do scissor rectangles solve it?

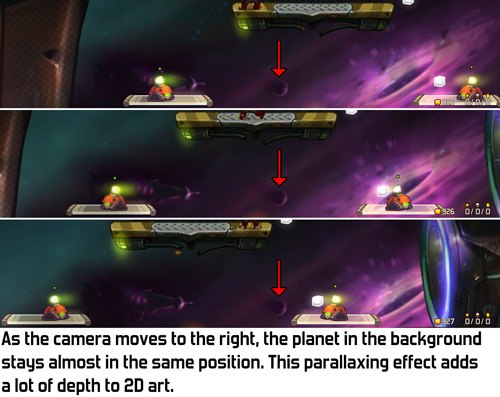
In a purely 2D game like Awesomenauts there's no real perspective: backgrounds are just a lot of 2D textures. As the camera moves all those layers move at different speeds to suggest depth. Traditionally in games that's called parallaxing. From a technical perspective that's basically all there is to 'perspective' and 'distance' in a game like Awesomenauts.

However, this simple idea of objects following the camera creates a big problem. An object that is really far away hardly moves on the screen when the camera moves. The mountain in front of you in the far distance? Walk 10 meters to the left and it's still in front of you. Walk 100 meters to the left and it's still in front of you. It's so far away that it's basically always in front of you. That's realistic and as intended, but what if two rooms in your level should have different objects in them? If the rooms are really deep (like for example a factory hall) then the objects in the back of one room will be visible in the other.


In a 3D game the solution to this is simple: just put a wall in between these two rooms. But this is not a 3D engine. This is a purely 2D engine and walls that go into the distance are not supported. Heck, we don't even have a z-buffer to figure out what parts would be in front of or behind that wall! Also, what if we don't want a wall? What if we want to suggest really deep spaces but don't want to put endless walls into the distance in between them?

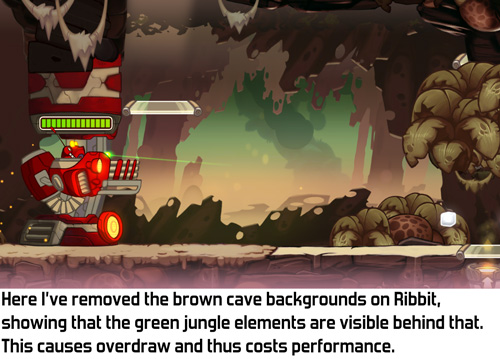
The solution our artists used in older Awesomenauts maps is that such deep rooms can't be close to each other. For example, in Ribbit IV the top part of the level is a lush jungle that continues far into the background. Originally my colleague Ralph also added deep caves in the bottom part of the map, but parts from the jungle became visible in the caves, and vice versa. So Ralph made the caves less deep. The jungle parts are still rendered behind the caves, but because the caves have a solid wall close to the camera the jungle isn't visible there anymore.


Not only is this very limiting for our artists, it's also a huge waste of performance: it causes a lot of overdraw. 'Overdraw' is when several objects are rendered on top of each other. The more objects are rendered on top of each other, the higher the overdraw is and the worse the framerate gets. Sometimes that's needed to get a certain effect, like when having lots of overlapping smoke particles. But here it's a waste: the jungle isn't even visible, so why render it? High overdraw is the number one performance drain in Awesomenauts, so not doing this would be quite wonderful. (For more on overdraw have a look at this post: Optimising Special Effects In Awesomenauts.)


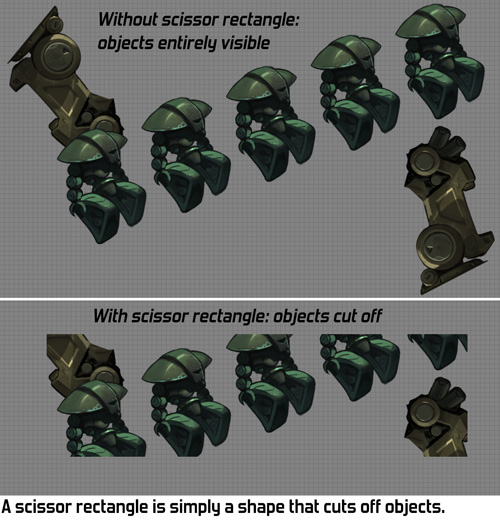
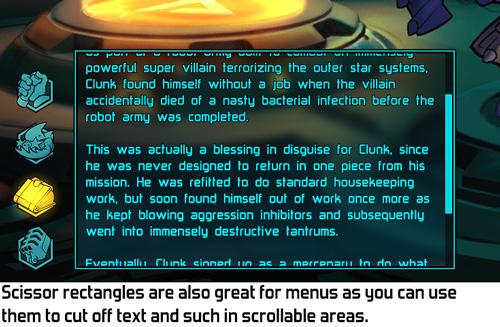
I had been thinking about this problem for a while, mostly coming up with solutions that were quite a lot of work to build, when one day I realised that videocards have a very simple feature that solves exactly this problem: scissor rectangles! The basic idea of a scissor rectangle is that when rendering an object, you tell the videocard to only render the parts of it that are within a certain area on the screen: the scissor rectangle. Everything else is cut off. It's like a mask in Photoshop, but in-game.


Scissor rectangles are a very simple and very limited feature. They only do rectangles that are aligned with the screen. So you can't have a rotated rectangle, or a shape that's more complex than a rectangle. If you want any of that you'll need to resort to more involved tech, like the stencil buffer, which isn't efficient to recreate differently for each object rendered. I was looking for something simpler, something that could be changed for each object rendered without causing a performance hit. Scissor rectangles provide exactly that.


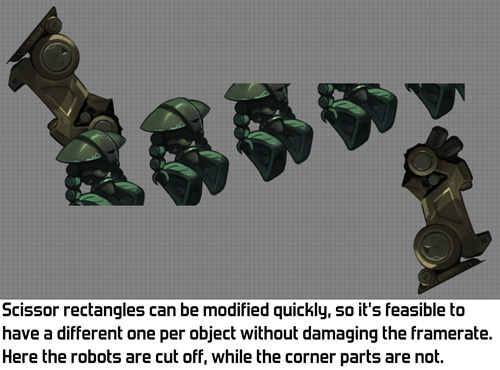
The next question is how to integrate scissor rectangles with our tools: how can an artist easily define which objects are cut off by which scissor rectangle? I chose to link scissor rectangles to our animation system. An 'animation' in the RoniTech (our internal engine) is simply just a bunch of objects that might be animated, so a part of a level can also be an 'animation'. I made it so that each animation can have a custom scissor rectangle, placed by the artist. The resulting workflow is that a level artist creates a room or area in the animation editor, adds a scissor rectangle and then puts the entire 'animation' in the level. It's an easy and fast workflow.

Our levels are mostly decorated by my colleague Ralph, using art drawn by Gijs. On the Starstorm map Ralph used scissor rectangles extensively for the first time and I love the result: he put a lot of depth and detail in the backgrounds and the framerate is higher than on other maps because the scissor rectangles reduce overdraw. Here's a short demo video:


For any programmers that read this, here are some implementation details I've encountered. Feel free to skip this list if you're not a programmer. ;)
  • The videocard wants to know about scissor rectangles in screen coordinates, while the way we use them means our tools place them in world space. To use scissor rectangles this way you'll need to convert the coordinates yourself before sending them to the GPU.
  • If you accidentaly swap the top and bottom of the scissor rectangle then everything will still work fine on AMD and NVidia GPUs, but on some Intel GPUs the objects will disappear altogether.
  • It's not allowed to define scissor rectangles that are partially or entirely outside the screen, so be sure the cap them to the edges of the screen.
  • The relevant functions in OpenGL are glEnable(GL_SCISSOR_TEST) and glScissor()
  • DirectX 9: SetRenderState(D3DRS_SCISSORTESTENABLE, TRUE) and SetScissorRect()
  • There are equivalent functions that we use on Xbox One and Playstation 4. I haven't checked on mobile but I expect scissor rectangles are a standard feature on practically all videocards.


So there you have it: scissor rectangles! Not only did they enable our level artists to make deeper, richer levels, but they also improved performance by reducing overdraw and were quick and easy to add to our engine.

Sunday, 25 September 2016

Fixing texture distortion on deformed polygons

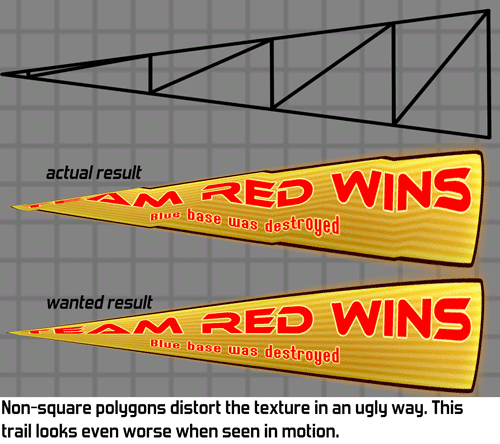
An odd effect that can be very noticeable in 2D games is the distortion that happens when deforming a texture. Especially when tapering a polygon the art can become really weird. This has been a problem in our engine for years, but since strong taper isn't used often I didn't think it needed fixing. However, when I added trails last year the distortion became much more problematic and I had to look for a solution.


If you're not very familiar with how videocards work this looks really weird. To a human it is very clear how the texture should be squashed when tapering a polygon, why can't my computer figure this out?

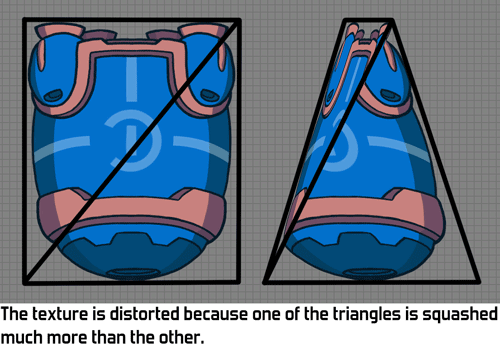
The reason is that videocards only handle triangles. They don't really know what a square is so if you want a square, you need to create two triangles that happen to form a square together. Many 3D tools hide this, but that's what happening under the hood.

When applying this taper to a square that consists of two triangles we can see why the weird distortion is happening. Those two triangles aren't the same size anymore: one gets squashed much more than the other. Since half of the texture is on one triangle and the other half is on the other triangle, we get this ugly malformed texture.


Another way of looking at the problem is to look at the centre of the image. The middle of the diagonal corresponds to the middle of the texture. But if we taper, then the middle isn't quite the middle of our object anymore!


Does this mean all deformed polygons always look broken? Luckily not: this problem only occurs if the texture has a different shape. If you apply a tapered texture to a tapered polygon it will look fine. The problem occurs when applying a square texture to a tapered polygon.

Now that it's clear what the problem is, how do we solve it? My first thought was to do something with shaders and modifying the texture coordinates to compensate. Maybe I could do away with explicit texture coordinates altogether and define the texture placement through a formula instead? I expect this should be possible somehow, although handling more complex geometry like trails might be pretty hard. Also, this seems overly complex and might cost additional performance: calculating the texture coordinates in the pixel shader would cost additional fillrate. Fillrate is the main performance bottleneck in Awesomenauts so anything costly there is probably problematic. (Note this older blogpost about fillrate in Awesomenauts.)

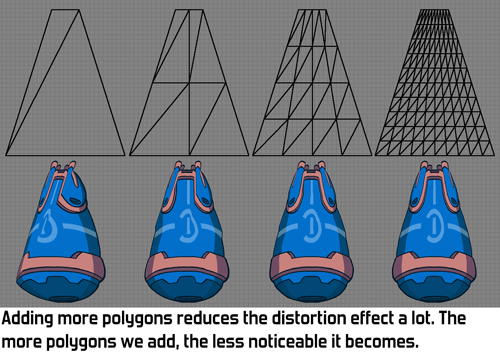
There is a much simpler solution: more polygons! If you subdivide the quad into a bunch of smaller quads the distortion becomes much much less noticeable. After a couple of subdivisions the distortion is usually hardly visible anymore. It isn't actually gone, but if the player doesn't notice it then it's good enough!


Note that a much more efficient subdivision for this particular situation is also possible by not doing a grid-based subdivision. For example by adding a second diagonal, creating a cross with 4 triangles. (Thanks to Reddit users eggfruit and not_a_profi for pointing this out.) A grid-based subdivision is more flexible though as it can also be used for other things than just solving this particular problem.

Solving problems by throwing more polygons at them is generally not a good idea, since those polygons of course cost more performance. However, our games generally use very few polygons so that's not where the performance bottleneck is for us. Also, we don't have all that many objects that need this solution, so the performance impact is negligible. Here we see a common pattern in modern game development: computers are so fast now that many things that may seem like a performance waste really don't matter, unless you're making triple-A games and are trying to beat the competition in squeezing the most effects out of the hardware.

So there you have it: I've solved this problem by simple throwing more polygons at it! Adding an option for subdivisions to the Ronitech (our own engine) had been on my wishlist for quite a while, so this felt like a good excuse to finally do so. This not only fixes the texture distortion problem: now that we have this option we could also add other fun features, like an animatable bend. I have even been playing around in my spare time with using those subdivisions for 3D heightmaps to add depth to objects in Awesomenauts. My tests show this could look really awesome, but this is not in a state where there's anything to show yet. Maybe that will make for a nice future blogpost somewhere next year. ^_^

Saturday, 17 September 2016

A simple way to smooth angular trails

Last week I discussed our tools for making trails. One problem I encountered with trails is that they often don't look very good when attached to a character. Player movement in a platformer like Awesomenauts is not very smooth: all of a sudden you jump, or land, or turn around, and this creates a trail with lots of angles in it. For some effects this is fine, but especially for wider trails a smoother, curvier look is much better. Today I would like to discuss the smoothing algorithm I implemented to solve this.


Before I continue, here's last week's overview video of our trails again, since it also contains some footage of the smoothing:


Key when smoothing a trail is that the trail should always remain attached to the emitter (in this case a character). If the smoothing makes the trail detach from the emitter just a little bit, it starts to look floaty and incorrect. An artist can work around this by fading out the trail near its start, but this is not always desired. This makes smoothing a challenge: the emitter follows the player's angular movement but the resulting trail should not.

The trail must also look stable: it can't suddenly pop from unsmooth to smooth. The conclusion of these two requirements is that we must apply the smoothing over time instead of immediately or in one step.

The smoothing algorithm I came up with turns out to be really simple. It was inspired by how subdivision surfaces work on 3D mesh smoothing, but without the subdividing.


The basic idea is this: for each segment of the trail I calculate the position in between its neighbouring segments, and then move the segment a little bit towards that centre. On a straight trail without corners this means nothing happens: the segment is already in between its neighbours. But on a corner this achieves exactly what we want: the corner moves inwards a bit, rounding the corner.


By repeating this process every frame with very small steps we get a curve that over time becomes ever smoother. At first it only processes the corners, but every frame it grows to smoothen further along the straight parts as well.


To control the smoothing I've provided our artists with two settings: one sets how strong the smoothing should be, and the other how long it should keep smoothing. If you let the smoothing take too long the trail keeps deforming and starts looking floaty and unstable. What usually works best is to use quite a strong smoothing for a very short amount of time (around 0.5 seconds). This way it stops quickly enough that the player doesn't notice significant instability.

An implementation note is that we ignore the first and last segment, since those have only one neighbour, which happens to also solve the problem that the curve needs to stay attached to the emitter. A small but important detail is that not only the first and last segment should be left out of the smoothing, but also the second and penultimate segment. This is because in my version of trails the start of the trail moves with the emitter, causing it to start really close to the second segment, which gives odd results when smoothing. Something similar happens with the final segment.

Now that I've explained how it works, here's a short video that shows the impact of the various settings that control the smoothing:


A downside of this algorithm is that the strength of the smoothing depends on the number of segments. The fewer segments there are, the stronger the effect is. This means that if an artist tweaks the number of segments after having set the smoothing, she'll need to tweak the smoothing again.

The smoothing algorithm I've described here today gets the job done, is easy to implement and costs little performance. It's nice how sometimes seemingly complex problems can have such easy solutions. :) Next week I'll discuss the texture distortion caused by deformed polygons, which is a problem for both trails and normal 2D sprites.

Sunday, 11 September 2016

Creating crisper special effects with trails

Until recently most special effects in Awesomenauts were either animated by hand or made using particles. This seemed to give enough possibilities, until we played the gorgeous Ori and the Blind Forest, which has very crisp special effects. We analysed how they achieved this and one of the conclusions was that for many things that we would make with particles, they used trails. Trails are quite an obvious concept, but for some reason it had never seemed like a big problem that they weren't an option in our tools. So about a year ago I added trails to our engine.


How to implement trails seems quite obvious: it's just a series of triangle segments, what's interesting about that? However, when I started implementing trails it turned out there are quite a lot of different approaches imaginable. I went with one that's extremely flexible, but also sometimes slightly difficult to control for certain effects. Today I'd like to share how I built our trails tool and what the pros and cons are. But before I get to that, let's start with a video that shows the tools for our trails and what our artists have made with those.


The core idea of my implementation is that a trail is like a series of connected particles, called segments. Each segment has it's own position and velocity, and the trail is formed by creating polygons in between the segments. This is a fun approach: it makes things like gravity, waviness and wind really easy, since you can just apply those effects to each segment separately and then connect them. It also means that the trail automatically stretches when you move quickly, just like a trail should.


An interesting aspect is what to do when standing still. In the case of normal particles you would just keep creating them regardless of your own speed, but with a trail that isn't a good idea: connecting segments that are nearly on the same position results in jumpy segment orientations. My solution to this is to have a minimum distance between segments and only emit another segment if you've moved enough. Doing this naively does have a weird side-effect: you get small holes in between the starting point of the trail and the newest created segment. To avoid this I move the newest segment along with the position of the emitter until a new segment is made.


If no care is taken something similar would also happen at the end, where the tip of the trail just suddenly disappears when its segment times out. Here the solution is to smoothly move the timed out final segment towards the penultimate segment before removing it.

To avoid creating too many segments, the artist sets how many segments he needs. Since I already have this minimum distance between segments I figured this would also be a good way to limit the number of segments. However, I now bumped into another oddity: if you move really quickly you will create a new segment every frame. That means that the number of segments depends on the framerate. Our artists have fast computers and usually have vsync disabled so they often run the game at 200fps or more. They need to go out of their way to see what Awesomenauts looks like on 30fps or even 20fps. To avoid situations where artists unknowingly create effects that only look smooth and good on very high framerates, I've limited the maximum number of segments per second to 60. If on older netbooks the framerate drops below that you will still get less smooth trails, but the difference between 20fps and 60fps is much more acceptable than between 20fps and 200fps.

A fun option you get from treating segments as particles is that you can do more than just leave them. A normal trail only exists when you move, it's literally a trail. But why not shoot segments away, like you often do with particles? With some creativity this can be abused to create effects like flames (shooting segments upwards) or flags (shooting segments horizontally) and get a very dynamic look for them. I also added an option for gravity/wind to change the speed of a segment over time.

One of the most fun things when making tools is when artists (ab)use them to make things you didn't expect. Especially Ronimo artist Ralph is really good at this. He considers it his personal crusade to use every feature of our editors for something. The weirder the feature, the more Ralph considers it a challenge to use it for something pretty. So when making trails my goal was to feed the Ralph by making trails super flexible. For this reason I added four different ways of mapping textures to the trail, and two textures can be combined on a single trail:


When I showed the trails to our artists they immediately wondered whether they could make things like a hair or a cape with it. Doing so with a normal trail would result in a very elastic look: trails become longer and shorter depending on how fast you move, which is usually not desired when making something like a braid or cloth. To fix this problem I added a feature that gives the trail a maximum and minimum length, shortening or stretching it when needed. This turned out not to work too well. The minimum length gave really odd results, especially when the character is standing still, so I removed that feature altogether. The maximum length does work, but in practice it doesn't produce convincing hair or cloth movement, so our artists usually go back to hand-animating those. I think to make good hair or cloth you need a very different approach: those require a real physics simulation, instead of simply emitting segments like I do now.

On top of all of the things discussed so far we got a lot of additional flexibility for free: years ago I made the tools of the Ronitech (our internal engine) in such a way that almost anything is animatable, so our artists can change most of the settings of trails over time. This allows for a lot of fun additional possibilities, like varying the thickness of a trail over time, or making the colour pulsate.

My implementation of trails does have one main downside: textures aren't very stable. The constantly varying length of the first and last segments makes textures flicker a bit, even though I compensate to get the correct texture coordinates. Framedrops can also leave longer holes in between segments, which is not immediately a problem but again it makes textures slightly less stable. I think if I were to ever make another version of trails I would decouple the polygons from the segments, and just create the polygons at equal distances over the path laid out by the segments.

All in all I'm really happy with how our trails system turned out. The approach of treating a trail as connected particles makes some things slightly unpredictable, but it does give a lot of flexibility. I expect our artists will come up with some more unexpected uses of trails in the future.

In the next two weeks I will discuss two more specific aspects of trails: the smoothing algorithm I created to make angular movement produce very smooth and curvy trails, and how to solve the texture distortion that occurs when skewing a quad with a texture on it. Till then!

Sunday, 20 July 2014

Evolving level art from Swords & Soldiers 1 to 2

In Swords & Soldiers 2 we are stepping up the quality of everything compared to the original. Level art is one of the areas where we are improving the game a lot. With our improved tools we can make them look a lot more detailed and varied. We also approach level art in a very different way now. Today I would like to discuss how the approaches in both games differ and why we switched to different techniques.


In the original Swords & Soldiers the levels were mostly procedurally generated. The only parts that were placed by hand were the ground itself and the small props on it, like grass and flowers. The foreground and background layers were randomly filled with objects. Since this is essentially a 1D game I simply wrote an algorithm that placed mountains (or trees, or houses) at varying distances from each other. Each layer had a bunch of different textures and settings for how densely it should be filled with objects.


There are many arguments in favour of procedurally placing objects like that, but at the time only one really mattered: we didn't have any tools to place objects by hand. I was the only full-time programmer on Swords & Soldiers 1 and I had to build all the gameplay plus the entire engine, so there was no time to create such tools. I did have a couple of interns helping with programming, but in total there was just way too little time to implement any real tools for level creation.

Levels therefore had to be created in Notepad, as I previously described in this blogpost. This worked surprisingly fast and simple for our artists and designers, but of course precise control over graphics is not possible this way.


Our artists had a limited palette of options to differentiate levels and create varied places. They made six different art sets they could use for parts of levels: desert, snow, grass, rocks, jungle and cherry blossom. They could set a gradient for the sky colour and a second gradient to modify the colour of background props. They could set the weather to rain or snow, modify the density of background props, foreground props and clouds and place smaller props on the landscape by hand.

While all of these options together may sound like a decent set of tools to create unique levels, in practice this is not the case. Levels in Swords & Soldiers 1 quickly blend together and start to look similar. One reason for this is that levels often contain more than one environment type. They might for example vary between rocks and desert. An environment type always randomly varies between all the textures it has. The result is that in only a few levels we can have seen nearly all level art in the game. In fact, the very long Berserker Run level contains all six settings and thus contains nearly all level art the game has.


Another problem is that randomly placed objects may stand in a different spot in every level, but they all feel the same. No matter at what distance the same set of mountains is positioned, it always feels like the same place. This could of course be done better with a more advanced procedural algorithm and a smarter set of textures, but in practice procedural content nearly always suffers from this.

This problem even shows in a game like Diablo III, which has high quality procedural world generation at its core. Blizzard spent enormous amounts of time on creating sophisticated algorithms and tons of art assets for random world generation, and yet when I played through Diablo III it felt like I was constantly visiting the same places. Either a place is uninteresting, with some random trees and bushes, or it is unique with some special big props. The number of unique props in Diablo III is large but not infinite, so they start to feel repetitive quickly.

I have not seen a single game with procedural worlds where the visuals did not become repetitive really quickly. In that sense I am slightly afraid for No Man's Sky: the game looks mindblowingly amazing, but I can hardly imagine they solved this problem well enough to keep planet discovery visually interesting. (I sure hope they did though, because that game looks soooooo good!)

In Swords & Soldiers 2 we therefore concluded that we did not want to use this approach anymore. We also don't need to work around a lack of tools anymore, since we now have the impressive toolset we created for Awesomenauts. All of that is at our disposal for Swords & Soldiers 2 as well.

By placing most objects by hand our artists can now create real compositions. The way trees are arranged can create forests, small clearings and green fields. This way even without additional assets it is possible to create places that feel much more real and unique than any procedural algorithm can. Of course one could add procedural rules to create such places, but there are limits to how much can be done this way, especially because every rule that creates a specific kind of place can be used only a couple of items if repetitiveness is to be avoided. With a good artist there really are no limits to how much variation and uniqueness can be created. Most of the levels in Swords & Soldiers 2 are filled with art by Ronimo artist Ralph and he is a true master at creating interesting compositions and little micro-stories through object placement.


Another big difference between Swords & Soldiers 1 and 2 is that in 2 we have much bigger props. In the original game mountains and trees were relatively small, so you always saw a lot of them. In the sequel we have scaled them much larger, so you might see only one or two really large mountains in the background, instead of dozens. This makes it all feel a lot larger, drawing the player more into the world instead of looking at funny miniatures. At the same time this makes the backgrounds look less repetitive: if you don't see ten mountains at the same time, then it is also much less obvious that several of them use the same texture.

This is strengthened by another big improvement in Swords & Soldiers 2: there are many more unique assets for specific levels. For example, one level plays in a Viking golf court and there are golf related objects everywhere. These props are not used in any of the other levels, making this level unique and memorable. This way the player will remember more specific things than in Swords & Soldiers 1, where all the levels looked quite similar. A level doesn't even need all that many unique props: since background objects are so much larger now, having one really big prop can sometimes already define a level.


Another improvement that I would like to mention today is the art style. The original game had a very simple cartoony look, while the sequel is much more detailed and painterly. Our artists went for a style reminiscent of French animation and it works beautifully. Most of the level art in Swords & Soldiers 2 is drawn by Adam Daroszewski. He worked as a freelancer for us and did an amazing job at creating a painterly and coherent look.

I have spent most of this blogpost explaining how Swords & Soldiers 2's level art is better than the original. There is however also one big downside: it is much more work to make. With the lack of proper tools and the simple style we had when we made Swords & Soldiers 1 it took very little time to decorate more levels. In part 2 everything requires much more work to do. It really shows, but it is an important trade-off to be aware of. Not having proper tools means that there are a lot of things that artists simply cannot do and this saves huge amounts of time.

Limitations like that are a very effective way of limiting the amount of time it takes to make a game. The better your tools, the bigger the risk of using them too much. We have already spent much more time making Swords & Soldiers 2 than originally planned and the game isn't even done yet. At the same time it is looking so good that spending so much time is totally worth it. I hope that when the game launches you will be as enthusiastic about it as we are! ^_^

In conclusion, I would like to say that I think procedural level generation is great for games that evolve around it, but for a designed experience having hand-made levels works much better. Levels in a game like Swords & Soldiers 2 look better when made by hand than when generated.

Saturday, 14 June 2014

Solving path finding and AI movement in a 2D platformer

When we started developent of the bots for Awesomenauts, we started with the most complex part: how to do path finding and movement? When people think of path finding, they usually think of A*. This well-known standard algorithm indeed solves the finding of the path, and in games like an RTS that is all there is to it, since the path can easily be traversed. In a platformer however the step after the finding of the path is much more complex: doing actual movement over the path. Awesomenauts features a ton of different platforming mechanics, like jumps, double jumps, flying, hovering, hopping and air control. We also have moving platforms and the player can upgrade his jump height. How should an AI know which jumps it can make, how to time the jump, how much air control is needed? This turned out to be big challenge!

Since there are so many potential subtleties in platforming movement, my first thought was that handling it in our behaviour trees might not be doable at all. Behaviour trees are good at making decisions, but might not be as good at doing subtle controls during a jump. Add to that that the AIs only execute their behaviour trees 10 times per second because of performance limitations, and I expected trouble.


The solution I came up with was to record tons of gameplay by real players and generate playable path segments from this. By recording not just the player's position but also his exact button presses, I figured we could get enough information to replicate real movement with precise control. Player movement would be split into short bits for moving from one platform to another. The game could then stitch these together to generate specific paths for going from A to B.

To perform movement this way, the behaviour tree would choose where it wants to go and then executes a special block that takes control and fully automatically handles the movement towards the goal. Very much like playing back a replay of segments of a players' previous movement. The behaviour tree could of course stop execution of such movement at any given time to engage in combat, which would again be controlled entirely by the behaviour tree.

While the above sounds interesting and workable, the devil is in the details. We would have to write recording and playback code, plus a complex algorithm to analyse the recorded movement and turn that into segments. But it doesn't end there. There were six character classes at the time, each with their own movement mechanics. They could buy upgrades that make them walk faster and jump higher. There are moving platforms that mean that certain jumps are only achievable in combination with certain timing of the platform position. All of these variations increase the complexity of the algorithms needed, and the amount of sample recordings needed to make it work. Then their would need to be a way to stich segments together for playback: momentum is not lost instantly, so going into a jump while previously going to the left is not the same as when going into that same jump while previously going to the right.

The final blow to this plan was that the levels were constantly changing during development. Every change would mean rerecording and reprocessing the movement data.

These problems together made this solution feel just too complicated and too much work to implement. I can still imagine it might have worked really well, but not within the scope of a small indie team building an already too complex and too large multiplayer game. We needed a simpler approach, not something like this.

Looking for a better solution we started experimenting. Programmer Bart Knuiman did an internship at Ronimo at the time and his internship topic was AI, so he started experimenting with this. He made a small level that included platforming, but that did not need path finding because there were no walls or gaps. Bart's goal with this level was to make a Lonestar AI that was challenging and fun to play against, using only our existing behaviour tree systems. Impressively, he managed to make something quite good from scratch in less than a week. Most Ronimo team members lost their first battle against this AI and took a couple of minutes to find the loopholes and oversights one needed to abuse to win. For such a short development time that was a really good result, so we concluded that for movement and combat, the behaviour trees were good enough after all.


The only thing really impossible with the systems we had back then was path finding in complex levels. We designed a system for this and Bart built this as well. The important choice we made here was to split path finding and movement into a local solver and a global solver. I didn't know that terminology back then, but someone told me later that it was a common thing with an official name. For finding the global route towards the goal we used path finding nodes and standard A* to figure out which route to take over them. The nodes are spaced relatively far from each other and the local solver figures out how to get to the next node.


The local solver differs per character class and can use the unique properties of that type of character. A jumping character presses the jump button to get up, while one with a jetpack just pushes the stick upwards. The basics of a local solver are pretty simply, but in practice handling all the complexities of platforming is a lot more difficult, yet still doable.


The complex recording system outlined at the start of this post was incredibly complex, while the solution with the local and global solvers is so much simpler. The reason it could be so simple is that although platforming mechanics in Awesomenauts are diverse, they are rarely complex: no pixel-precise wall jumps or air control are needed like in Super Meat Boy, and moving platforms don't move all that fast so getting on to them doesn't require super precise timing. These properties simplify the problem enough that creating a local solver in AI is quite doable.

One aspect that I haven't mentioned yet is how we get the path finding graph. How do we generate the nodes and edges that A* needs to find a route from A to B? The answer is quite simple: our designers place them by hand. Awesomenauts has only four levels and a level needs well below one hundred path finding nodes, so this is quite doable.


While placing the pathfinding we need to take the different movement mechanics into account. Some characters can jump higher than others, and Yuri can even fly. Each class has his own local solver to handle its own movement mechanics, but how do we handle this in the global solver? How do we handle that some paths are only traversable by some characters? Here the solution is also straightforward: any edge we place in the path finding graph can list included or excluded classes. When running A* we just ignore any edges that are not for the current character type. This was originally mostly needed for flyer Yuri: all other classes were similar enough that they could use the same path finding edges.

A similar problem is that falling down from a high platform is possible even if it is too high to jump towards, and jumppads can also only be used in one direction. These things are easy to include in the path finding graph by making those edges only traversable in one direction.

Creating the path finding graph by hand has a couple of added benefits. The first is that we can exclude routes that may work but are too difficult for the local solver to traverse, or are not desirable to use (they might be too dangerous for example). Placing the nodes and edges by hand adds some control to make the movement look sensible. Another nicety is that we can add markers to nodes. The AI can use these markers to decide where it wants to go. For example, an AI can ask the global solver for a route towards "FrontTurretTop" or towards "HealthpackBottom".

The path finding nodes were placed by our designers and they also built the final AIs for the bots. Jasper had made the skirmish AIs for Swords & Soldiers and he also designed the bot behaviours for Awesomenauts.

Awesomenauts launched with only six classes and only four of them had a bot AI. Since then many more characters were added, but they also never received bot AIs. Now that modders are making AIs for those we will probably have to update the edges to take things like Swiggins' low jump and the hopping flight of Vinnie & Spike into account.

To me the most interesting aspect of pathfinding in Awesomenauts is that after prototyping we ended up with a much simpler solution than originally expected. This is a good reminder that whenever we think about building something complex or something that is too much work, we should spent some time prototyping simpler solutions, hoping one of them might work.

PS. The AI tools for Awesomenauts have been released for modders in patch 2.5. Modders and interested developers can try them out, including our pretty spectacular AI debugging tools. They are free to use for non-commercial use, check the included license file for more details. Visit our basic modding guide and modding subforum for more info on how to use these tools.