Our new game Blightbound features many types of foggy effects: mist, dust, smoke and more. Such effects are often made with planes and particles, allowing us to draw fog and effect textures by hand and giving us maximum artistic control. However, one issue with this is that the place where fog planes intersect with geometry creates a hard edge, which looks very fake and outdated. My solution was to implement depth fade. This is a commonly used technique for soft particles, but we use it on lots of objects, not just on particles.
In today’s blogpost I’ll explain how depth fade rendering works. I’ll also show just how widely this technique can be applied, by going through a bunch of examples from Blightbound.
First, let’s have a look at what problem we’re trying to solve here. When putting partially transparent planes in the world, the place where they intersect with other objects creates a straight cut-off line. Sometimes that’s desired, but often those transparent planes represent volumetric effects. They’re not supposed to look like flat planes, but that’s just the easiest and most efficient way of rendering them. This is fine when there are no intersections, but when there are then the hard lines where they touch other objects break the volumetric illusion.
There’s a simple solution for this that’s used in a lot of games: depth fade. The idea is to simply fade out the plane near the intersection. This produces an effect similar to how real fog works: objects that go into the fog seem to smoothly fade out. However, actually figuring out all polygon intersections takes too much performance, so we want a rendering trick instead.
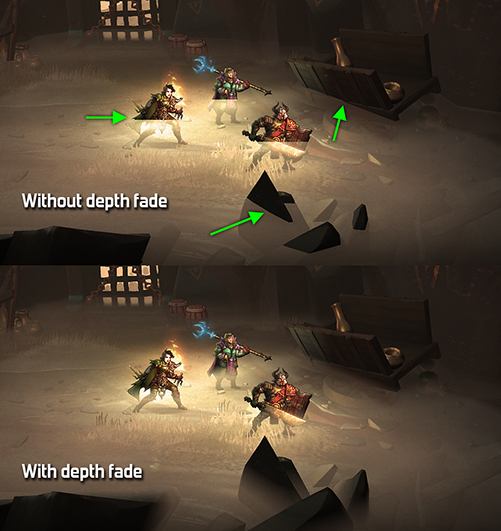
This screenshot from Blightbound shows a fog plane just above the ground. In the top image it is rendered in the standard way, resulting in hard intersections with the characters, rocks and cart. At the bottom the intersections are smoothened by depth fade.
The trick to rendering with depth fade is to first render all normal geometry, excluding any transparent objects. This fills the depth buffer, so for every pixel we know what distance it has from the camera. Then when rendering the objects that need depth fade, the pixel shader looks up the distance in the depth buffer and compares that to its own distance. If these are close to each other, then we assume that we’re near an intersection and fade out this pixel. The nearer, the stronger the fade out, until the object is entirely invisible at the point of intersection.
This technique has a few neat bonus features on top of just smoothing out intersections. By simply setting the distance over which the fade occurs, we can modify the density of the mist. Also, objects don't need to actually intersect with the fog plane to get depth fade applied. Being just beneath the fog plane also makes the effect visible. Thus depth fade is more than just a way to smoothen intersections.
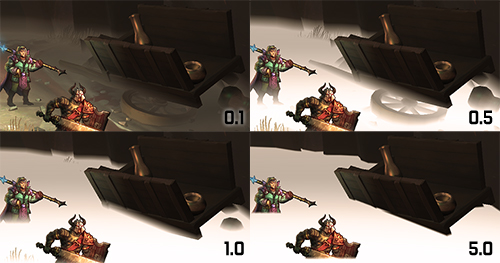
The fog's density setting determines the width of the smoothing of the intersections. At a very high density the smoothing is almost lost. At a very low density the fog almost disappears because the ground is now also considered 'close' to the fog plane.
While this technique is traditionally mostly used for particles, it can easily be used for all objects with transparency. Since the world of Blightbound is covered by the blight (a thick, corrupting fog) we have a lot of types of fog in our game, including many fog planes and particles, as well as smoke and special effects. Our artists can apply depth fade rendering to all of those, not just to particles.
Depth fade is also great for hiding the seams of moving objects, like this fog wall.
A nice property of depth fade is that it doesn't cost all that much performance compared to traditional alpha blending. For each pixel of a particle or fog plane that we render, it costs one extra texture look-up (in the depth buffer) and a distance calculation. Compared to more advanced volumetric techniques, like voxel ray marching, that's a very low price. Since the performance impact of depth fade is low, our artists can use this technique on many objects, not just on the few that really, really need it.
Depth fade can also solve problems with camera facing glow planes. The glow on this torch is always oriented towards the camera, but that makes it intersect with the wall behind it under certain angles. Using depth fade, the intersection can be hidden. This animation shows alternating with and without depth fade.
When I implemented depth fade, I thought I was being pretty clever: I had only ever seen this technique used for soft particles, not for generic object rendering. However, while searching the web a bit to write this blogpost, I found out it's actually a standard feature in the Unreal engine. For Unity I only found the option on particles, but it might exist in a more generic form there as well.
Now that we know how depth fade works, let’s have a look at a bunch of example uses from Blightbound. Special thanks to my colleague Ralph Rademakers, who made most of the levels and is thus the prime user of depth fade in Blightbound. Ralph gave me a nice list of cool spots to show:
A compilation of examples from Blightbound where depth fade is used to great effect, showing both with and without depth fade.
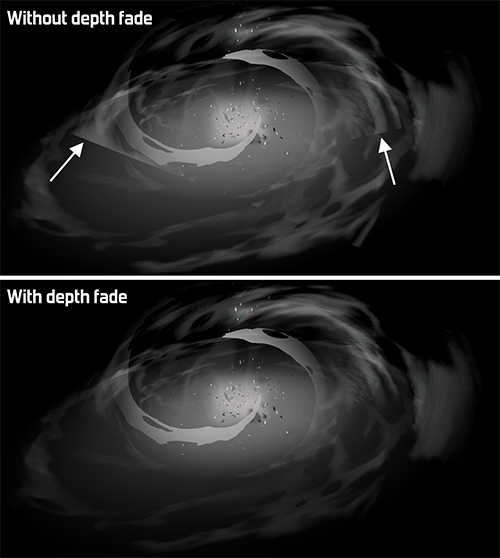
Another application of depth fade is to hide seams of VFX with the world. In this example the smoke effect intersects with a black ground plane.
When I initially implemented depth fade in Blightbound, I thought it would mostly be used on fog planes that float just above the ground, to give the impression of heroes walking through a low hanging, milky fog. As soon as our artists got hold of this technique however they started using it on tons of other objects. This is to me one of the most fun parts of building graphics tech: seeing how much more artists can do with it than I had originally imagined!