Last week I discussed how we used After Effects and Duik as our animation tools for Blightbound, achieving crisp animations at high framerates with small filesizes and nice tools for our animators. The real strength of this workflow however comes from our Skin Editor. This makes it possible to reuse animations, quickly tweak the looks of characters, swap gear, add special effects and attach objects to characters convincingly. Today I’d like to explain the ideas behind our Skin Editor and how this impacted the work of our artists.
As I showed in last week’s blogpost, the basic idea behind animations in Blightbound is that a character is made up of parts (hands, torso, face, upper arms, lower arms, etc.). These parts move and rotate and the game plays that back directly, instead of using sprite sheets.

Characters in Blightbound are animated using parts, and frame-to-frame variations on those parts. This shows some of the parts used in the animations of Malborys.
Since the game knows exactly what parts there are and where they are, there are a lot of fun things we can do with this besides simply playing back animations. How cool would it be to swap parts to create new characters, to swap weapons, to attach special effects to weapons and to attach effect-over-time animations to bodyparts? To achieve all of these things our artists made sure all characters have a similar structure, and I developed our Skin Editor.
The basic idea behind our Skin Editor is that it finds all the visible parts in all the animations for a rig and allows changing or hiding them. So a skin can change whatever it wants: a character’s head, weapon, shoulder, or even everything. When an animation is played back in-game, we inform it which skins are active and those are applied to modify the character’s looks during gameplay.
A demonstration of the interface and the various features of the Blightbound skin editor.
Skins allow us to create a new character by drawing new parts, without needing to create any new animations. This was an important goal for us, because for Blightbound we wanted quite a lot of characters. A core idea behind the game is that it should be a bit like Pokémon: gotta catch em all. There are a lot of playable heroes and the player collects those during gameplay. However, for Awesomenauts it took us 8 years to get to 34 characters and here we needed more animations per character and more characters (enemies included). So the Awesomenauts workflow wasn’t going to work and we needed to apply more reuse instead. The Skin Editor made this possible.
Note that above I said we apply skins, plural. Our skin system allows combining several skins, as well as changing which skins are active on the fly. A skin can add parts, but it can also remove or replace parts from the skin below it. This is pretty cool, because it allows us to do all kinds of cool things. For example, weapons are skins, so swapping a weapon means swapping a skin while keeping the base body skin the same.

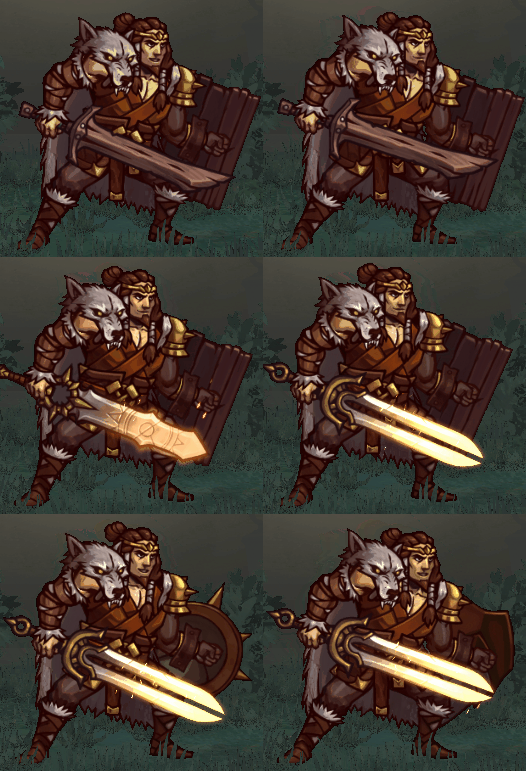
Weapons and shields are easily swapped by enabling and disabling additional skins.
Weapons are an obvious application of this, but we can do more outlandish stuff with this. If an enemy gets hit by a knife that applies a bleed effect (damage over time), then we would like to have an effect on the enemy for the duration of the bleed effect. In Awesomenauts we were heavily limited in these kinds of effects because the sprite sheet didn’t tell us where any of the limbs or feet of the character were. This meant status effects needed to be visualised with animations that are always centered on the character. In Blightbound we can do much better: we can have a knife sticking our of a leg, and the knife will move correctly with the leg. All it takes is adding a skin to the enemy that contains that knife.
Normally we put textures in skins, mostly body parts and clothing and weapons and such. But we also have a feature to attach any in-engine animation to a skin. This allows us to do things like adding sparkly particles to a staff, dripping blood to the knife, glows to the shackles, trails, and even physics capes. We also use this to attach gameplay dummies to skins, for example to make sure projectiles come out of the tip of the staff, no matter where that staff is in the current animation.

The skin system allows us to accurately attach visuals for status effects to the animation. Here the slow effect attaches to the legs. Also, the cape is a nice example of attaching a physics object to the character.
A fun but mostly unused feature I implemented is the scaling of parts. Skins can not just replace parts, but also change their size. We hoped we could use this to change a character’s silhouette, for example by giving one character longer arms and shorter legs. This feature also allows making all heads bigger (which is a common Easter egg in many games, but we didn’t add it to Blightbound).
While scaling worked fine from a technical perspective, in practice it was hard to make good looking characters this way so our artists ended up hardly using that feature. Also, a more complete implementation of limb scaling requires animation retargeting (for example to keep feet firmly on the ground when the ratio between upper and lower legs is changed), which is some pretty advanced tech that we didn’t have time to dive into.
So far it might seem like just having that skin editor enables all of these cool features. However, to make this work, all animations need to have consistent elements. For example, if we want to attach that knife to that underarm, then each animation that the character can play needs to have an underarm and it always needs to have the same name. In some cases we worked around this by adding empty visual parts to the rig, so that any characters that needed those parts could enable them. This is somewhat similar to adding attachment dummies to a skeleton in 3D animation.
Also, if we want to quickly reskin a character, then we should limit how many unique parts there are. In my previous post I mentioned that we do frame-to-frame animation on parts, for example by drawing several heads with different expressions. For every new character we add on this rig, we need to draw all of those heads. The larger the number of parts, the more work it is to add a new character that replaces all of those parts.
There are some tricks that we used to decrease the workload. For starters, our skinning system falls back to the default if variations don’t exist. If for example one character has a mask, then we don’t need to make copies of that mask for different facial expressions. If a character is less important then we can also just choose to not draw the facial expressions for that character, even if they wouldn’t be hidden by a mask.

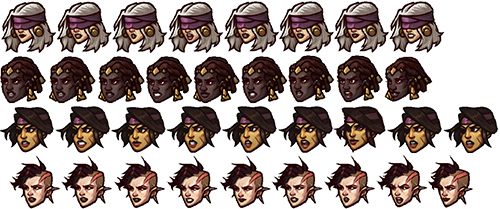
For each character we need to draw all the parts used in all their animations. For four characters in Blightbound this shows all the heads needed for the female rig. Note that some characters have one head fewer. That's okay because in such cases our skin system automatically falls back to the default.
Another thing we used is that not all characters use all animations. Enemies for example share some animations with heroes, but their animation set is a lot smaller. Enemies therefore only need to have the parts that are actually used in their animation set. For this same reason our animators had a lot more flexibility in adding parts whenever they made a character-specific animation: none of the other characters need to have those parts.
By carefully choosing which parts and variations are really needed, our artists managed to keep it all doable. Still, in total Blightbound currently has over 4,600 character parts. Together these form around 50 characters (players and enemies), 104 weapons and 45 shields.
This did require a lot of experimenting with exactly how a body is made up. While the basic parts may seem straightforward, there are a lot of subtle choices to be made. For example, feet are split in the front part (including the toes) and the back part, and the pelvis and torso are split. Also, some parts are in the rig twice: once in the front and once in the back, for more clothing possibilities.

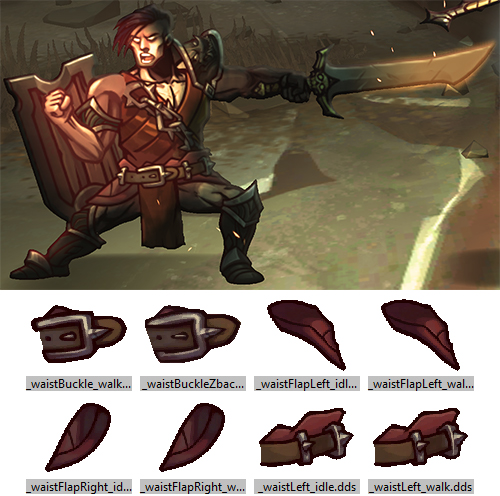
Our artists spent a lot of time figuring out exactly how the rig should be split into parts to be able to do a lot of poses and clothing variations without introducing too many parts. For example, here we see that the belt is split into 3 parts and there are "waistflaps" in the rig.
This brings us to the biggest downside of this approach: it adds a lot of limitations to what our animators can do. For each animation they need to creatively reuse the existing parts as much as possible. They can add new parts when it’s really needed, but they need to be very conservative with this to avoid bloating the workload. The result is that animations are a bit less dynamic that in Awesomenauts and Swords & Soldiers 2. Also, our artists generally did not enjoy the extra challenge of these limitations.
Another downside is that reusing animations makes characters a lot more similar visually, and limits what we can do in terms of body types. Our artists did go out of their way to make the characters as visually unique as possible within the limitations of the rig, for example by adding variation through extreme headgear, capes and clothing.
To make characters feel more unique, our artists have made select unique animations for each hero. Especially the idle animations are different, but in some cases also the walk animations. That’s one of the nice things of reuse: during development you quickly have a full character in the game with all animations, and then later on you can replace specific animations to make them more unique.

To make characters that use the same rig less samey, most have a unique idle animation.
Animation reuse is also great for prototyping: if for example a designer wants to try swapping skills around between enemies, they get an animation set for free to get a better idea of what gameplay feel that will have. In Awesomenauts on the other hand that often required an artist to make some extra concept frames for skill visualisation.
Before I finish this blogpost I would like to point out that the Skin Editor and the limitations we applied to be able to reuse animations are not necessary when using After Effects and Duik for animations. It’s perfectly possible to let go of all of those limitations and still get all the benefits that I discussed in last week’s blogpost. In fact, our After Effects exporter is technically capable of exporting Awesomenauts characters without using sprite sheets.
Despite the downsides, the scope of Blightbound would not have been doable for us without the approach we used. The combination of the Skin Editor and the consistent body setup that our artists applied to all animations made a lot of cool things possible for Blightbound. We were able to make more characters then we could otherwise have, create swappable gear, add special effects to weapons and attach animations to body parts. In total, I think the result is pretty spectacular. Also, playing around with the Skin Editor is just plain fun!
To conclude, here’s a video that shows what happens when you repeatedly randomise all parts of a character:
The Blightbound dev tools contain a feature to randomise skins. The results look both horrible and hilarious.
First off, very cool. At Blue Giraffe we also recognized that facial expressions can take up a lot of space (and dev time?) but often have quite similar silhouettes. That’s why we made an exporter that only saves the delta pixels, and can be rendered on top of the original face. Another way would be to itemize the face parts. But I’m sure you weighed the added complexity, overdraw and draw calls already :-)
ReplyDeleteWith this system texture space isn't much of an issue for us. All character parts combined is still only 64mb. It's a PC/console game, so that's very little and there's no point in optimising that further. I imagine sizes are different on mobile and browser games though.
DeleteWow, quite awesome tool.
ReplyDeleteI am a Unity user and this type of thing just came this year on the Engine. I mean, it had a Spine copy tool inside the Engine already but the Sprite Swap thing needed to be dealt manually via scripting some months ago.
And with a custom tool, things looks way more fast and more focused on the problem you're solving. Different from game engine specific tools which takes longer to be updated and tries to solve a lot of related problems resulting in a chimera tool that doesn't have a quick iteration workflow.
Bah, better stop complaining about it. To give context, I am just starting on this custom tool world, after discovering that the guys behind Supergiant Games had their own custom engine and they are like 7 guys. Hauha
BTW, the Blightbound engine is based on something like MonoGame? Or it is more native like a C++ with OpenGL/ DirectX?
Thanks for sharing this content!
Yeah custom tools are really nice to have, since you can solve very specific problems for your game and team. Takes a lot of work to make though, so you need to have a big enough team before it's an option.
DeleteBy the way, you don't need your own engine for any of that. You can make custom tools for Unity and Unreal as well (although I don't have any experience with that myself) and some of our tools aren't even in an engine: just Photoshop and After Effects scripts.
All our games so far are made in the Ronitech, which is our own C++ engine. It supports a lot of different rendering APIs depending on the platform. The Blightbound version of Ronitech supports DirectX11 (PC+XboxOne), DirectX9, OpenGL and the PS4 rendering API.
I wrote the first version of our engine for Swords & Soldiers, when we too were 7 people and I was the only programmer. I'm officially TH3 H4RDC0R3Z since then. :P