Wednesday, 17 March 2021

Super flexible 2D animations through the Blightbound Skin Editor

Last week I discussed how we used After Effects and Duik as our animation tools for Blightbound, achieving crisp animations at high framerates with small filesizes and nice tools for our animators. The real strength of this workflow however comes from our Skin Editor. This makes it possible to reuse animations, quickly tweak the looks of characters, swap gear, add special effects and attach objects to characters convincingly. Today I’d like to explain the ideas behind our Skin Editor and how this impacted the work of our artists.

As I showed in last week’s blogpost, the basic idea behind animations in Blightbound is that a character is made up of parts (hands, torso, face, upper arms, lower arms, etc.). These parts move and rotate and the game plays that back directly, instead of using sprite sheets.


Characters in Blightbound are animated using parts, and frame-to-frame variations on those parts. This shows some of the parts used in the animations of Malborys.

Since the game knows exactly what parts there are and where they are, there are a lot of fun things we can do with this besides simply playing back animations. How cool would it be to swap parts to create new characters, to swap weapons, to attach special effects to weapons and to attach effect-over-time animations to bodyparts? To achieve all of these things our artists made sure all characters have a similar structure, and I developed our Skin Editor.

The basic idea behind our Skin Editor is that it finds all the visible parts in all the animations for a rig and allows changing or hiding them. So a skin can change whatever it wants: a character’s head, weapon, shoulder, or even everything. When an animation is played back in-game, we inform it which skins are active and those are applied to modify the character’s looks during gameplay.


A demonstration of the interface and the various features of the Blightbound skin editor.

Skins allow us to create a new character by drawing new parts, without needing to create any new animations. This was an important goal for us, because for Blightbound we wanted quite a lot of characters. A core idea behind the game is that it should be a bit like Pokémon: gotta catch em all. There are a lot of playable heroes and the player collects those during gameplay. However, for Awesomenauts it took us 8 years to get to 34 characters and here we needed more animations per character and more characters (enemies included). So the Awesomenauts workflow wasn’t going to work and we needed to apply more reuse instead. The Skin Editor made this possible.

Note that above I said we apply skins, plural. Our skin system allows combining several skins, as well as changing which skins are active on the fly. A skin can add parts, but it can also remove or replace parts from the skin below it. This is pretty cool, because it allows us to do all kinds of cool things. For example, weapons are skins, so swapping a weapon means swapping a skin while keeping the base body skin the same.
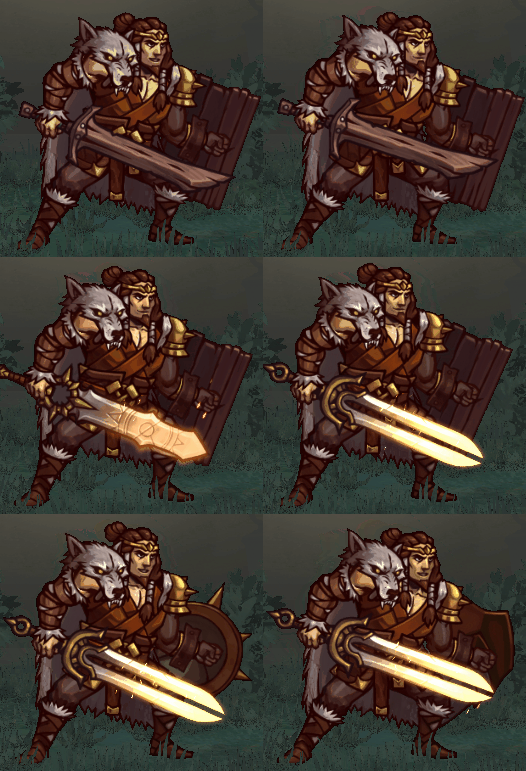

Weapons and shields are easily swapped by enabling and disabling additional skins.

Weapons are an obvious application of this, but we can do more outlandish stuff with this. If an enemy gets hit by a knife that applies a bleed effect (damage over time), then we would like to have an effect on the enemy for the duration of the bleed effect. In Awesomenauts we were heavily limited in these kinds of effects because the sprite sheet didn’t tell us where any of the limbs or feet of the character were. This meant status effects needed to be visualised with animations that are always centered on the character. In Blightbound we can do much better: we can have a knife sticking our of a leg, and the knife will move correctly with the leg. All it takes is adding a skin to the enemy that contains that knife.

Normally we put textures in skins, mostly body parts and clothing and weapons and such. But we also have a feature to attach any in-engine animation to a skin. This allows us to do things like adding sparkly particles to a staff, dripping blood to the knife, glows to the shackles, trails, and even physics capes. We also use this to attach gameplay dummies to skins, for example to make sure projectiles come out of the tip of the staff, no matter where that staff is in the current animation.


The skin system allows us to accurately attach visuals for status effects to the animation. Here the slow effect attaches to the legs. Also, the cape is a nice example of attaching a physics object to the character.

A fun but mostly unused feature I implemented is the scaling of parts. Skins can not just replace parts, but also change their size. We hoped we could use this to change a character’s silhouette, for example by giving one character longer arms and shorter legs. This feature also allows making all heads bigger (which is a common Easter egg in many games, but we didn’t add it to Blightbound).

While scaling worked fine from a technical perspective, in practice it was hard to make good looking characters this way so our artists ended up hardly using that feature. Also, a more complete implementation of limb scaling requires animation retargeting (for example to keep feet firmly on the ground when the ratio between upper and lower legs is changed), which is some pretty advanced tech that we didn’t have time to dive into.

So far it might seem like just having that skin editor enables all of these cool features. However, to make this work, all animations need to have consistent elements. For example, if we want to attach that knife to that underarm, then each animation that the character can play needs to have an underarm and it always needs to have the same name. In some cases we worked around this by adding empty visual parts to the rig, so that any characters that needed those parts could enable them. This is somewhat similar to adding attachment dummies to a skeleton in 3D animation.

Also, if we want to quickly reskin a character, then we should limit how many unique parts there are. In my previous post I mentioned that we do frame-to-frame animation on parts, for example by drawing several heads with different expressions. For every new character we add on this rig, we need to draw all of those heads. The larger the number of parts, the more work it is to add a new character that replaces all of those parts.

There are some tricks that we used to decrease the workload. For starters, our skinning system falls back to the default if variations don’t exist. If for example one character has a mask, then we don’t need to make copies of that mask for different facial expressions. If a character is less important then we can also just choose to not draw the facial expressions for that character, even if they wouldn’t be hidden by a mask.
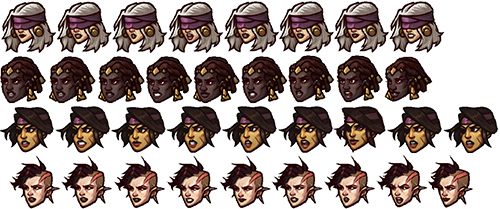

For each character we need to draw all the parts used in all their animations. For four characters in Blightbound this shows all the heads needed for the female rig. Note that some characters have one head fewer. That's okay because in such cases our skin system automatically falls back to the default.

Another thing we used is that not all characters use all animations. Enemies for example share some animations with heroes, but their animation set is a lot smaller. Enemies therefore only need to have the parts that are actually used in their animation set. For this same reason our animators had a lot more flexibility in adding parts whenever they made a character-specific animation: none of the other characters need to have those parts.

By carefully choosing which parts and variations are really needed, our artists managed to keep it all doable. Still, in total Blightbound currently has over 4,600 character parts. Together these form around 50 characters (players and enemies), 104 weapons and 45 shields.

This did require a lot of experimenting with exactly how a body is made up. While the basic parts may seem straightforward, there are a lot of subtle choices to be made. For example, feet are split in the front part (including the toes) and the back part, and the pelvis and torso are split. Also, some parts are in the rig twice: once in the front and once in the back, for more clothing possibilities.
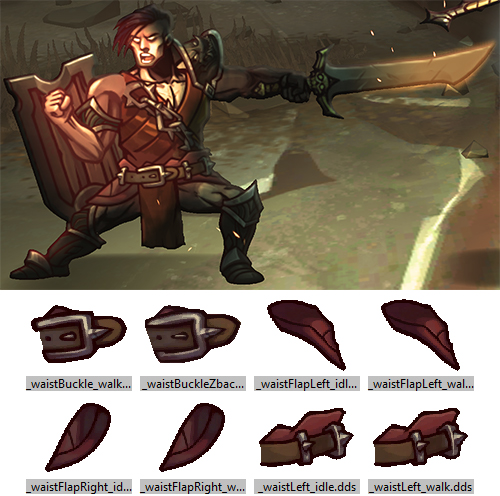

Our artists spent a lot of time figuring out exactly how the rig should be split into parts to be able to do a lot of poses and clothing variations without introducing too many parts. For example, here we see that the belt is split into 3 parts and there are "waistflaps" in the rig.

This brings us to the biggest downside of this approach: it adds a lot of limitations to what our animators can do. For each animation they need to creatively reuse the existing parts as much as possible. They can add new parts when it’s really needed, but they need to be very conservative with this to avoid bloating the workload. The result is that animations are a bit less dynamic that in Awesomenauts and Swords & Soldiers 2. Also, our artists generally did not enjoy the extra challenge of these limitations.

Another downside is that reusing animations makes characters a lot more similar visually, and limits what we can do in terms of body types. Our artists did go out of their way to make the characters as visually unique as possible within the limitations of the rig, for example by adding variation through extreme headgear, capes and clothing.

To make characters feel more unique, our artists have made select unique animations for each hero. Especially the idle animations are different, but in some cases also the walk animations. That’s one of the nice things of reuse: during development you quickly have a full character in the game with all animations, and then later on you can replace specific animations to make them more unique.


To make characters that use the same rig less samey, most have a unique idle animation.

Animation reuse is also great for prototyping: if for example a designer wants to try swapping skills around between enemies, they get an animation set for free to get a better idea of what gameplay feel that will have. In Awesomenauts on the other hand that often required an artist to make some extra concept frames for skill visualisation.

Before I finish this blogpost I would like to point out that the Skin Editor and the limitations we applied to be able to reuse animations are not necessary when using After Effects and Duik for animations. It’s perfectly possible to let go of all of those limitations and still get all the benefits that I discussed in last week’s blogpost. In fact, our After Effects exporter is technically capable of exporting Awesomenauts characters without using sprite sheets.

Despite the downsides, the scope of Blightbound would not have been doable for us without the approach we used. The combination of the Skin Editor and the consistent body setup that our artists applied to all animations made a lot of cool things possible for Blightbound. We were able to make more characters then we could otherwise have, create swappable gear, add special effects to weapons and attach animations to body parts. In total, I think the result is pretty spectacular. Also, playing around with the Skin Editor is just plain fun!

To conclude, here’s a video that shows what happens when you repeatedly randomise all parts of a character:


The Blightbound dev tools contain a feature to randomise skins. The results look both horrible and hilarious.

Special thanks to Ronimo artists Koen Gabriels, Tim Scheel and Gijs Hermans for providing feedback on this article.

Saturday, 13 March 2021

New song: The Remains of the Mountain

Here's my newest song! It's an atmospheric piece, more ambiance than real song. I think the atmosphere is pretty strong on this one, I hope you like it!


Visit music.joostvandongen.com for an MP3 download of this song.

This song is actually an improvisation I recorded back in 2014. It's four layers of cello and one layer of... a pan's metal lid! Because why not.

Back in 2014 I liked the result, but it was too rough to use. I didn't think I'd manage to capture the same feel if I were to extensively practice the piece and record it again, so I abandoned this piece. Since then I've learned a lot more about editing recordings and fixing issues. Especially, I recently bought Melodyne, which is a great tool for fixing incorrect pitch and timing in recordings. With this I managed to get this song to a point where I'm actually happy with the result.

Also, here's a little bit of advanced music theory that I applied in this song. This song contains a bunch of very long chords without any vibrato, so the exact pitch of the chords is very audible. The opening chord for example is a major third. If you make that pitch perfect for modern tuning, the chord is actually slightly out of tune. I explained that years ago in this blogpost, but I had never gotten around to actually applying that knowledge. Now, using Melodyne's precise pitch control, I finally could. I've pitched the top note of the opening chord slightly lower than it would be on a piano, given the major third chord just intonation (also called "pure intonation"). While it's possible to play like that right way, my cello skills aren't good enough to control the pitch I'm playing that precisely in a recording.

Similarly, the minor thirds, fifths and major sixths in this song are also just intonation. Unfortunately Melodyne couldn't figure out some of the chords, so I couldn't apply it everywhere.

Oh, now that I'm talking music: my album is coming out in just two weeks! It will release on streaming platforms (Spotify, YouTube and others), and I'll also sell it on CD, including a bonus disc without the narrator. Send an email to joost@joostvandongen.com if you'd like to buy a physical copy. It doesn't contain The Remains of the Mountain, but it does contain 47 minutes of other awesome cello pieces I composed. I'm really looking forward to finally sharing it with the world!


The CD edition of my album contains a 16 pages booklet with art by Marissa Delbressine, and a bonus disc with a version of the album without the narrator (so purely instrumental).

Wednesday, 10 March 2021

Finding a suitable toolchain for animating Blightbound’s 2D characters

For Blightbound our technical ambitions for the 2D animation system were quite lofty: we wanted high quality animation, screen-filling bosses, crisp character art, high framerate and swappable gear. This required a complete rework of our animation pipeline, since the sprite sheets we used in Awesomenauts and Swords & Soldiers 2 allow for none of those requirements, except for high quality animations. In today’s blogpost I’d like to explain the problems we faced, and what combination of tools we chose to solve them. This is the first half of a two-parter: next week I’ll discuss our skin editor and its implications on animation.


Blightbound features huge screen-filling bosses that need to animate smoothly without taking up insane amounts of memory.

Traditionally 2D animation in games is done using sprite sheets. A sprite sheet is simply a big texture with all the frames for all a character’s animations in it. Sprite sheets aren’t limited to just character animation: they can also store other things, like special effects or plants. The frames might be in a grid, or spaced more efficiently like we did for Awesomenauts. In any case, it’s just a series of tightly packed images.

Sprite sheets are great because they allow for complete freedom. The animator can draw anything they like and it will just work. Extreme squash-and-stretch? Perspective changes? Morphs? Do as you please, to the game it’s all just images!

However, sprite sheets come with a few huge downsides. First is size. If you have a big character and want it to be crisp and high-resolution, then each frame is going to take up a lot of space. Having lots of large images is going to cost too much memory. In Awesomenauts this was indeed a problem for some of the characters. For Clunk to fit in one 4096*4096 sprite sheet (the maximum we chose for memory and compatibility reasons), we had to either lower the resolution a bit, or reduce the framerate. And that’s not even that big of a character! The high memory usage of sprite sheets means that screen-filling bosses either can’t be done, or need to have very few frames, or can’t be crisp.


In Awesomenauts, red Clunk occupies an entire 4k sprite sheet texture for all his animation frames. Clunk fit only after slightly downsizing him.

The second major downside of sprite sheets is that since it’s just images, it’s very hard to do anything with them except simply showing them. For Awesomenauts we’ve often talked about letting players customise characters by changing for example their hat or other parts, but simple sprite sheets make that incredibly hard. The engine would need to know where the hat is exactly, but the sprite sheet doesn’t contain that information. Nor does it tell us whether there are different perspectives of the hat in different frames, or whether anything is ever in front of or behind the hat.

I can think of some workarounds for this problem, but it’s all so cumbersome that’s it’s not practical to actually do. This is the main reason why Awesomenauts only contains skins that swap the entire look of a character, and no swappable hats or clothing: those would be completely new sprite sheets for each combination.


Since every skin change in Awesomenauts requires an entire new sprite sheet we decided to make full reskins instead of allowing the user to customise individual parts (like hats or weapons). These are the four looks for Ted McPain.

So, sprite sheets can’t give us four of our requirements (screen-filling bosses, crisp character art, high animation framerate and swappable items). What can we do instead? The obvious direction for a solution is to split a character in parts, and let those parts move relative to each other. Or even to go for full skeletal animation.

If you have a background in 3D animation, you might think “well skeletal animation of course, it’s awesome!” And in 3D it is indeed, but in 2D it’s a lot more limited. Because we’re restricted to the 2D plane, there’s a lot of animation that can’t be done with a standard skeleton in 2D. Rotating the head of the character away from the camera is super easy in 3D, but impossible with 2D skeletal animation. Swinging a sword vertically is easy, but horizontally is very hard because that requires 3D perspective. Wanting to circumvent these limitations, we opted for a combination of 2D skeletal animation and traditional frame-to-frame animation on parts where needed.

A common tool for doing part-based 2D animation is Spine. Spine is used by a lot of games and we expected this to be our best option. We tried Spine and it was indeed quick and easy to use, as well as easy to integrate into our own engine. However, it turned out to be a bit too simple: Spine doesn’t allow swapping a part in the middle of an animation. This is needed if you want to mix skeletal animation with frame-to-frame animation, for example by switching to a different drawing of a head or hand. The workaround was to layer several skeletons on top of each other, but that was too clunky to work with. We reached out to Spine at the time, explaining this issue, and they confirmed this was the only way. Our evaluation was three years ago and we haven't tried Spine since, but according to this post by them their options for combining frame-to-frame with skeletal animation seem to have improved recently.


Spine by Esoteric Software is a 2D character animation tool for games for creating animations using parts, skeletons and deformations (screenshot taken from one of Spine's tutorial videos).

We also tried some other tools, including Blender and 3D Studio MAX, but those turned out to be too focussed on 3D to create a good workflow for 2D animation for us. Especially the nice skeletal systems they have became quite impractical when used for 2D animation.

So instead, we wanted to stick with After Effects. After Effects is mostly known as a tool for editing video and doing special effects and such, but it’s actually also just a really good general animation tool. Our artists happily used it for character animation in our previous games Awesomenauts and Swords & Soldiers 2. The basic idea is this: each part in an animation is a layer, and can be animated, linked and deformed freely. By turning layers on and off, you can do frame-to-frame animation on parts (like a hand opening and closing) or on the character as a whole.

I imagine After Effects would be a bad fit for full hand-drawn frame-to-frame animation, like in Cuphead, since After Effects doesn’t even allow drawing on layers directly (we draw all our parts in Photoshop). However, for our games it’s an excellent tool because we don’t want to redraw the entire character every frame anyway.

There was something missing though: After Effects is a great animation tool, but it’s not really tailored to 2D character animation. Good thing we already knew about the Duik plug-in. Duik adds the rigging features that are common in 3D animation to After Effects. Combined with the strong tools After Effects already has, it’s a really effective 2D animation tool for games.


Duik is an After Effects plugin that adds tons of 2D animation features (screenshot from this tutorial video by Motion Tutorials).

I previously mentioned we wanted to mix skeletal animation with frame-to-frame animation. That part is actually really simple with Duik. The artist just links several drawings of a part to a bone and switches which is visible. This way we can change facial expressions during animations, as well as do things like open and close hands, pivot or distort a torso and switch facial expressions.


Thumbnails of most animation parts needed for one character in Blightbound. The various hands, faces and chests are for frame-to-frame animation on parts of the body.

Happy with After Effects+Duik as our animation tool, another important thing was missing: After Effects files can’t be played back in real-time engines. So I set about the task of writing an exporter from After Effects that exports all the hierarchy and animation data. I also implemented the in-game side of playing that back in real-time.

At it’s core, this is a surprisingly simple task. Each part in an After Effects animation is a layer and we can just export all the layers with their animation frames and play them back. Where I went wrong though, is that I wanted to emulate Duik’s systems in-game. I thought Duik only did basic two-bone inverse kinematics and implemented that in the engine. This worked with simple animations, but for complete characters the animations were completely broken in-game. When I looked deeper I learned that Duik actually has a ton of different animation systems and approaches. Mimicking all of those in-game was totally undoable.


Duik has so many features that only supporting parenting and two-bone IK produced completely wrong results in-game, as can be seen in this 'beautiful' monstrosity. This was intended to be a normal walk animation, early during development of Blightbound.

Once I realised this, I went for an easy alternative: animation baking. I export the orientation, scale and position of each part at 30 frames per second, simply storing the values for each frame (unless they’re not changing). This is a lot more data, but compared to the size of textures it’s really negligible. I did keep the hierarchy of the bones, so parts don’t start to subtly 'float' compared to each other.


Our custom file format is simply a text file with a long list of all parts and the information needed to position and animate them correctly, including parenting and keyframes.

I previously said we wanted high framerate. The game actually interpolates between these frames, so while they’re exported at 30fps, they’ll also run smoothly at 60fps, 144fps, or any other framerate. That’s also great for when slowing an enemy: in Awesomenauts, if you slow an enemy, you can see the low framerate of their slowed down walk animation. In Blightbound, movement remains perfectly smooth.

A note there is that whenever something needs to jump from one position to another instead of smoothly interpolating there, the artist needs to use a hold key. Our tool exports those and applies them correctly during playback. Overlooking this caused some bugs here and there, because artists aren’t used to needing to use hold keys when two frames are directly next to each other. In-game however there can be frames in between, so that case still needs a hold key.


A few animations that Ronimo animator Tim Scheel made for the Blightbound character Karrogh.

After Effects is a huge tool with tons of features, so it’s impossible to support them all in-game. Our exporter only supports what we actually need, and nothing else. This means our artists need to avoid using some After Effects features that they might want to use. In most cases this is fine, but one particular feature that we ended up not supporting due to a lack of time, is mesh deformations (also known as puppet pins). Being able to deform a part would have helped a lot, but we didn’t find the time to implement a good emulation of After Effects’ deformation features in-game. Quite a pity, and I wonder whether our artists have ever wished they had chosen Spine after all, since Spine supports deformations in-game out-of-the-box.

Our artists did apply a simple workaround for the lack of deformations. By doing them in Photoshop and saving them as different frames for a part, they work fine. Technically the engine then thinks it’s frame-to-frame animation, but it’s actually deformed instead of redrawn in Photoshop. This approach wasn’t used much because it requires a lot of handwork, especially when reusing animations on several characters, but it does get the job done when needed.


The chest deformation in this animation from Blightbound was made by deforming the chest part in Photoshop and then exporting it as separate parts.

From a memory perspective the result of our toolchain is pretty impressive. Whereas a single Awesomenauts character can take up 16mb of texture space (excluding skins and the blue team), all Blightbound characters and enemies together use only 65mb of texture space, spread out over 4,600 character parts. On top of that, Blightbound animations are much higher resolution and higher framerate and we can swap parts and weapons dynamically.

What we have so far is strong animation tools (After Effects + Duik) and a way to play animations back in-game. This is enough to make a playable game, but we wanted considerably more: easy reuse of animations between characters, equippable gear, attaching special effects to bodyparts and efficiently handling thousands of character parts. In next week’s blogpost I'll dive into how we achieved those goals using our own skin editor.

Special thanks to Ronimo artists Koen Gabriels and Gijs Hermans for providing feedback on this article.

Sunday, 21 February 2021

Blightbound's approach to individual storytelling in a coop game

An interesting design challenge during development of Blightbound was how to combine personal storytelling with coop gameplay. In Blightbound three players play together, but they might be at different spots in the stories of their respective characters. How to make room for storytelling without spoiling stories for other players who might not be there yet, and without making players wait for each other? Today I’d like to dissect the approach we’ve used to solve this problem.

Before I continue, note that this blogpost will spoil some story moments. However, I’ve made sure to only take examples from early in each character’s story, so the videos in this post will only be a minor spoiler to the game.

Blightbound is a coop dungeon crawler, but unlike games like Diablo it doesn’t have a linear campaign. Instead, the player repeatedly plays a number of dungeons while learning each character’s story and gathering loot and more characters. In that sense it’s structured more like the end-game of Diablo, or like a looter shooter.


Blightbound is a 3 player game, with both online and local coop.

Another important aspect of Blightbound is that it has a lot of heroes. Instead of maxing out one hero for dozens of hours, the player gets to unlock a bunch and is invited to try them all. We would like players to vary what character they play. For this reason we wanted to tell a lot of small stories, interweaved with gameplay, instead of telling one big story. Each character has their own little story they go through.

Each hero in Blightbound has an individual story that’s told through the dungeon runs with that character. When 3 players play together, they each play a different character so they’re supposed to get different stories. This is where the issues that I’m discussing today arise. Players shouldn’t see the stories that the other players are getting, because they might not have progressed to that point with that character yet (spoilers!), or might have seen that bit already. Also, Blightbound is a fast-paced game so we don’t want players waiting for each other’s cutscenes.

The solution we came up with is that the storytelling is entirely private. When one player gets a bit of story for their character, other players don’t notice this at all. They might even simultaneously be getting different stories for different characters!

Now how do we make that work without letting players wait for an invisible cutscene? The simplest solution is used a lot in Blightbound: dialogue while gameplay continues. The player gets served portraits, speech bubbles and voice acting while the gameplay continues. So there’s no need to stand still and watch a cutscene.


Two examples of basic story beats during gameplay.

This does introduce a problem: getting extensive dialogue during combat is going to be very distracting and the player likely won’t be able to follow the text while focussing on the fight. Luckily, we needed some pacing anyway. A dungeon that’s 15 minutes of constant combat is both too intense and boring. So we should introduce some quieter moments anyway, and we make dialogue happen during such moments as much as possible. This way players can keep exploring but also have the mindspace to digest the storytelling.

If the player keeps moving, who is that dialogue with then? Here we’ve tried to vary it as much as possible. The simplest ‘dialogues’ are inner monologues of the hero. In other cases there’s a dialogue with an an NPC who’s standing in the level. Here too the other players can’t see this non-player character. To avoid waiting, the player can just keep walking: the dialogue starts when interacting with the NPC, but after that the player can run away and the dialogue will continue.


Gameplay continues during dialogues, so teammates don't have to wait for you.

To spice things up, we’ve added a fun trick here. The player is playing with two others who are random other heroes. To make the dialogues more dynamic, these other heroes will actually respond to it. But 21 characters all responding to all the story moments of all 21 other characters is way too many combinations. So instead we’ve defined a bunch of standard responses that each character has unique versions of. These are referred to in the dialogue scripts and then inserted dynamically during gameplay.

We have a total of 11 types of such standard responses and each character has their own line for each type. This way the responses can fit their personality. For example, these three lines show how different characters fill in the symphathy response:

  • "I feel your pain."
  • "You have the clan's sympathy."
  • "Would a moisturizing salve help?" (lol wut)


All eleven types of responses for one of the playable heroes.

What we have so far is cool, but still rather basic: all storytelling is done through dialogues and monologues and that’s it. From there we’ve looked into how we could spice things up without adding pauses. We should also not introduce too much work: Blightbound has more than 100 such story moments so efficiency is important.

The first element that adds some variation is how story beats are triggered. In some cases it’s simple: enter an area that’s marked and the storytelling starts. Some story events can trigger in any such area, while others need to take place in specific dungeons since they’re linked to that setting.

The more interesting ones require some form of interaction. For example, the mage Korrus looks for vases to investigate, so you need to spot them and interact with them. Other characters see someone standing in the dungeon and need to interact with the character, or see a hallucination. When there’s a hallucination hanging in the level, it’s only visible to the player who’s story beat this is for. To their teammates, it’s just a regular spot in a dungeon. Again we’ve made sure that we only use short and simple interactions, so that your teammates don’t need to wait for you.

One of the more fun types of story events are elite enemies. Some heroes need to fight specific characters to progress their story. To make this work, we’ve made special elite versions of some enemies that only trigger as part of someone’s story. The party of 3 players fight the elite enemy together. The nice thing here is that to your teammates, it’s just another elite enemy with some special skills (we have plenty of those outside story moments as well), while to you this specific enemy is a story moment and triggers dialogue. So this is a coop battle that is also a single player story moment. Quit neat, I think!


An example of a story beat in which we encounter an elite enemy.

Unlocking new heroes to play is a big part of Blightbound’s progression system. Here too a goal was to add some variation. Many heroes are simply found and rescued from a dungeon, but some others can only be unlocked by paying the merchant, by making your village prosper, or by finishing the story of another character.

For the simplest case, where a hero is rescued from a dungeon, we again ran into the problem of this being a coop game. My teammate might already have saved the hero that I’m rescuing, how does that work? To solve this problem, we’ve introduced the concept of survivors. These are basic characters that you can’t play. When you rescue a survivor, you get a little prosperity bonus to your village and that’s it. Now whenever one player is unlocking a hero by rescuing them in a dungeon, the other players see this as rescuing a generic survivor. This way it never looks like a teammate is reviving thin air: there’s always someone lying on the ground, ready to be saved. It might just happen to be a different character for each player.


Unlocking a hero compared to rescuing an anymous survivor.

One more nice trick that I would like to mention is one that we’ve so far unfortunately not finished implementing (Blightbound is still in Early Access on Steam). Since levels have these areas that are ideal for triggering story beats (no combat, some space for exploration), it would be nice to do something with that even when there’s no story beat for your specific character triggering in that run. So Roderick (the writer on Blightbound) has written a bunch of dialogues and banter that add some world building and personality building, but aren’t tied to any moment in the story. This way we can always trigger something. Since this is really a non-essential bonus feature we haven’t gotten around to actually implementing these lines yet, but I really like this feature so I can only hope that we’ll find the time to add this at some point.

Before concluding this blogpost I’d like to also have a short look at the implementation. With 21 heroes all having story moments and shouts and banter, Blightbound has a LOT of voice lines. There are more than 100 story events and over 6,000 voice files, ranging from short barks to several sentences. Working efficiently with such large volumes requires some proper tools, so Ronimo programmer Jeroen Stout (known for having made Dinner Date before joining Ronimo) implemented a system he calls Voice-A-Tron.

Voice-A-Tron was tailor-made for Blightbound and it’s a very neat tool that provides a bunch of features, including:

  • A spreadsheet that automatically presents all lines in two formats: per character and as it appears in dialogue (so alternating between lines of different characters).
  • Some simple scripting rules that allow defining dialogues, what portrait to use, where to trigger context-sensitive responses, triggering animations and even triggering related achievements and unlocks.
  • A system that automatically executes these scripts in-game, so that our game designers need to do less work to implement story beats.
  • Special objects that can be placed in levels to control where and when story beats are triggered.

Using Jeroen’s Voice-A-Tron system, Roderick Leeuwenhart wrote and defined all the story beats. Roderick is the writer for all Blightbound dialogues, as well as a series of short stories set in the Blightbound universe. The next step was that Ronimo game designer Thomas van der Klis did the actual implementation, for example defining where story events can trigger and creating special items and elite enemies.

The result of all this work is that in Blightbound, each character has their own story beats and these are told without interrupting the flow of gameplay and without spoiling teammates. At the same time the system is simple enough that it was doable to implement for all 21 heroes in Blightbound. While Blightbound isn't a storytelling game at its core, I feel this adds a lot of personality and purpose to the experience.

Sunday, 6 December 2020

Softening polygon intersections in Blightbound

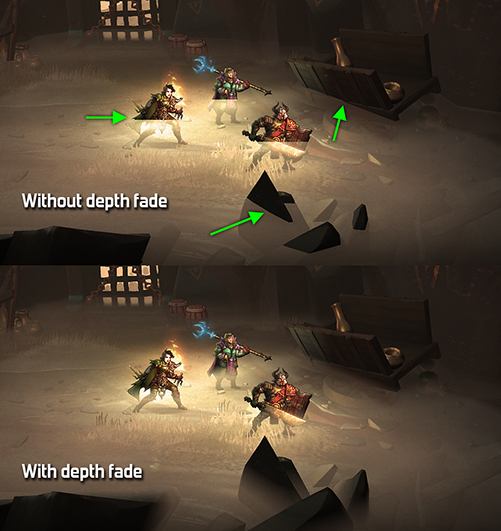
Our new game Blightbound features many types of foggy effects: mist, dust, smoke and more. Such effects are often made with planes and particles, allowing us to draw fog and effect textures by hand and giving us maximum artistic control. However, one issue with this is that the place where fog planes intersect with geometry creates a hard edge, which looks very fake and outdated. My solution was to implement depth fade. This is a commonly used technique for soft particles, but we use it on lots of objects, not just on particles.

In today’s blogpost I’ll explain how depth fade rendering works. I’ll also show just how widely this technique can be applied, by going through a bunch of examples from Blightbound.

First, let’s have a look at what problem we’re trying to solve here. When putting partially transparent planes in the world, the place where they intersect with other objects creates a straight cut-off line. Sometimes that’s desired, but often those transparent planes represent volumetric effects. They’re not supposed to look like flat planes, but that’s just the easiest and most efficient way of rendering them. This is fine when there are no intersections, but when there are then the hard lines where they touch other objects break the volumetric illusion.

There’s a simple solution for this that’s used in a lot of games: depth fade. The idea is to simply fade out the plane near the intersection. This produces an effect similar to how real fog works: objects that go into the fog seem to smoothly fade out. However, actually figuring out all polygon intersections takes too much performance, so we want a rendering trick instead.


This screenshot from Blightbound shows a fog plane just above the ground. In the top image it is rendered in the standard way, resulting in hard intersections with the characters, rocks and cart. At the bottom the intersections are smoothened by depth fade.

The trick to rendering with depth fade is to first render all normal geometry, excluding any transparent objects. This fills the depth buffer, so for every pixel we know what distance it has from the camera. Then when rendering the objects that need depth fade, the pixel shader looks up the distance in the depth buffer and compares that to its own distance. If these are close to each other, then we assume that we’re near an intersection and fade out this pixel. The nearer, the stronger the fade out, until the object is entirely invisible at the point of intersection.

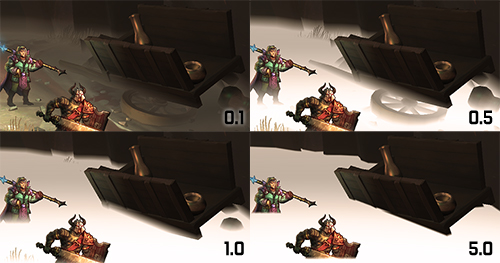
This technique has a few neat bonus features on top of just smoothing out intersections. By simply setting the distance over which the fade occurs, we can modify the density of the mist. Also, objects don't need to actually intersect with the fog plane to get depth fade applied. Being just beneath the fog plane also makes the effect visible. Thus depth fade is more than just a way to smoothen intersections.


The fog's density setting determines the width of the smoothing of the intersections. At a very high density the smoothing is almost lost. At a very low density the fog almost disappears because the ground is now also considered 'close' to the fog plane.

While this technique is traditionally mostly used for particles, it can easily be used for all objects with transparency. Since the world of Blightbound is covered by the blight (a thick, corrupting fog) we have a lot of types of fog in our game, including many fog planes and particles, as well as smoke and special effects. Our artists can apply depth fade rendering to all of those, not just to particles.


Depth fade is also great for hiding the seams of moving objects, like this fog wall.

A nice property of depth fade is that it doesn't cost all that much performance compared to traditional alpha blending. For each pixel of a particle or fog plane that we render, it costs one extra texture look-up (in the depth buffer) and a distance calculation. Compared to more advanced volumetric techniques, like voxel ray marching, that's a very low price. Since the performance impact of depth fade is low, our artists can use this technique on many objects, not just on the few that really, really need it.


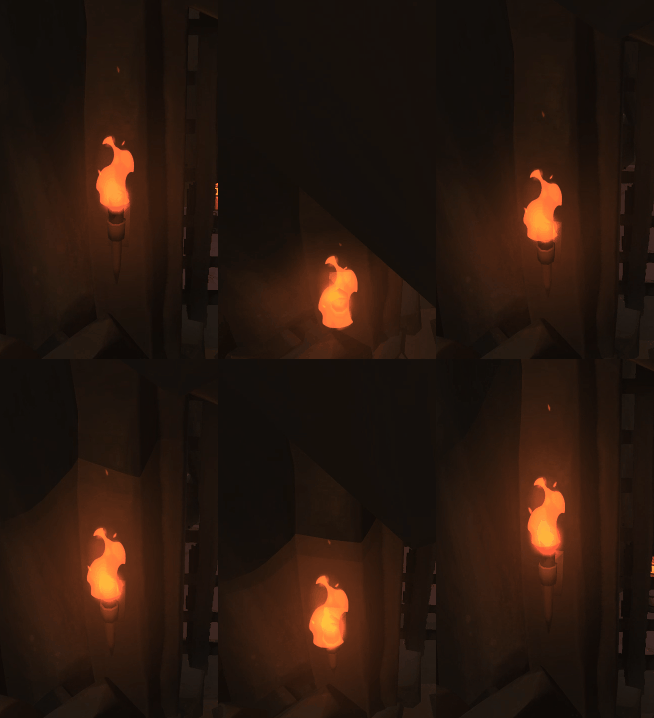
Depth fade can also solve problems with camera facing glow planes. The glow on this torch is always oriented towards the camera, but that makes it intersect with the wall behind it under certain angles. Using depth fade, the intersection can be hidden. This animation shows alternating with and without depth fade.

When I implemented depth fade, I thought I was being pretty clever: I had only ever seen this technique used for soft particles, not for generic object rendering. However, while searching the web a bit to write this blogpost, I found out it's actually a standard feature in the Unreal engine. For Unity I only found the option on particles, but it might exist in a more generic form there as well.

Now that we know how depth fade works, let’s have a look at a bunch of example uses from Blightbound. Special thanks to my colleague Ralph Rademakers, who made most of the levels and is thus the prime user of depth fade in Blightbound. Ralph gave me a nice list of cool spots to show:


A compilation of examples from Blightbound where depth fade is used to great effect, showing both with and without depth fade.


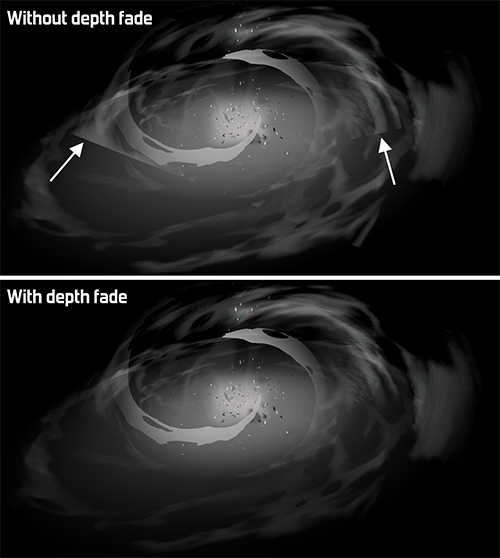
Another application of depth fade is to hide seams of VFX with the world. In this example the smoke effect intersects with a black ground plane.

When I initially implemented depth fade in Blightbound, I thought it would mostly be used on fog planes that float just above the ground, to give the impression of heroes walking through a low hanging, milky fog. As soon as our artists got hold of this technique however they started using it on tons of other objects. This is to me one of the most fun parts of building graphics tech: seeing how much more artists can do with it than I had originally imagined!

Wednesday, 25 November 2020

Arcane Glamour LIVE NOW! Blightbound's biggest update yet!

Today we've launched our biggest update for Blightbound on Steam yet! I'm really proud of what we've achieved with this one, since it not only adds a lot of cool stuff, but also makes big improvements to existing things in the game. Menus have been overhauled, the tutorial has been improved and many minor issues have been fixed. Also, some features that limited players and didn't really achieve their goals have been removed: blight, notoriety and limitations on character select.

Our previous major update is less than two months away and I think it's pretty impressive how much we've cranked out in that time. Now for the most important thing: I hope our players will like the new changes and improvements!

The new character in this update, Roland of Stendhall, also comes with a short story about how he joined the refuge. I had a lot of fun reading how vain Roderick Leeuwenhart depicts him. You can read the story (as well as the other ones) here: I, Roland of Stendhall. I'm especially font of Roderick's invention of the word magesplain: "The geologist saw all sorts of difficulties in this plan and was keen to magesplain them to me."

You can find the full list of changes in the patch notes.


Sunday, 15 November 2020

5 years below minimum wage: the financial history of Ronimo

Starting your own game company is fun and exciting, but it’s also challenging. It takes courage and skill, but above all: patience and perseverance. Some become successful quickly, but in many cases it takes years to achieve financial success and actually make a decent living out of your own game company. It might take long to make your first product or get your first deal, and that first achievement might only be a stepping stone towards a next step that brings financial stability. Today I’d like to show an example of just how long that can take by sharing the financials of the first five years of Ronimo, the company I co-founded with 6 friends nearly 14 years ago.

TLDR: The very short summary is this: it took us 2 years to make any money from Ronimo at all, 4 years to earn (almost) our country’s official minimum wage and 6 years to receive a more decent monthly salary from our own company. During that period we were near bankruptcy twice. Why did it take so long? Read on and you shall know!

A note before I continue: this blogpost is partially about how long it took us to “make a decent living”, but the cost of living differs hugely per country. The Netherlands is a wealthy country so cost of living is relatively high. A quick internet search shows that cost of living is much higher in some countries and only half in others. Since most revenue is worldwide, the same sales might mean financial stability in one place, but not enough to pay the rent in another.

Also, for anyone used to reading US dollars instead of euros: if you just replace the € sign with a $ sign, you’re in the right ballpark (especially given that the exchange rates between dollars and euros have varied a lot over the years).

In our second year of studying at the Utrecht School of the Arts our classmate Fabian Akker brought up the idea of starting a company together, with a group. Around that time we had done a couple of school projects that had failed quite miserably, so my first thought was: “we suck, let’s not.” However, the third year was to bring the first major game project, so we figured that if we could make something awesome there, then maybe we could also start a company making our own games.

The resulting game was De Blob: a huge success! We put it online and got attention from gaming press and even had some publishers contacting us, wondering whether they could buy the rights to De Blob.

(Note that De Blob was not exactly made by Ronimo: of the 9 students who made De Blob, only 5 were part of the 7 founders of Ronimo.)

Convinced by De Blob’s success, we decided to really go through with starting our own company. However, each of us still had to do a 7 months graduation project. We combined them and made starting Ronimo our graduation project. Getting school to approve of that was a bit of a struggle, but once they did, we even got our own office inside school.

At the time, 'indie' as it's known today hardly existed and we had definitely never heard of it. We thought the only way was to make retail games and that required funding from a publisher. So we set out to make a pitchable prototype: Snowball Earth. This was intended to be a Nintendo Wii game and we hoped to find publisher funding once we had graduated. At this point Ronimo didn’t make any money at all, but that was okay since we were still students.

September 2007. We were so focussed on pitching to publishers that we did our graduation stuff on the side and crunched for what came a few weeks later: Games Convention in Leipzig, Germany! There we pitched to at least a dozen publishers. Some were interested and continued conversations with us afterwards. Hopeful, we continued work on the game, looking to improve it and increase our chances of signing a deal.

Our very first presentation was for a then pretty famous person from a big company. He was so excited that… he feel asleep during out presentation. Jet lag. Or disinterest. Or both. When we woke him up, he proceeded to try to sell us his own middleware and hardly looked at our game.

By this time we had graduated and had moved to our own office in Utrecht. A very small office for 7 people, but it was cosy and exciting. What we didn’t have, however, was money. We did some minor work-for-hire jobs, but since we weren’t fully committed to that, we hardly made any money there. Just enough to pay the rent of our office, but definitely not enough to provide ourselves with any income.

This is something I've seen quite a lot: studios who want to make their own games and finance that with work-for-hire rarely succeed at both. Either they hardly make any money from the work-for-hire, or they spend so much time on that that they can hardly focus on their own game. Often the result is that the game takes many years to build and turns out mediocre because of the lack of focus and time. The reason for this is simple: doing work-for-hire well and making it lucrative is hard and it's rare for that to work as an aside, especially for inexperienced recent graduates.

So, we didn’t make any money and we weren’t students anymore. How did we not starve? This varied amongst the founders. First of all, in September 2007 we managed to sell all the rights to De Blob to THQ, a then major publisher that’s now defunct. (Note that THQ Nordic is a different company that later bought the rights to the name and games of THQ, including De Blob.) For this we were each paid a nice amount (can’t disclose it due to NDA unfortunately), enough to pay the rent for quite a while. However, only 5 of the 7 Ronimo founders were part of the De Blob team, so 2 others didn’t have this.

Six of the founders had an additional source of income: the now defunct WWIK government subsidy. This paid recent art graduates around €600 per month. That’s less than half of the official minimum wage in the Netherlands at the time, but enough to not starve. To live cheaply, three of Ronimo’s founders rented an apartment together with one more person.

I personally didn’t get WWIK because I had some savings and thus didn’t qualify, so I went even cheaper: I kept living with my mum until I was 26 years old. I have a lovely mum though so I totally didn’t mind. Thanks, mum!

This is also a good moment to mention how privileged we are to be doing this in the Netherlands. In many places in the world all of this would have been much harder.

So, how did the pitching go? A few publishers were interested and one even flew over to do due diligence: judging whether we would really be able to make the full game. In the end none of them actually offered us a deal because Snowball Earth was too unique and we were too inexperienced to be trusted with that much money. We were asking for €1.5m development budget. Not much for the big game we envisioned, but definitely too much to give to a bunch of students who had so little clue about business and production processes.

Snowball Earth was too big a game to finish without funding, so we ended up cancelling it altogether. Years later we did release our prototypes, which you can still find here together with videos and screenshots.

What next, then? By this time indie was on the rise and we had managed to get Nintendo Wii devkits. We decided to make something small that we could finish and publish ourselves: Swords & Soldiers for WiiWare (the predecessor of the current Nintendo eShop).

We estimated we could make this game in 3 months. One year later, we finished and launched it. I’m still impressed that we managed to make something of that size and quality in just one year, and I’m even more impressed that we were stupid enough to think we could make something like that in just 3 months...

Throughout this year we still didn’t make any money, but we did hire interns. In the Netherlands internships are a standard part of many schools and are not paid like normal jobs. So for only €200 per month we could have a game student work for us full-time. Despite that low compensation, those interns were getting more money from Ronimo than we were! On average, we had 2 or 3 interns at a time helping with development.

In May 2009 Swords & Soldiers launched on Nintendo Wii. It got critical acclaim, reached the #1 selling spot on WiiWare in Europe and #3 in America. In total it sold 30k copies and made €146k during the first year (and very little on WiiWare afterwards). A big success for us at the time, but not that much money in retrospect.

In August 2009, after 2.5 years of working full-time with seven people, we were finally able to pay ourselves a monthly income. A whopping €600 per month! Oh wait, that’s super little… but it certainly felt like a big step forward!

Something we hadn’t realised yet at the time is the importance of porting our games to different platforms. That is, until Sony offered us money to make a PlayStation 3 port of Swords & Soldiers, including multiplayer.

To make this port and continue work on our next game OMG Space! (which would later be renamed to Awesomenauts) we needed more programmers. Up until this point I had been the only programmer at Ronimo (besides interns) and that wasn’t enough to make a port and a new game. We hired two programmers. Unlike us, those coders were paid real wages (though not very high ones). And so, while we the founders finally made more than our interns, we instead now had employees who made way more than us.

In September 2010 Swords & Soldiers released as a downloadable game on PlayStation 3. Unfortunately it didn’t make break even, so the only money we made from this was the initial porting budget we got from Sony.

Now that we realised that porting is a super important source of revenue, we also ported Swords & Soldiers to Steam and released that in December 2010. Making a port is only a fraction of the effort of making a full game, and every new platform is a new roll of the dice: a new chance at success. And indeed, while the PS3 version hardly sold, the Steam version would make us €120k in its first year and €35k in its second year.

Now that we had employees and paid ourselves a little bit, we had significant monthly costs. Too much to carry ourselves, so we were looking for a publisher for Awesomenauts. Near the end of 2010 this was becoming dire: we were only a few months away from being out of money altogether.

We were saved when we signed a publishing deal with DTP (yet another company that doesn’t exist anymore). The total development budget we got from them was €300k. Not much for a game of this size, but it was a lot for us! As is common, we received that money spread out over milestones and not all at once.

Awesomenauts was a very ambitious project, with complex multiplayer and simultaneously launching on two platforms that were new to us (Xbox 360 and PlayStation 3). We needed more programmers to pull that off. Good thing the budget we got from the publisher allowed us to grow a bit more. In the first half of 2011 we hired two more programmers and a producer, bringing the team’s total size to 12 full time employees. On top of that we usually also had 3 or 4 interns working with us.

The funding also allowed us to finally pay ourselves almost minimum wage: €1400 per month. Still less than our employees got, but at least we felt like we were finally making real money.

In March 2012 we managed to secure some additional income: Swords & Soldiers was included in the Humble Android Bundle and this made us €37k. Towards the end of the year it got included as a bonus in another Humble Android Bundle, making us another €10k.

This money was needed desperately, since Awesomenauts had seen numerous delays at this point. I don’t remember the exact original planned release date, but I think in total the console release got delayed by around half a year. The publisher didn’t give us extra budget for that, so we had to make do with the money we had.

In May 2012 Awesomenauts finally launched on Xbox 360 and PlayStation 3. But not before our publisher DTP went insolvent a mere week for launch. This made everything extremely complex and we didn’t know whether we would see any royalties at all. We got lucky: we had some unreleased DLC they wanted so we managed to strike a deal with the trustee for the insolvency so that the DLC would be released and we would still get royalties.

Nevertheless, Awesomenauts initially didn’t sell all that well on consoles and it took long before we got any royalties at all. We were nearly out of money but had one more card to play: a Steam port of Awesomenauts. Finances were so tight that we couldn’t pay ourselves anymore for a short period. We continued to pay our employees though, so only the founders were hit.

Then in August 2012 Awesomenauts launched on Steam and this version turned out to sell way better than the console versions. We were saved! And we had gotten lucky again with our publisher: since DTP was insolvent, they couldn’t pay for development of the Steam port of Awesomenauts, and thus we got the full rights to that version.

Awesomenauts kept doing very well so we supported it for 5 more years with tons of additional content. It also allowed us to finally switch what type of company we were: we switched from being a V.O.F. to a B.V. These are Dutch legal terms so let's not go into the details here. What it comes down to, is that a V.O.F. is strongly tied to the owners’ personal finances. If the company goes bankrupt, so does the owner personally. Being a B.V. is much safer, since now the company can go bankrupt without giving creditors the right to come after your personal belongings as well.

Being a B.V. does come with a requirement here in the Netherlands: unless you have good reason not to, the company needed to pay the active owners at least €2300 per month (after taxes). So in February 2013, six years after we started the company, we finally started to make a wage significantly higher than minimum wage. And even then it wasn’t that much: this excludes some insurances that are standard for employees but not for owners, and for me personally as a programmer: I’m pretty sure I could have made more had I worked elsewhere.

As far as I can tell, most game startups take several years to become financially successful. I think it might have taken us longer than most, but we made it at all and that’s already special. In fact, since the 'indiepocalypse' happened a few years ago most people who start a game company never manage to make a living at all (as I've previously said: the future of indie is amateur). With Ronimo we were lucky that we happened to start our company at a time when indie was hip and happening and it was relatively easy to reach players. Today, competition is much tougher than it was when we started, so chances of success are lower as well.

What’s the moral of this very long story? It’s simple: to start a game company, you don’t need just skill, vision and bravery, but also perseverance and a willingness to make little money for a long while.